Site seems to be working OK.

Christmas Presents

User avatar
BrokenolMarine
Ranch Foreman
Posts: 7446
Joined: Sat Nov 26, 2016 8:28 am
Location: South Central Oklahoma in the mountains
United States of America

Re: Christmas Presents

Post by BrokenolMarine » Fri Sep 20, 2019 5:57 pm

I got out in the shop today, and took the first two out of the clamps to clear the bench. Then worked on the layout of number three. Wanted to solve that puzzle and get it clamped before beginning the work on the first two. I had fueled up with a mug of coffee and was ready to go. I used the square and began the layout. Many of the last group's pieces had flaws, which I cut out, and I used pieces from the "Extra" group to fill in. I'm not slow, I knew I would need some. :roll: Been there before. (The rule is, when you prepare wood from rough stock, ALWAYS prep extra.) If you look at the initial layout, you'll see that there are some gaps as the pieces aren't all the same width. This can be fixed so it doesn't cause problems later.
13 layout number 3.jpg
13 layout number 3.jpg (152.95 KiB) Viewed 5011 times

Set up the table saw, to the width of the narrowest piece, then made it 1/32nd smaller. Ran all the pieces thru ... :) Better safe than sorry. This was for width only, the height was set by the planer. 8-)

14 trim to match.jpg
14 trim to match.jpg (128.2 KiB) Viewed 5011 times

Now, went back to the layout, and with the newly trimmed pieces, including a couple extras, I was able to get a nicely fitted layout. No gaps. You'll note the reference edge is butted, but the left edge is left over long.

15 no gaps.jpg
15 no gaps.jpg (155.18 KiB) Viewed 5011 times


Number three is glued up and clamped.

16 glue up three.jpg
16 glue up three.jpg (129.41 KiB) Viewed 5011 times

One and two were run thru the planer to insure both sides were flat and then trimmed and the edges neatened. They will still get sanded thru 120, 220, and 320 before receiving finish, but I will wait and sand all the boards at one time.

17 trimmed one and two.jpg
17 trimmed one and two.jpg (171.98 KiB) Viewed 5011 times
You can tell a lot about the character of a man...
by the way he treats those who can do nothing for him.

I don't look back at the things I can no longer do, I just look forward to the things I still can.

User avatar
BrokenolMarine
Ranch Foreman
Posts: 7446
Joined: Sat Nov 26, 2016 8:28 am
Location: South Central Oklahoma in the mountains
United States of America

Re: Christmas Presents

Post by BrokenolMarine » Fri Sep 20, 2019 6:06 pm

Time to start the Chevron Board. I watched several different videos on YouTube on the process and pulled techniques from several. It will be an involved process, and you end up gluing up the cutting board at least twice, but the result will be worth it, if I don't blow it. ;) I am using the walnut, maple and adding mahogany as a trim/accent. Prior to starting I ran all the stock thru the planer to insure that all four sides were smooth and clean. The mahogany was already crisp and clean from the prep work during recovery. (It's reclaimed, but that's a long story.) I ripped it to Height to match the other two woods.

Let's get rolling. The first step is to cut one end at 45 degrees and all the pieces will reference off that end. Once that was done, it was a matter of starting the layout, then the glue up.

18 starting chevron pattern.jpg
18 starting chevron pattern.jpg (107.94 KiB) Viewed 5011 times

Once I was happy with the layout, I put down the parchment paper and got busy with the glue up. This was the longest by far as the thin mahogany accents added eight boards to the mix.

19 glue up chevron.jpg
19 glue up chevron.jpg (147.98 KiB) Viewed 5011 times

Once they were all glued up, I put them in the clamps and added the cross member for downward pressure to keep them flat.

20 chevron in the clamps.jpg
20 chevron in the clamps.jpg (108.84 KiB) Viewed 5011 times
Hours later I was able to remove them from the clamps, true up the 45 degree edge and then cut one and a half inch strips using the 45 degree edge along the fence as a guide. Turning alternating pieces the opposite direction gives you the chevron pattern. Too tired to do the second glue up this evening, but you get the idea.

21 ripped at 1 and a half inches.jpg
21 ripped at 1 and a half inches.jpg (173.14 KiB) Viewed 5011 times

I REALLY like this pattern, and I think THIS will be Miss Tina's board. :P Unless I blow it and it becomes kindling. :twisted:
You can tell a lot about the character of a man...
by the way he treats those who can do nothing for him.

I don't look back at the things I can no longer do, I just look forward to the things I still can.

User avatar
markiver54
Deputy Marshal
Posts: 11092
Joined: Sun Nov 04, 2018 11:49 am
Location: Biue Ridge Mountains, NC
United States of America

Re: Christmas Presents

Post by markiver54 » Fri Sep 20, 2019 6:45 pm

LOVE IT Jim! Great work!
Beautiful.
I'm your Huckleberry

User avatar
Ernie
Drover
Posts: 2526
Joined: Thu Mar 07, 2019 8:07 pm
Location: Southwestern Lower Michigan
United States of America

Re: Christmas Presents

Post by Ernie » Fri Sep 20, 2019 9:53 pm

WOW I really like it!

User avatar
Dahliathemeh
Cattle Driver
Posts: 700
Joined: Fri Jan 26, 2018 11:31 pm
Location: Chicago
Contact:
United States of America

Re: Christmas Presents

Post by Dahliathemeh » Sat Sep 21, 2019 10:55 am

COOL!!
I never take myself seriously....

User avatar
markiver54
Deputy Marshal
Posts: 11092
Joined: Sun Nov 04, 2018 11:49 am
Location: Biue Ridge Mountains, NC
United States of America

Re: Christmas Presents

Post by markiver54 » Sat Sep 21, 2019 11:12 am

VERY cool indeed. Almost makes me want to start cooking....I said, almost,🤔
Think I'll leave that to the pro! :)
I'm your Huckleberry

User avatar
BrokenolMarine
Ranch Foreman
Posts: 7446
Joined: Sat Nov 26, 2016 8:28 am
Location: South Central Oklahoma in the mountains
United States of America

Re: Christmas Presents

Post by BrokenolMarine » Sat Sep 21, 2019 12:03 pm

Worst case, they are all practice and become attractive pot rests to protect the counter tops. :D
I make more cutting boards after these practice boards...
... And hopefully I learned something. At least i'm not stuck in the recliner until my surgery.
;)
You can tell a lot about the character of a man...
by the way he treats those who can do nothing for him.

I don't look back at the things I can no longer do, I just look forward to the things I still can.

User avatar
BrokenolMarine
Ranch Foreman
Posts: 7446
Joined: Sat Nov 26, 2016 8:28 am
Location: South Central Oklahoma in the mountains
United States of America

Re: Christmas Presents

Post by BrokenolMarine » Mon Sep 23, 2019 9:51 am

I worked in the shop yesterday, planing the four cutting boards, then treating a couple knots in a couple of the cutting boards with the CT glue to seal them and sanding between treatments.
I sanded the four boards with 120 grit sand paper, and hit them each time I went out to retreat the knots with the CT. The glue settles and shrinks, and you refill the holes. Hit them again first thing this morning and they looked great. After a break, I'll route the edges and cut the finger slots for lifting, and then sand at 220 and 320 and then do the mineral oil thing.

Cutting Board One Sanded to 120:

30 one sanded to 120.jpg
30 one sanded to 120.jpg (188.01 KiB) Viewed 4979 times

Cutting Board Two sanded to 120:

31 two sanded to 120.jpg
31 two sanded to 120.jpg (177.58 KiB) Viewed 4979 times

Cutting Board Three sanded to 120:

32 three sanded to 120.jpg
32 three sanded to 120.jpg (210.98 KiB) Viewed 4979 times

Cutting Board Four sanded to 120:

33 four sanded to 120.jpg
33 four sanded to 120.jpg (216.97 KiB) Viewed 4979 times

Three is Miss T's fav and will be her choice if I don't make another that she likes better between now and the time I ship the boards to Oklahoma and Texas and deliver the boards to Henrico. I will keep working since there were things I learned making these four that I will do better the next time out. I consider these boards practice runs and if the next group turn out better... I won't feel bad at all about the time invested. A learning curve. :)


Miss Tina brought Fiona to see me in the shop, she wanted to show off her new dress Tina made her from an old pair of Denim shorts from the rag barrel.

30a fionas new dress.jpg
30a fionas new dress.jpg (142.87 KiB) Viewed 4979 times

Fiona just had her Spay surgery and four baby teeth surgically removed. She is awful happy for a surgical recovery dog. The dress will keep her from licking better than the cone of shame.
;) She hated the cone of shame and the look.... :? ... if looks could kill. :P
You can tell a lot about the character of a man...
by the way he treats those who can do nothing for him.

I don't look back at the things I can no longer do, I just look forward to the things I still can.

User avatar
markiver54
Deputy Marshal
Posts: 11092
Joined: Sun Nov 04, 2018 11:49 am
Location: Biue Ridge Mountains, NC
United States of America

Re: Christmas Presents

Post by markiver54 » Mon Sep 23, 2019 10:28 am

The boards look great Jim!
Glad you had some help out there from that adorable little Fiona. Nice work by Miss-T also!
I'm your Huckleberry

User avatar
Mags
Administrator
Posts: 8678
Joined: Fri Apr 13, 2018 9:40 pm
Location: Tualatin Valley Oregon
United States of America

Re: Christmas Presents

Post by Mags » Mon Sep 23, 2019 12:31 pm

.
Looking good!
BrokenolMarine wrote:
Mon Sep 23, 2019 9:51 am
...
UPDATES: OR passes 114, "one of strictest gun control measures in U.S." https://henryrifleforums.com/viewtopic. ... 34#p213234

User avatar
BrokenolMarine
Ranch Foreman
Posts: 7446
Joined: Sat Nov 26, 2016 8:28 am
Location: South Central Oklahoma in the mountains
United States of America

Re: Christmas Presents

Post by BrokenolMarine » Mon Sep 23, 2019 3:04 pm

Lessons Learned so far?
Don't piece together linear segments... Just another chance for gaps.

Joint the sides, plane tops and bottoms, every step.

Use enough glue, but not too much. How much is enough, or too much? Ah..good question.
Enough and the boards hold tight. Too much? You have a mess to clean up, and hydraulic pressure resists a tight joint. Sheesh.

Good clamps... Good clamps make a difference. I don't have the right type clamps for this job, and have been making do. Eventually, I will get the right type. :lol:
You can tell a lot about the character of a man...
by the way he treats those who can do nothing for him.

I don't look back at the things I can no longer do, I just look forward to the things I still can.

User avatar
BrokenolMarine
Ranch Foreman
Posts: 7446
Joined: Sat Nov 26, 2016 8:28 am
Location: South Central Oklahoma in the mountains
United States of America

Re: Christmas Presents

Post by BrokenolMarine » Sun Oct 06, 2019 11:26 am

Got back to work on the Christmas Cutting Boards. I sliced that Table Top from my friend into 1-1/2 inch slices, AFTER removing the four metal screws I found buried in the wood. I used a hollow 3/8 bit to cut AROUND the screws all the way thru and drop them out the bottom of the boards, and I'll cut a 3/8 plug from leftover material and put in the sections before the glue up. I cut the sections so the holes left behind will be buried IN the cutting boards but for grins, I'll fill the holes with matching material, YOU never know. ;)

In case, dear reader, you didn't see the "Small Projects" post, I will be using the PVC work stand in this project. It was made especially for glue up of the cutting boards. Here is a mock up of the stand in use. It allows for smooth glue up and then clamping...
34 pvc rack.jpg
34 pvc rack.jpg (166.93 KiB) Viewed 5072 times
35 side view.jpg
35 side view.jpg (153.7 KiB) Viewed 5072 times

The board components on the stand are the ones I intend to use, but they had not yet been planed. The main component show is the exotic from the Caribbean. The name escapes me, but I will make the two boards from these slices from the table top and present them to my Friend and his son as a memorial of the Father and Grandfather, pilot of a bomber in WWII and a good role model all their lives. He is living in a home these days, but still sharp as a tack and recently interviewed and video taped so his memories of a critical mission during the war could be forever kept and used at the WWII Museum. If you visit, Dave's Dad narrates the harrowing mission where is gunner had his foot shot off and still completed the mission. As Pilot in Command he recommended the Gunner for the Silver Star, which he received.

I wandered off topic, which I am prone to do... Sorry.

The table component, prior to planing.... kinda shows it's age.

36 table slices.jpg
36 table slices.jpg (119.08 KiB) Viewed 5072 times

All those slices after planing.... beautiful.

37 after planing.jpg
37 after planing.jpg (98.17 KiB) Viewed 5072 times

If you look at the upper picture, note the maple and purple heart accent. As stated in another post elsewhere, I intend to rip those in half, thinning those from 3/4 to 3/8 thickness. They are intended only as accent pieces and I think at the 3/4 thickness they do more than accent. I may split them and put an accent at the top and bottom, or just the single accent stripe. Thoughts?
You can tell a lot about the character of a man...
by the way he treats those who can do nothing for him.

I don't look back at the things I can no longer do, I just look forward to the things I still can.

User avatar
BrokenolMarine
Ranch Foreman
Posts: 7446
Joined: Sat Nov 26, 2016 8:28 am
Location: South Central Oklahoma in the mountains
United States of America

Re: Christmas Presents

Post by BrokenolMarine » Mon Oct 07, 2019 10:43 am

Worked on the new boards yesterday and this morning. Yesterday I marked the accent pieces and ripped them to 3/8ths, then ran them thru the planer. A slow steady pass thru the band saw nearly got them to the same size... :roll: ... nearly. :)

38 ripping the accents.jpg
38 ripping the accents.jpg (195.85 KiB) Viewed 5059 times

After ripping you can see they are pretty close, but there are still waves and ripples and some burn marks, they will take a few passes thru the planer. That purple heart sure is a beautiful deep color huh?

39 after ripping.jpg
39 after ripping.jpg (156.51 KiB) Viewed 5059 times

Rolled out the planer and ran them all thru, until they were a consistent size and smooth so they would glue up tight and without gaps. Then test fitted them loosely, with just hand pressure looking for gaps, didn't see any. If you don't see any with hand pressure, there certainly won't be any with the pressure applied by the clamps. (2200 pounds.) ;)


Here is the new pattern, I certainly like it a lot better. I left the glue up for the next day.

40 better size.jpg
40 better size.jpg (105.2 KiB) Viewed 5059 times

This morning I headed out to do the glue up. A chance to try the new jig and see if it was worth the effort. Clamped it on the bench and laid out the first cutting board. You leave the nearest piece standing and lay each of the others flat turning them back away from you. Then you glue the side facing up and turn each one to the board in front, rebuilding your cutting board.

41 laid out for glue up.jpg
41 laid out for glue up.jpg (154.03 KiB) Viewed 5059 times

There are a number of ways to apply the glue, and I have tried several, seeing many options in the video. I finally found the one that works the best and would you believe it is a properly sized paint roller. Once it soaks up enough glue that it doesn't suck up anymore, it's a dream for application. Even and smooth and quick. You squirt the glue directly on the board and then spread it evenly with the roller. Place the board then repeat.

42 would you believe a paint roller.jpg
42 would you believe a paint roller.jpg (131.87 KiB) Viewed 5059 times

Careful application of the glue reduces the mess, and makes for a smooth even job. Once all the glue is applied you clamp up the project and set is aside to dry.

43 clamped and set aside.jpg
43 clamped and set aside.jpg (133.39 KiB) Viewed 5059 times

Here is a closer look at the pattern as clamped. Once the board is set up, it will have the edges trimmed and then be scraped to remove excess glue and run thru the planer and sanded to 320 or 400.

44 closer look.jpg
44 closer look.jpg (209.01 KiB) Viewed 5059 times

This is a real cutting board, and the pair is supposed to be the gift for my friend and his son. I can't screw these up. The wood is irreplaceable.

:evil:
You can tell a lot about the character of a man...
by the way he treats those who can do nothing for him.

I don't look back at the things I can no longer do, I just look forward to the things I still can.

MuddyWaters62
Cowhand
Posts: 326
Joined: Thu Jun 09, 2016 11:37 am
Location: Texas
United States of America

Re: Christmas Presents

Post by MuddyWaters62 » Tue Oct 08, 2019 12:11 pm

I believe that you have really nailed this project for your friend and son. I really love purple heart wood. I have used it for several projects. I used it as laminate in gluing up a bench rest stock. I used it with maple in thin layers and it looked almost psychodelic polished and automotive clear coated. Thanks again for all your pics and tips. Much appreciated.posting.php?mode=reply&f=56&t=7529#
Muddy

User avatar
BrokenolMarine
Ranch Foreman
Posts: 7446
Joined: Sat Nov 26, 2016 8:28 am
Location: South Central Oklahoma in the mountains
United States of America

Re: Christmas Presents

Post by BrokenolMarine » Tue Oct 08, 2019 9:25 pm

Got out a couple times today to work on the Cutting Boards. My problem is that things distract me. I was cold this morning and I had to wear my sweat pants and hoodie out to the shop... and :roll: that was a problem.... caused a distraction. For the last couple years, I just draped the jacket over something and covered it in sawdust. Then I would take my apron off it's hook and think, there should be more hooks. ;) :P

So today, before I got started, I figured I would put up more hooks. I knew I had a half dozen of the brass coat hooks somewhere, I had remembered seeing them. I hung my jacket over the back of the walker and started looking. In the drawers and cabinets. I knew I had seen them in the last few months. :roll: I had laid them all out on the bench for something. I know I had seen them and .... I looked in the different cans on the shelf. Where did I put them... :| Oh... I remember why I laid them all out. Tina wanted a rack made for the dog leashes and collars.. :evil: :oops: There are now eight brass hooks mounted on a pine board in the laundry room. (Gibbs Slap.) Half Hour Wasted.

So, I took a pine board and cut it to 18", marked three equally spaced locations and drilled a one inch hole with a Forstner bit... then... Boom, four inch long 1" dowel. Coat rack. Now where to put it. Needs to be near the door, but... ;) Oh... I have been thinking I need to move the pencil sharpener nearer the workbench, WHY walk all the way back to the door to sharpen a pencil? Duh. Disassembled the sharpener... (AND discovered it was packed full... I MEAN packed full of two years of shavings.) :twisted: unscrewed the sharpener from the wall and shavings went everywhere.

Installed the sharpener to the left of the tool cabinet near the work bench after spending a few minutes cleaning it out. Then Installed the coat rack beside the door. Place to hang the coat and the apron. Extra hook for Miss T when she comes in. (Half hour now gone.)

45  coat rack.jpg
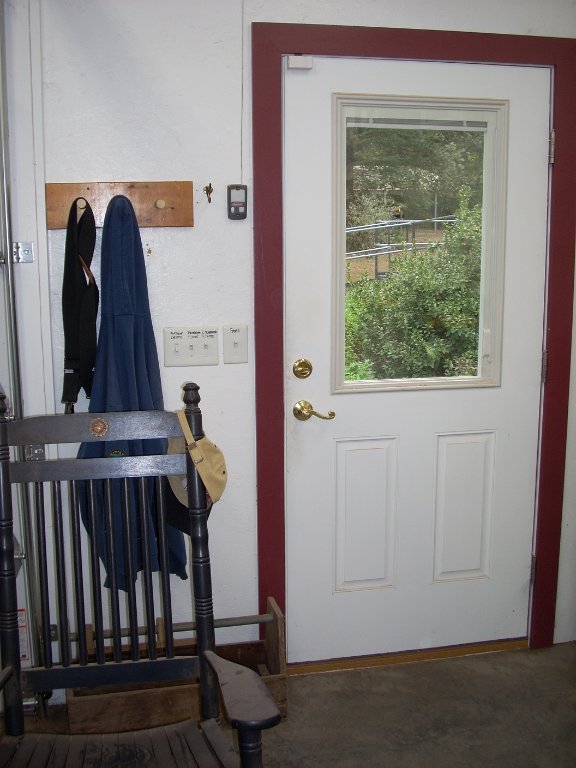
45 coat rack.jpg (108.25 KiB) Viewed 5033 times

Got out the shop vac to clean up the mess on the workbench and under the new coat rack from the filthy sharpener. (How long has it been since YOU cleaned out your sharpener?) Remembered that the filter in the vacuum is packed with sawdust and it will barely suck. :cry: Took all the tools out of the rack on the vacuum, disconnected the hose, and lifted off the top, removed the filter. 1/2" of dust packed on the filter. Whacked it in the trash can and got the soft brush and cleaned it out, took the canister out and dumped it in the can, and reassembled the vacuum. (Geez, where does the time go?) Time for lunch.

Back out to the shop after lunch.... took the clamps off the cutting boards, and put them back on the rack.

46 clamps put away.jpg
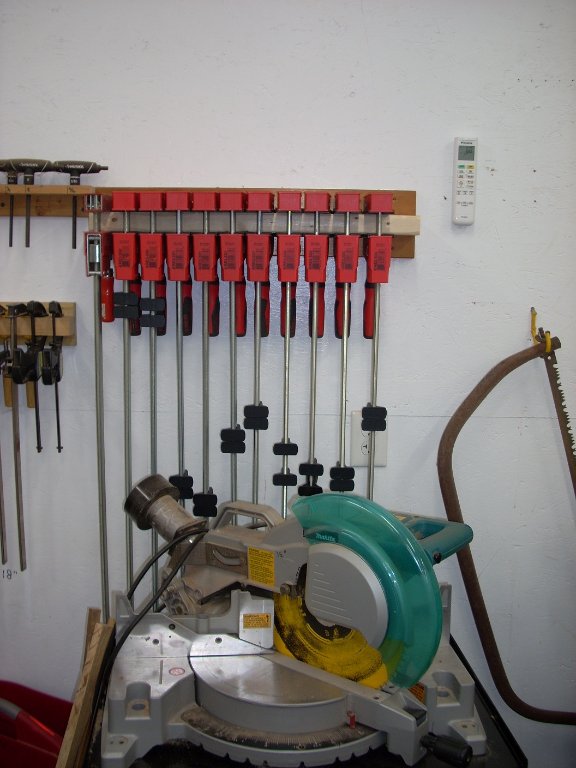
46 clamps put away.jpg (108.4 KiB) Viewed 5033 times

Put the two rough cutting boards thru the planer, to shave off the old glue and then get two flat sides, removing the slight imperfections. A lot less than in the last four practice boards since I had my pvc rack to assemble them on and the GOOD clamps.


47 rough cutting boards.jpg
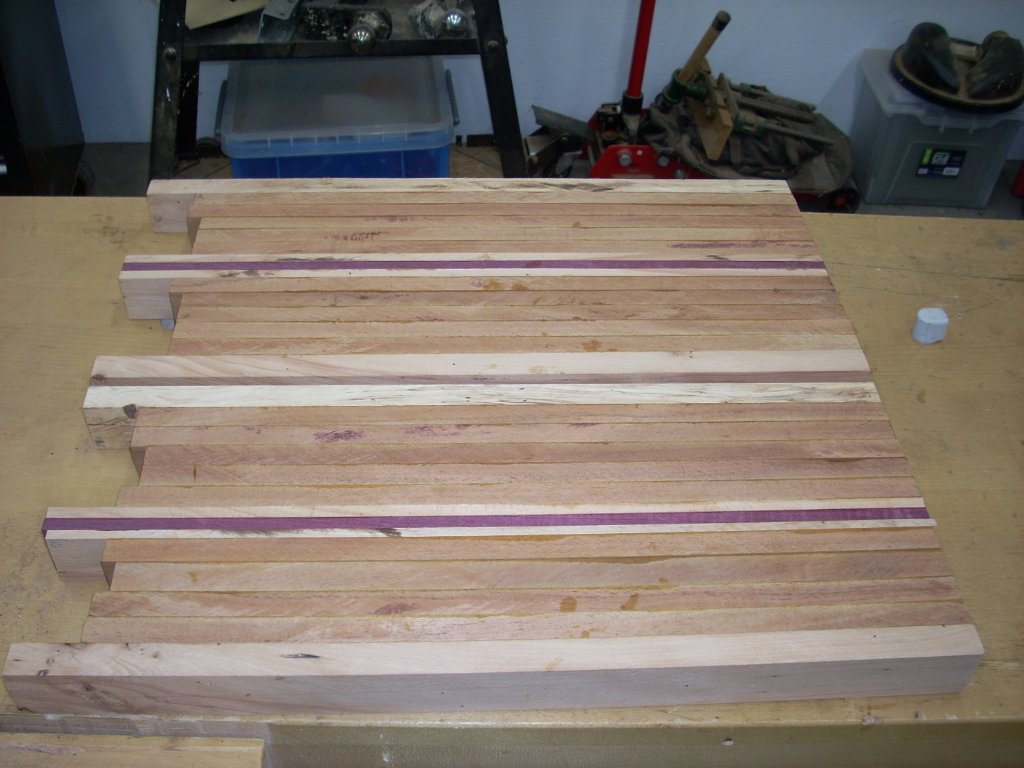
47 rough cutting boards.jpg (153.9 KiB) Viewed 5033 times


After they were planed smooth, I put them in the SLED I built to allow for this operation and trimmed both ends square. This would not have been possible without the sled. The miter bar would not have been deep enough to allow the width of the cutting board to fit nor strong enough to handle the weight.

48 Sled ride.jpg
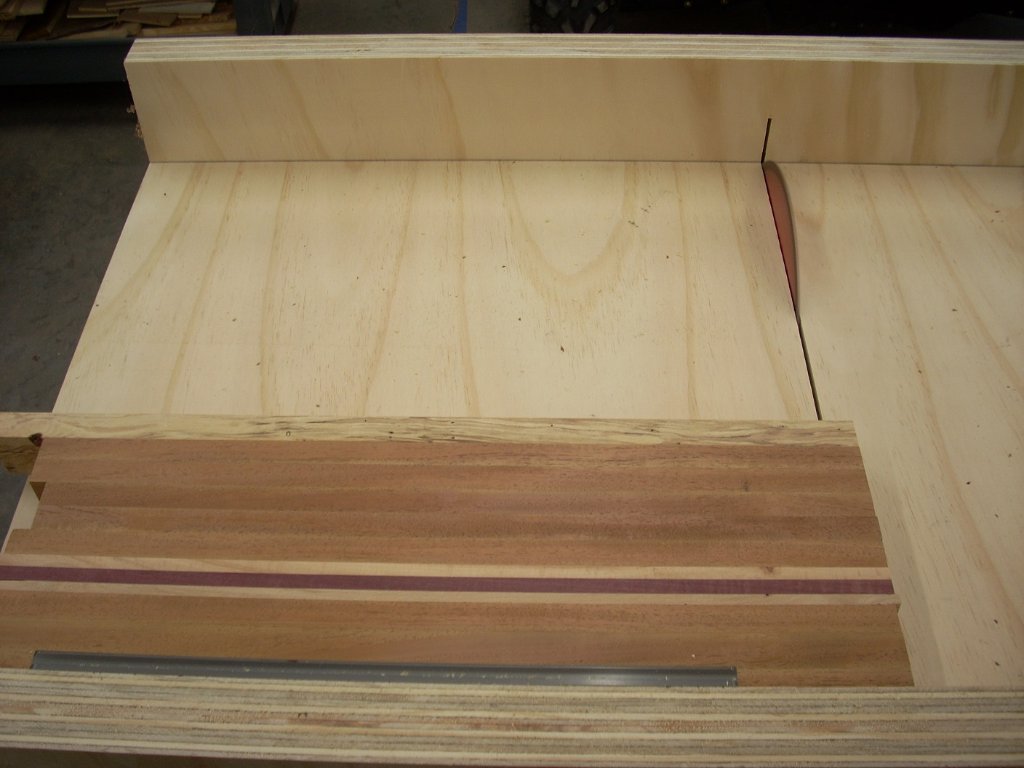
48 Sled ride.jpg (125.45 KiB) Viewed 5033 times
49 one planed.jpg
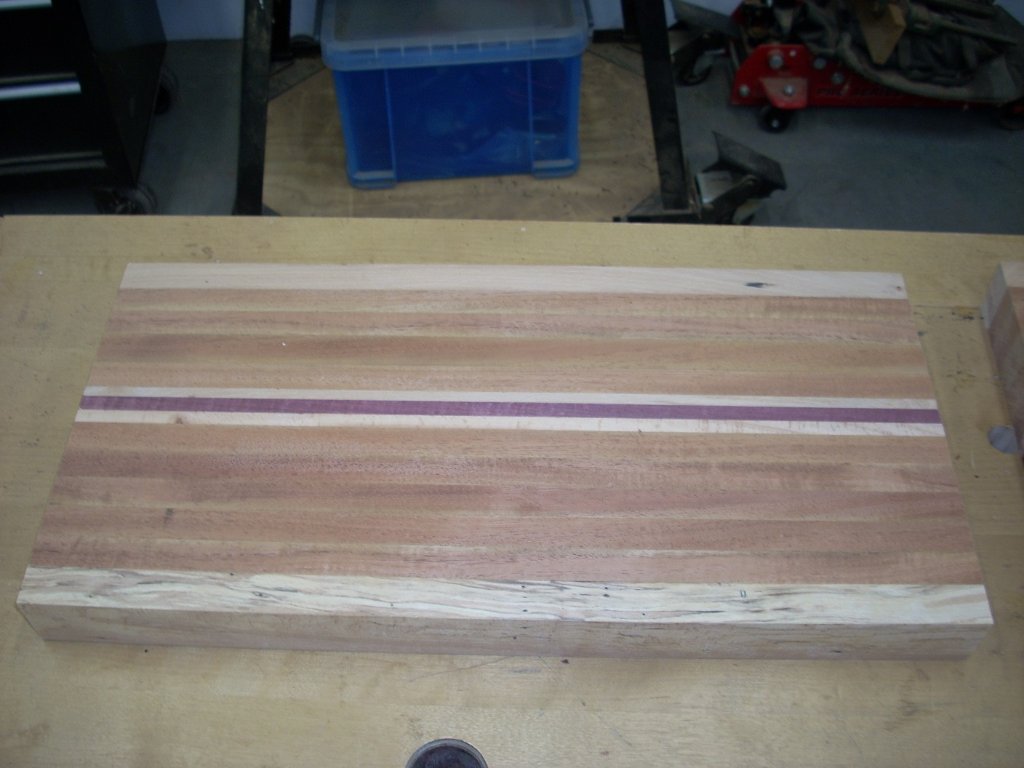
49 one planed.jpg (127.36 KiB) Viewed 5033 times
50 second planed.jpg
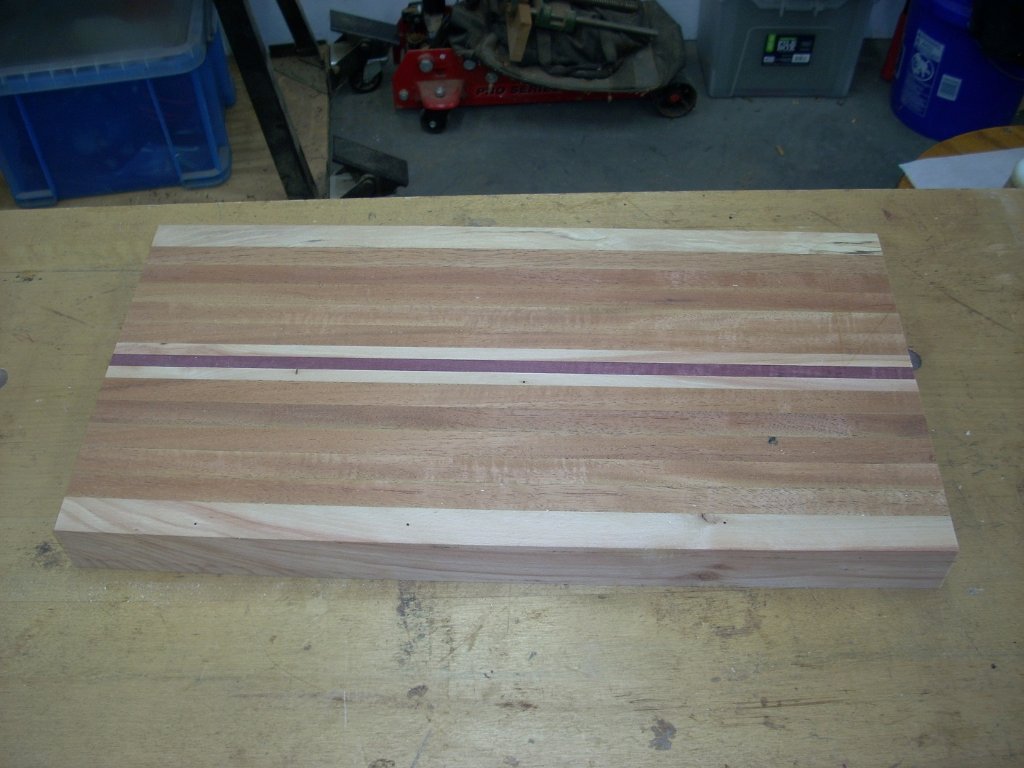
50 second planed.jpg (144.91 KiB) Viewed 5033 times

Once both were trimmed, I used the 1/4" roundover bit in the hand held router to round the top edge of both cutting boards then switched to the orbital sander and smoothed the tops, sides and the bottom to 120 grit, rolling the edges and the corners at this grit. I took my time and made sure it all looked good. Next I upped to 220 and worked the edges and top again and the result was a surface like high quality glass. I wish you could feel it.

51 sanded to 220.jpg
51 sanded to 220.jpg (183.24 KiB) Viewed 5033 times

The next step is to order a CA glue kit with all three levels, Thin, Medium, and Thick. I will CAREFULLY fill the worm holes, VERY minor cracks, and some knots on the back; prior to applying the three coats of mineral oil. I also plan to add the small rubber feet. Then done.
You can tell a lot about the character of a man...
by the way he treats those who can do nothing for him.

I don't look back at the things I can no longer do, I just look forward to the things I still can.

User avatar
markiver54
Deputy Marshal
Posts: 11092
Joined: Sun Nov 04, 2018 11:49 am
Location: Biue Ridge Mountains, NC
United States of America

Re: Christmas Presents

Post by markiver54 » Tue Oct 08, 2019 10:23 pm

Wow! Sounds like a busy day...heck, Ya wore me out!😁
I'm your Huckleberry

User avatar
BrokenolMarine
Ranch Foreman
Posts: 7446
Joined: Sat Nov 26, 2016 8:28 am
Location: South Central Oklahoma in the mountains
United States of America

Re: Christmas Presents

Post by BrokenolMarine » Tue Oct 08, 2019 10:36 pm

I sat down in my recliner after the second session just for a minute. She whispered her siren's song... I woke up an hour later. ;) geez, she is good.
You can tell a lot about the character of a man...
by the way he treats those who can do nothing for him.

I don't look back at the things I can no longer do, I just look forward to the things I still can.

User avatar
BrokenolMarine
Ranch Foreman
Posts: 7446
Joined: Sat Nov 26, 2016 8:28 am
Location: South Central Oklahoma in the mountains
United States of America

Re: Christmas Presents

Post by BrokenolMarine » Wed Oct 09, 2019 2:49 pm

Got back out to work in the shop, and went to work on the first four boards to see if I could salvage them. I put a clear base on the router for better control, but THAT became a task since it didn't fit the Porter Cable router. Careful measuring and three step drilling and it was installed.

52 router base.jpg
52 router base.jpg (193.81 KiB) Viewed 5017 times

Note the clear base is wide, and has a handle for the left hand for excellent control. I had "Forgetten" I had this, but it is a great asset to aide in both control of the router and stability. Look at the clean cut of the passes on the Chevron cutting board. Nice, except for the beading caused by the thickness of the board and the edge of the router being wider than the bearing. My fault.

53 bead line.jpg
53 bead line.jpg (139.94 KiB) Viewed 5017 times

Some time with 120 grit sandpaper smoothed the transitions and took away the bead line.

54 removed.jpg
54 removed.jpg (128.62 KiB) Viewed 5017 times

Then, I worked the top and sides again with 220 and got a nice smooth finish on this puppy. Awaiting the CA glue to arrive and we will be golden.

55 better view.jpg
55 better view.jpg (175.32 KiB) Viewed 5017 times

Worked on the walnut cutting boards as well. They had their edges dressed up and the scratches from that old nasty router table removed. The edge beading was removed with a plane, and I ran them thru the planer a and shaved just enough off the top to remove the scratches. Then 120/220 for these as well. Boards one and two are done, three is clamped regluing a loose joint.

56 walnut one.jpg
56 walnut one.jpg (184.14 KiB) Viewed 5017 times
57 walnut two.jpg
57 walnut two.jpg (179.41 KiB) Viewed 5017 times

Feet for all the boards are on order.
You can tell a lot about the character of a man...
by the way he treats those who can do nothing for him.

I don't look back at the things I can no longer do, I just look forward to the things I still can.

MuddyWaters62
Cowhand
Posts: 326
Joined: Thu Jun 09, 2016 11:37 am
Location: Texas
United States of America

Re: Christmas Presents

Post by MuddyWaters62 » Wed Oct 09, 2019 3:18 pm

Gee! How else are you going to find things that mysteriously walk away? The poltergeists in my shop are always doing that to me. I swear I can put a piece down and have my hand on it, then I look again, it has disappeared. Look high and low, it shows back up across the shop 2 days later. I guess that's why I have so many tool duplicates and even some triplicates!!!
It has finally now gotten out of the mid 90's and down to 70's. I can work in my shop without browning out the neighborhood!! I still like your last cutting boards, even though I would of used a bit more of the purple heart. I've got some left over Purple heart and some lacewood. I think I will build a table protector for T'Day Turkey platter x 2. Can't have too many??
Muddy

User avatar
BrokenolMarine
Ranch Foreman
Posts: 7446
Joined: Sat Nov 26, 2016 8:28 am
Location: South Central Oklahoma in the mountains
United States of America

Re: Christmas Presents

Post by BrokenolMarine » Wed Oct 09, 2019 3:45 pm

I didn't have the purple heart when I made those first four. Woodcraft put it on sale after they were done. Believe me, it was bought for accents. :D I bought a good bit. I have a good supply of lacewood, but I make nice boxes from that. :D
You can tell a lot about the character of a man...
by the way he treats those who can do nothing for him.

I don't look back at the things I can no longer do, I just look forward to the things I still can.

Post Reply