Site seems to be OK. Load issue should be resolved now.

The Armorer's ToolBox Project

Sit back and talk with friends. Same rules as before. Rule #1-Relax with friends on the front or back porch.
Rule #2-No Politics, religion or anything above a G level.
User avatar
BrokenolMarine
Ranch Foreman
Posts: 7494
Joined: Sat Nov 26, 2016 8:28 am
Location: South Central Oklahoma in the mountains
United States of America

Re: The Armorer's ToolBox Project

Post by BrokenolMarine » Sun Aug 20, 2017 3:04 pm

A second session on this Sunday afternoon saw me finish the second tier and get closer to being done with the drawer fronts. A couple interesting tasks ahead. BTW, the glue up of the knot worked... ;) ... the portion that included the knot didn't break in half. I was holding my breath when I ran that portion across the table saw. :twisted:

Here is the long shot of the work so far....
1.jpg
1.jpg (301.11 KiB) Viewed 1604 times
Looking good and the Book Match is really starting to show.

Here is your closeup.
2.jpg
2.jpg (290.93 KiB) Viewed 1604 times
You can see the repair in the side of the "closet" and look under the repair.
A trick will happen there. See the arc of pencil connecting the real crack of the repair, to the small real crack in the lower section? This is where I will make the repair disappear. I will take my exacto knife and cut a fake crack along the pencil mark... fill the fake crack with used coffee grounds, and put super glue over them, joining the two cracks. Once the drawer fronts are sanded, stained, and finished, the cracks will be LESS prominent / more natural, and will appear to join the swirls of book matched grain patterns in the upper and lower drawer tiers.

Yup. Before I take that final step, I'll test it in a scrap piece to insure it works well in this walnut. :roll: It has been a while since I used the trick to repair a crack in a friend's project. His was Mahogany, and it was perfect.

HE was very happy, he was about to throw it out, and decided that the repair really gave it character.
:)
Last edited by BrokenolMarine on Tue Aug 22, 2017 7:47 am, edited 1 time in total.
You can tell a lot about the character of a man...
by the way he treats those who can do nothing for him.

I don't look back at the things I can no longer do, I just look forward to the things I still can.

User avatar
BrokenolMarine
Ranch Foreman
Posts: 7494
Joined: Sat Nov 26, 2016 8:28 am
Location: South Central Oklahoma in the mountains
United States of America

Re: The Armorer's ToolBox Project

Post by BrokenolMarine » Sun Aug 20, 2017 7:02 pm

One last Sunday session... and knocked out the drawer fronts.
:P

Okay... they aren't done ... done. Still have to sand them, and put the oil and wax finish on them, and put the pull knobs on, but the cutting out and attaching portion IS done. :roll: 8-) :P I'm pleased, I didn't screw it up. Ah... that's a strip of Oak Trim at the top. The door and top will be framed in oak.
2.jpg
2.jpg (293.32 KiB) Viewed 1596 times
You can tell a lot about the character of a man...
by the way he treats those who can do nothing for him.

I don't look back at the things I can no longer do, I just look forward to the things I still can.

User avatar
RanchRoper
Forum Ambassador
Posts: 12964
Joined: Mon Mar 21, 2016 12:14 am
Location: Land of Shining Mountains, Alberta
Canada

Re: The Armorer's ToolBox Project

Post by RanchRoper » Sun Aug 20, 2017 7:20 pm

That is looking real good. Nice workmanship.

Kibler Colonial Flintlock .50

Ohkínohkomit - Shoot skillfully

User avatar
BigAl52
Forum Ambassador
Posts: 15048
Joined: Sun Oct 23, 2016 12:43 pm
Location: Evans,Colorado
United States of America

Re: The Armorer's ToolBox Project

Post by BigAl52 » Sun Aug 20, 2017 10:51 pm

Love the grain pattern on the front. I will be waiting to see how it takes the finish coats. I also liked the muzzleloader on the wall in some previous pics. Al
Don't let the old man in


H001T .22LR
H001T .22LR MONUMENT VALLEY
H003T PUMP .22LR
BBS .41 MAG
SS .357
SIDE GATE 38-55

User avatar
BrokenolMarine
Ranch Foreman
Posts: 7494
Joined: Sat Nov 26, 2016 8:28 am
Location: South Central Oklahoma in the mountains
United States of America

Re: The Armorer's ToolBox Project

Post by BrokenolMarine » Mon Aug 21, 2017 9:40 pm

Last Trip to the shop this afternoon, I worked on the door frame and top frame, and did a little work on the panels for the door and top. I had to run panels thru the band saw to have enough for the day's work, and set up the wide dado blade to make the lap jointed oak frames for the projects at hand. :)
1.jpg
1.jpg (271.71 KiB) Viewed 1585 times
This is supposed to be two kits for door and top frames and panels. But, the panels aren't quite wide enough to fill the frames. If I had made the frames two inches wide rather than 1 inch wide the panels would have worked, :roll: but they would have looked "clunky" to my eye. So I had to run the leftover from the original board thru the band saw to book match it, and... then fill the knot that had a hole going all the way thru. :x Breaks of the game.
2.jpg
2.jpg (281.97 KiB) Viewed 1585 times
As you can see in the picture, I covered the back of the panels behind the holes in the knots, with blue tape that peels off... normally. :?
Then I filled the whole with "special glue" and covered that with dried used coffee grounds. Then another layer of glue, coffee grounds over that and packed it down, another layer of grounds, and a layer of glue.
3.jpg
3.jpg (289.69 KiB) Viewed 1585 times
After working both knots for about a half hour, I was satisfied and left them to dry overnight. The glue sets up fast, but since I need to sand the repair flat, it needs to cure all the way thru, and be ready to sand flush. If the repair doesn't look right, I'll have to dig it out and redo the work using regular sawdust and color it with a sharpie. :roll:
4.jpg
4.jpg (311.19 KiB) Viewed 1585 times
I think we'll be fine. I will know more when I start sanding in the morning.

Here is a peek at the oak frames for the door and the top. I used lap joints to join the four pieces, and once the individual panels are dry, I will joint the edges in the center so they join with no gaps, then cut the grooves in the frames and then glue up all the pieces and parts for the top and the door, and make any decorative cuts to the edges, do any sanding... before I attach them to the tool box.
5.jpg
5.jpg (265.37 KiB) Viewed 1585 times
Should be a fun day tomorrow.
After this construction portion is done, it will all be finishing, except the drawer pulls. They are attached last, otherwise they would be in the way of the finishing steps.
You can tell a lot about the character of a man...
by the way he treats those who can do nothing for him.

I don't look back at the things I can no longer do, I just look forward to the things I still can.

User avatar
BrokenolMarine
Ranch Foreman
Posts: 7494
Joined: Sat Nov 26, 2016 8:28 am
Location: South Central Oklahoma in the mountains
United States of America

Re: The Armorer's ToolBox Project

Post by BrokenolMarine » Mon Aug 21, 2017 10:11 pm

I haven't, of course, glued the frame pieces yet. They have to be grooved to accept the panels, then clamped and edged with the forming plane. Then the two assemblies will be, ah... assembled. ;)
Last edited by BrokenolMarine on Mon Aug 21, 2017 10:12 pm, edited 1 time in total.
You can tell a lot about the character of a man...
by the way he treats those who can do nothing for him.

I don't look back at the things I can no longer do, I just look forward to the things I still can.

User avatar
BrokenolMarine
Ranch Foreman
Posts: 7494
Joined: Sat Nov 26, 2016 8:28 am
Location: South Central Oklahoma in the mountains
United States of America

Re: The Armorer's ToolBox Project

Post by BrokenolMarine » Tue Aug 22, 2017 10:12 am

BigAl,

Thanks for the compliment. The muzzleloader is a reproduction I took in trade for a ccw class a friend of the wife's wanted to take. She bought the rifle and pistol, and though she is a professor with a Doctoral degree... poor gal doesn't have the common sense to deal with black powder guns. :roll:

She bought them mainly to shoot at college football games for the boom/smoke like when she was a college student. Ah, not happening these days. Nearly blew up herself and the pistol first time out.... :o

She couldn't wait to shoot the new cap and ball revolver. It's simple to operate. Just pour in some... "some" black powder... add a ball and shoot. BOOM.... Pistol nearly jumped out of her hand and she needed new undies.

I asked if she read the manual.

"What."

I asked how she measured the charge.

"What? Measured" :?

Anyway... I recommend my safety class, and told her I'd take the muzzleloader as a wallhanger for the discounted class fee. She was famous for being tight with her money unless it was something she really wanted.

At the end of the class, she had learned about firearms handling, safety, and the rest. I made sure she poured OUT the last of her black powder, and and had gotten rid of the cap and ball pistol as well.

I hung the muzzle loader on the wall with a saber, but that's now in a rack with a couple other swords. I have a few. ;)

The coach gun hanging up there is the really interesting piece. It's from the late 1800s. The manufacturer is Husqvarna. Yup, the company later known for chainsaws. Back then they were well known for firearms, including full out engraved presentation doubles.
You can tell a lot about the character of a man...
by the way he treats those who can do nothing for him.

I don't look back at the things I can no longer do, I just look forward to the things I still can.

User avatar
BrokenolMarine
Ranch Foreman
Posts: 7494
Joined: Sat Nov 26, 2016 8:28 am
Location: South Central Oklahoma in the mountains
United States of America

Re: The Armorer's ToolBox Project

Post by BrokenolMarine » Tue Aug 22, 2017 7:43 pm

Today's work involved cutting the slots for the panels to fit in, creating the actual panels from the rough panel materials, and then inserting the panels and plugging the gaps. The door and top for the chest are done! :P Okay, mostly done. Still the finishing, hinges and the like, but the main work is done. :P

First a peek at hardware.

Here is a look at a Stacked Dado Set... used to cut the wider dadoes used to create the lap joints. A firm hand on the work is needed or you get "chatter" and rough joints, or the stacked dado set throws the work across the room if you were smart enough to stand to one side. Impales you with it if you weren't. :?
1.jpg
1.jpg (249.47 KiB) Viewed 1563 times
This is a boxed joint dado set. It cuts a 1/4 inch or 3/8 inch dado, but more importantly, a PERFECTLY flat dado. And Yes... it's a very expensive set compared to the cheaper stuff you can get at some of the big box stores or harbor freight. BUT... worth every penny. :)
2.jpg
2.jpg (273.21 KiB) Viewed 1563 times
Since you are cutting a much narrower dado, and if you are smart, shallower., (Deeper dadoes are cut on multiple passes.... :roll: ) there is less risk. But, I still stand off to the side, in case my work piece decides it wants to become a Javelin. ;)

The door and top assemblies had their grooves cut, and were assembled. I used a triangle square to make sure the assemblies were square during glue up. You can see the clear plastic square laying on the work table to the right of the frames in the picture. Note the gaps where the grooves run out to the edge, those will have to be plugged. You can make "plunge" dado cuts to avoid those, but they have risks. I choose to avoid the risks and do the extra work afterwards. 8-)
3.jpg
3.jpg (309.98 KiB) Viewed 1563 times
While the glue dried, I worked on the panels that would become the inserts in the frames. The repairs to the knots, done last night, worked out pretty good. Especially if you remember the large gaps we started with. Later sanding with increasingly finer grades of paper should produce even better results. This is the door assembled. I'm happy with the result so far. The stain will really make the grain pop. I am "really" looking forward to the grain on the drawer fronts.
4.jpg
4.jpg (269.27 KiB) Viewed 1563 times
I didn't like the looks of the second panel in the book matched pair for the top, so I used the one panel for a center and two strips for edges on the top. I did like the outcome. I cut strips until I found matches in the grain that worked out. The top is on the left in this picture.
5.jpg
5.jpg (272.08 KiB) Viewed 1563 times
The last work session for the day was to hand fit EIGHT plugs in the door and top, plugging the gaps resulting in my failure to risk the plunge dado cuts. I cut each oak plug to length and then hand fit it to width by sanding it on an 80 grit sheet. Anal? Meh, it's worth the effort. 8-) Even if no one sees the chest but me, I'll know.
6.jpg
6.jpg (232.79 KiB) Viewed 1563 times
If you look closely, you can probably see the plugs in the bottom of the door panels. Small square plugs visible on the "inside" of the vertical rails close to the benchtop.
You can tell a lot about the character of a man...
by the way he treats those who can do nothing for him.

I don't look back at the things I can no longer do, I just look forward to the things I still can.

User avatar
BrokenolMarine
Ranch Foreman
Posts: 7494
Joined: Sat Nov 26, 2016 8:28 am
Location: South Central Oklahoma in the mountains
United States of America

Re: The Armorer's ToolBox Project

Post by BrokenolMarine » Tue Aug 22, 2017 7:46 pm

Tomorrow will be Sanding, sanding, and more sanding. Maybe some scraping with a card scraper. I'll also be fitting the racks for the cleaning rods in the little closet. If I get all the sanding done, I'll apply the finish, and maybe even set the hinges. Last will be the drawer pulls. I may add a base in Oak to raise the chest about 3/4" to make the drawers a bit easier to access sitting next to the work surface on the desk.
You can tell a lot about the character of a man...
by the way he treats those who can do nothing for him.

I don't look back at the things I can no longer do, I just look forward to the things I still can.

User avatar
BrokenolMarine
Ranch Foreman
Posts: 7494
Joined: Sat Nov 26, 2016 8:28 am
Location: South Central Oklahoma in the mountains
United States of America

Re: The Armorer's ToolBox Project

Post by BrokenolMarine » Wed Aug 23, 2017 8:40 pm

The morning started out as I expected, Sanding, and more sanding, first with shaping the door and top for the chest. As you can see in the two pictures below, I rounded the shoulders on three sides, and all four of the insides to give the frames a more graceful appearance... and sanded the panels. The forth exterior side was left flat and square. (Piano hinge.. ;) ) I also used a chisel to trim the plugs I put in the gaps yesterday. Flush on the ends, flush on the tops. Nearly invisible once stained. ;)
1.jpg
1.jpg (230.38 KiB) Viewed 1550 times
2.jpg
2.jpg (214.38 KiB) Viewed 1550 times

After the sanding on the door and top, I sanded the tool box itself, but mostly the drawers and front, removing the scratches and defects. There is always a risk, and the sanding caused a couple dings, when it picked up flaws in the knots or defects and knocked out small pieces. :twisted: I left them out. The tool box will take dings in use, and since it's not an item I will sell, it's for MY use, I can live with it. :roll:

Got all the scratches out, and was ready to start staining.
3.jpg
3.jpg (288.04 KiB) Viewed 1550 times
First I stained the walnut insert in the door panel. I was really happy with the way it turned out.
(This picture also shows the oak stain... sorry) :D
4.jpg
4.jpg (273.24 KiB) Viewed 1550 times
While I had the dark walnut stain, brush and rag working, I stained the drawer fronts. That was a task and took a good while, but man did it make the grain pop. 8-)
6.jpg
6.jpg (316.94 KiB) Viewed 1550 times
Next, I stained the Curly Cherry panel in the Top Assembly. I liked it okay, but it was nowhere near as satisfying as the Walnut panel in the closet door. ;)
5.jpg
5.jpg (265.52 KiB) Viewed 1550 times
The last task before cleaning up for the evening, was staining the oak frames around the two panel assemblies and the oak trim above the drawers in the chest. They really turned out well once they were stained. I have decided to make that base to raise the chest a bit, and I'll stain IT before I attach it. It will be a LOT easier that way. :P

Tomorrow I will stain the rest of the chest in Natural Watco Oil, install the hinges and drawer pulls, and put together the hangers for the cleaning rods in the closet. NEARLY Done!
:lol:
You can tell a lot about the character of a man...
by the way he treats those who can do nothing for him.

I don't look back at the things I can no longer do, I just look forward to the things I still can.

User avatar
BrokenolMarine
Ranch Foreman
Posts: 7494
Joined: Sat Nov 26, 2016 8:28 am
Location: South Central Oklahoma in the mountains
United States of America

Re: The Armorer's ToolBox Project

Post by BrokenolMarine » Wed Aug 23, 2017 8:47 pm

Note that in the picture of the drawer fronts stained, all the drawers were left open about a quarter inch so the stain didn't GLUE them shut. There isn't anything suddenly wrong with the fit. But, you can still see the grain pretty well, huh? ;)
You can tell a lot about the character of a man...
by the way he treats those who can do nothing for him.

I don't look back at the things I can no longer do, I just look forward to the things I still can.

User avatar
PT7
Drover
Posts: 4889
Joined: Mon Mar 21, 2016 8:32 am
Location: The Show-Me State
United States of America

Re: The Armorer's ToolBox Project

Post by PT7 » Wed Aug 23, 2017 9:10 pm

All caught up tonight on your progress, Marine. Excellent work, and sounds like you enjoyed yourself, too.

I was impressed with the coffee grounds and glue....never would have thought of that. Whenever I've worked with wood (mostly for outdoor decks and stairs, some deco shelves), I usually simply got rid of the knotholes. Never knew how to fix them like you did....really cool.

And you're right. That stain made the grain really pop on the front view!! Looks beautiful. A one-of-kind, special box. :D

Wonder what the next project will be when you've completed this good job?!?

~Пока~

User avatar
BrokenolMarine
Ranch Foreman
Posts: 7494
Joined: Sat Nov 26, 2016 8:28 am
Location: South Central Oklahoma in the mountains
United States of America

Re: The Armorer's ToolBox Project

Post by BrokenolMarine » Wed Aug 23, 2017 10:04 pm

The wife said I was making a bee hive next... which was fine with me. The top bar hive looked like an interesting project. But she found out she can't get bees til spring, so my next project will be to knock out some cedar soap rests for her natural soaps and lotion bars. A day or two at most. :P

After that, I guess I will build some boxes, or maybe some wooden toys for "Toys for Tots." Perhaps a presentation box for a 1911? (Toy for a Geezer?) :lol:
You can tell a lot about the character of a man...
by the way he treats those who can do nothing for him.

I don't look back at the things I can no longer do, I just look forward to the things I still can.

User avatar
BrokenolMarine
Ranch Foreman
Posts: 7494
Joined: Sat Nov 26, 2016 8:28 am
Location: South Central Oklahoma in the mountains
United States of America

Done... sorta....

Post by BrokenolMarine » Thu Aug 24, 2017 5:47 pm

Yup, I'm done... sorta. ;)

I have two little touch ups to do, and on the next trip to town, I need to buy a short piece of brass chain for the top, to stop it from falling backwards when you open it... but otherwise.. I'm done. It was a long day in the shop and I got a LOT done today, so refill your coffee, grab a donut, and let's get started..... :P

First thing this morning, I decided to stain the maple ply section so that would have a chance to dry. I used Watco Natural Oil stain, and other than the corners and the edging where I wanted to "dab", I just wiped 'er on. It really brings out the grain, just like all the other stains. No more plain white box.
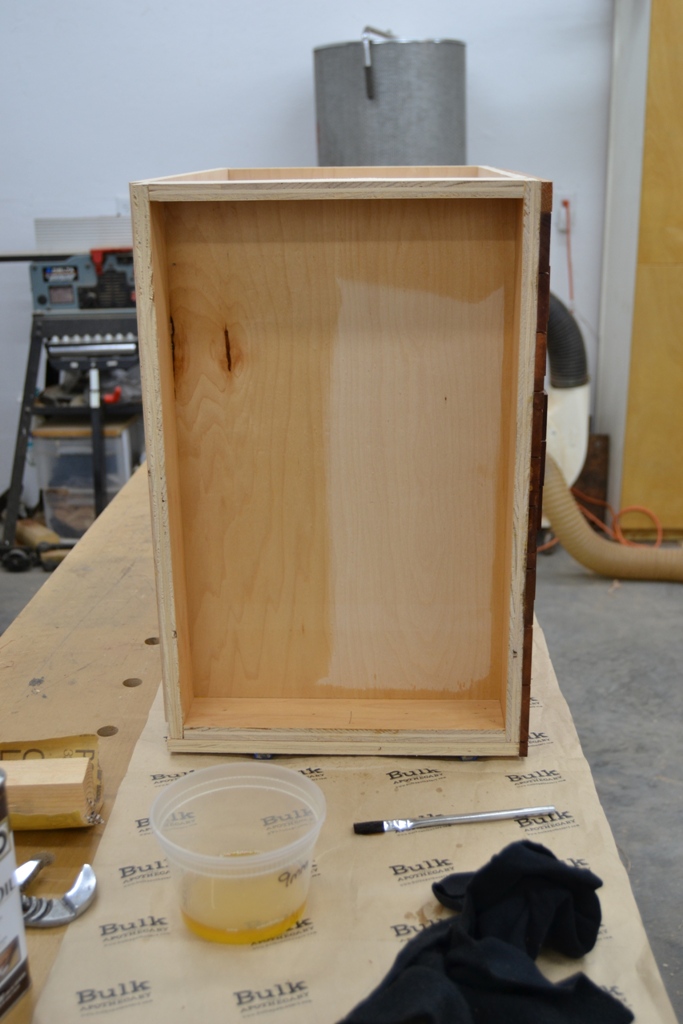
1.jpg
1.jpg (239.42 KiB) Viewed 1554 times
The next step was to make the "racks" for the cleaning rods. I wanted to hang ten rods, two for each of the five pistol calibers. I worked out the best way to hang them in the space I had, and that was a staggered method. You'll see it in a minute. I began with careful measuring and spacing. I do mean careful, didn't want to mess up the two nice pieces I had prepped.
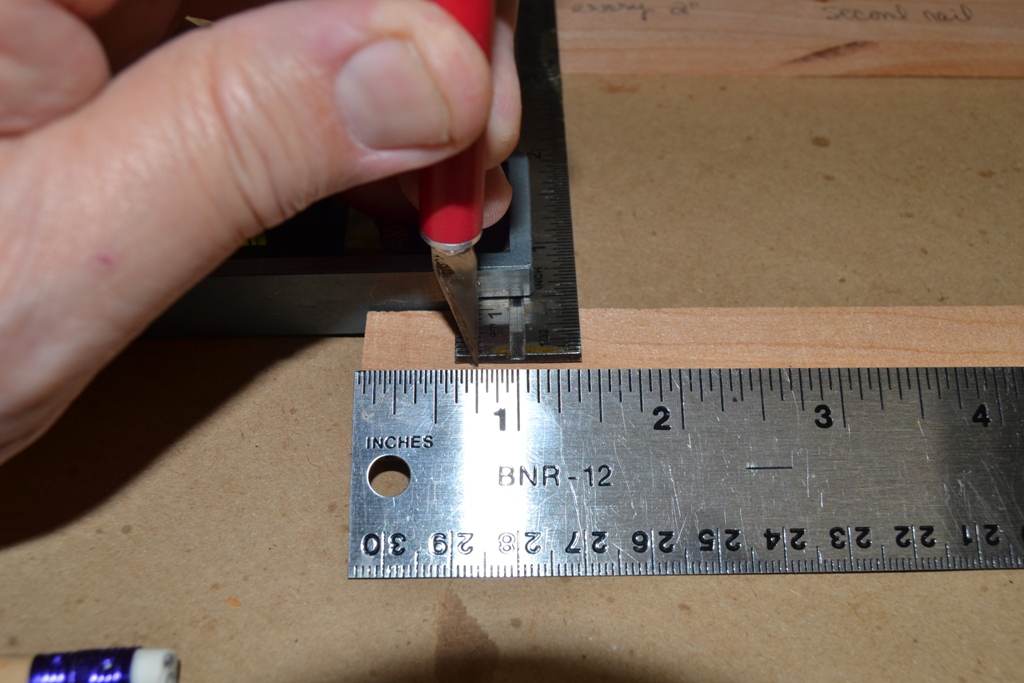
2.jpg
2.jpg (290.3 KiB) Viewed 1554 times
The next step in the process was to determine bit sizes for the casings I would use for the rods to hang on. Rather than use labels in the closet, the rods will hang on the casings for the caliber they are set up for. :) Use the right size bit and drill carefully, and they will press fit.
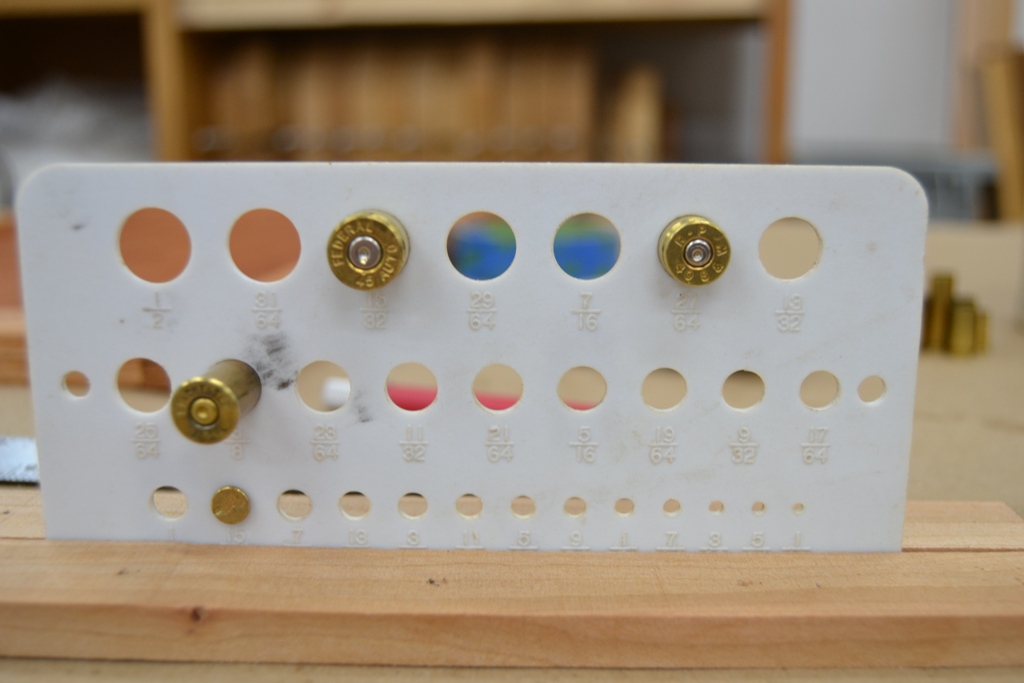
3.jpg
3.jpg (208.74 KiB) Viewed 1554 times
To insure the larger bits don't wander in the drill press as they contact the wood, I did two things. First I used a center punch to punch the holes I had marked when I measured the layout. Secondly, I drilled a pilot hole with a bit half the size of the smallest hole I would drill, that being the .22 casing.
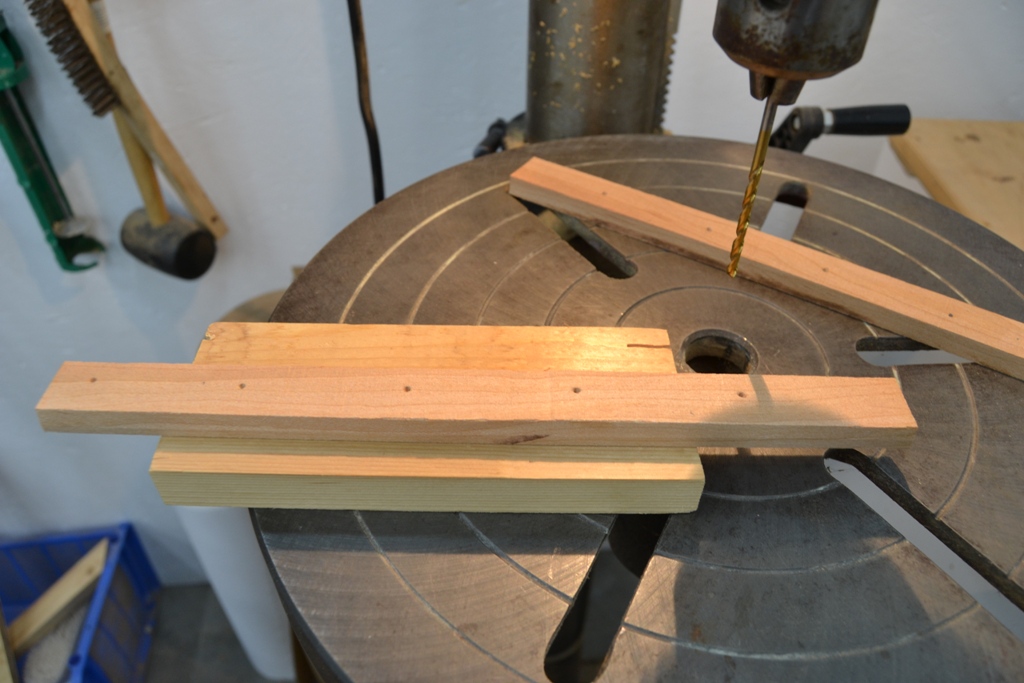
4.jpg
4.jpg (262.85 KiB) Viewed 1554 times
Taking my time and lining up each hole before making the plunge, I was happy with the result. I coated the back of the two racks with glue, insured they were level using a triangle and shot them with the pinner. They aren't going anywhere.
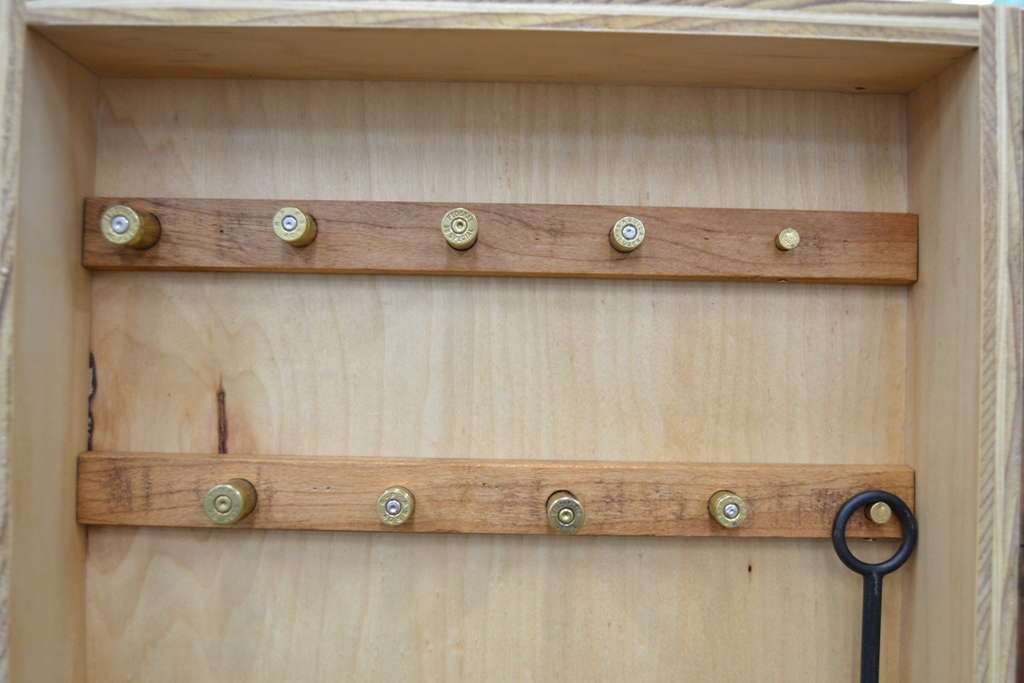
6.jpg
6.jpg (277.35 KiB) Viewed 1554 times
I attached the hinge to the door, and also inset a pair of magnets top and bottom to insure it stayed closed. The rare earth magnets are small and powerful. Careful layout takes time, as does the setup on the drill press, but the results are worth it.
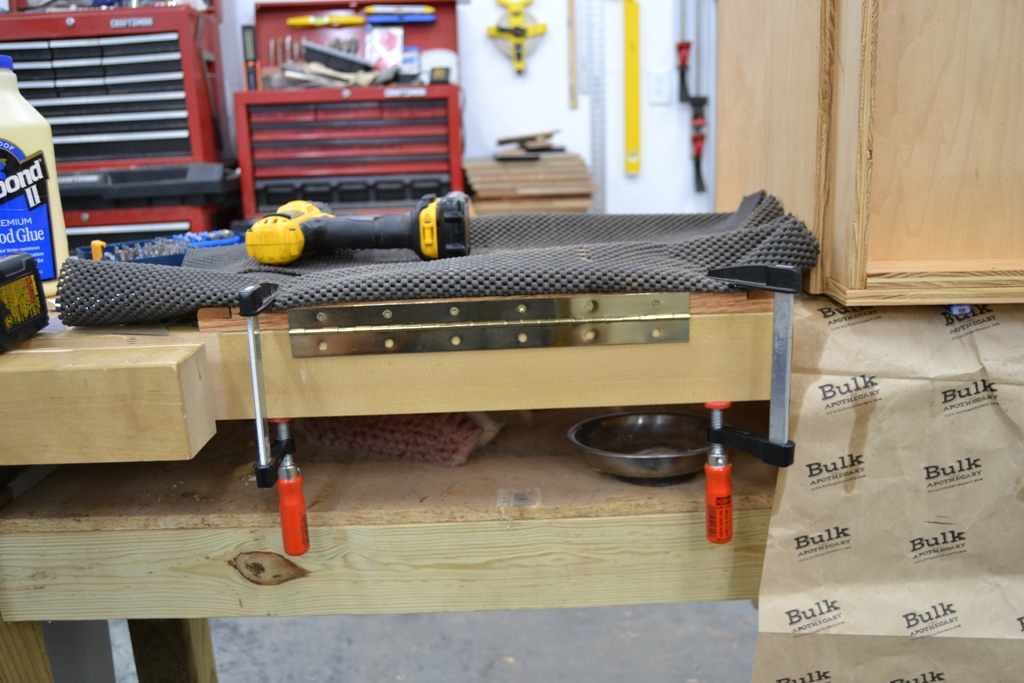
7.jpg
7.jpg (316.64 KiB) Viewed 1554 times
To make the magnets work as closures, you buy the kit which includes matching washers. Those were inset into the face of the closet wall. Again, set up and careful drilling with the forstner bit.
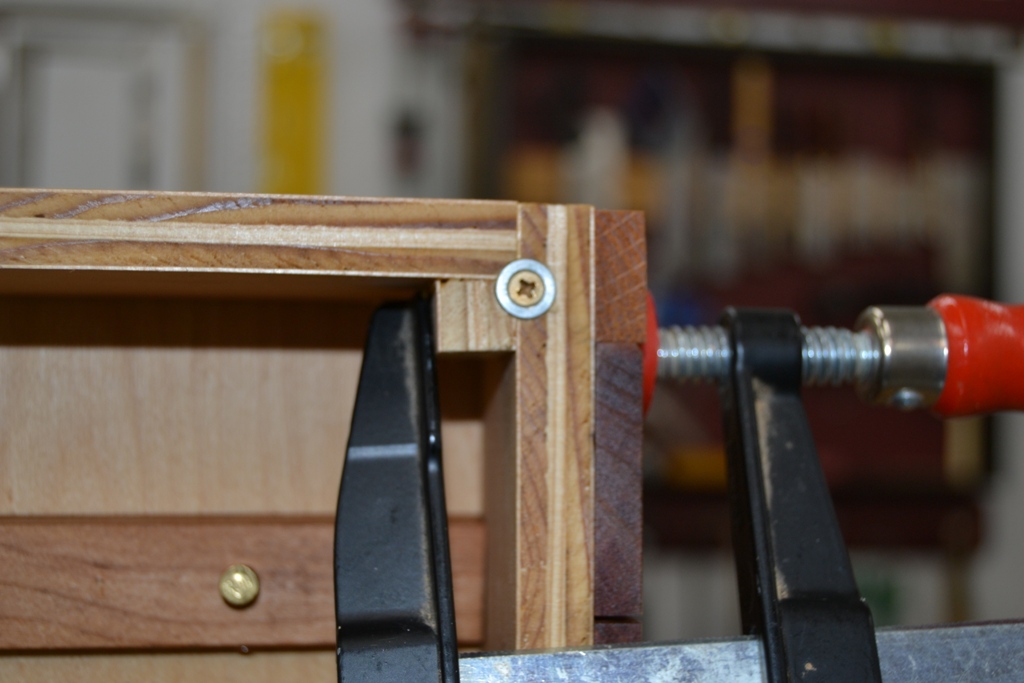
8.jpg
8.jpg (226.15 KiB) Viewed 1554 times
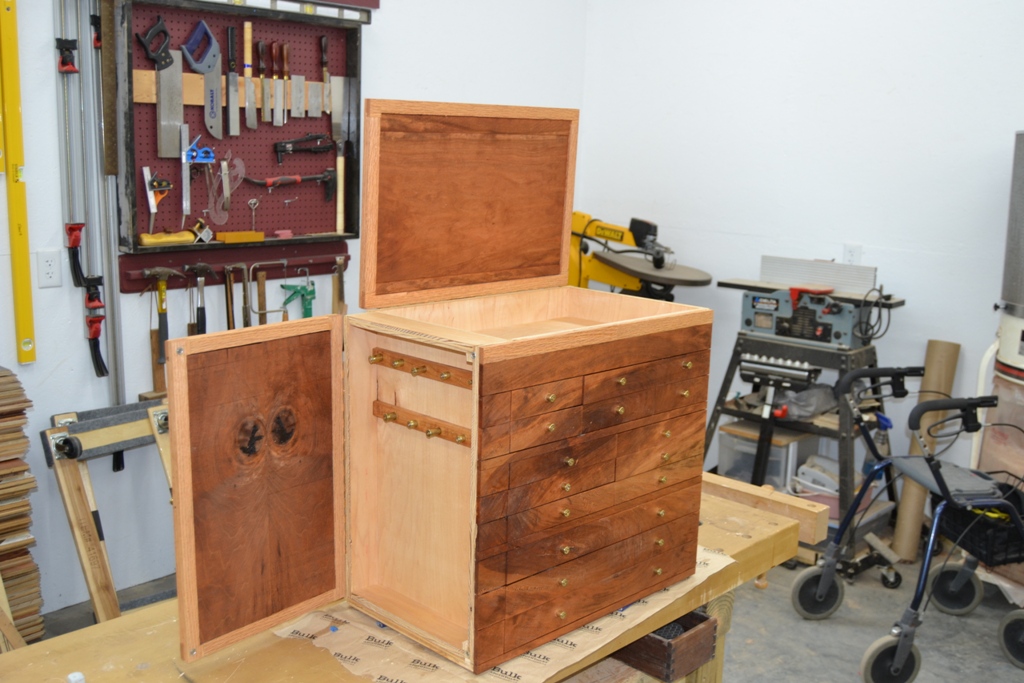
I repeated the process with the top, but gravity would keep the top closed, so the magnets were not needed. Both were attached to the box.
12.jpg
12.jpg (311.55 KiB) Viewed 1554 times
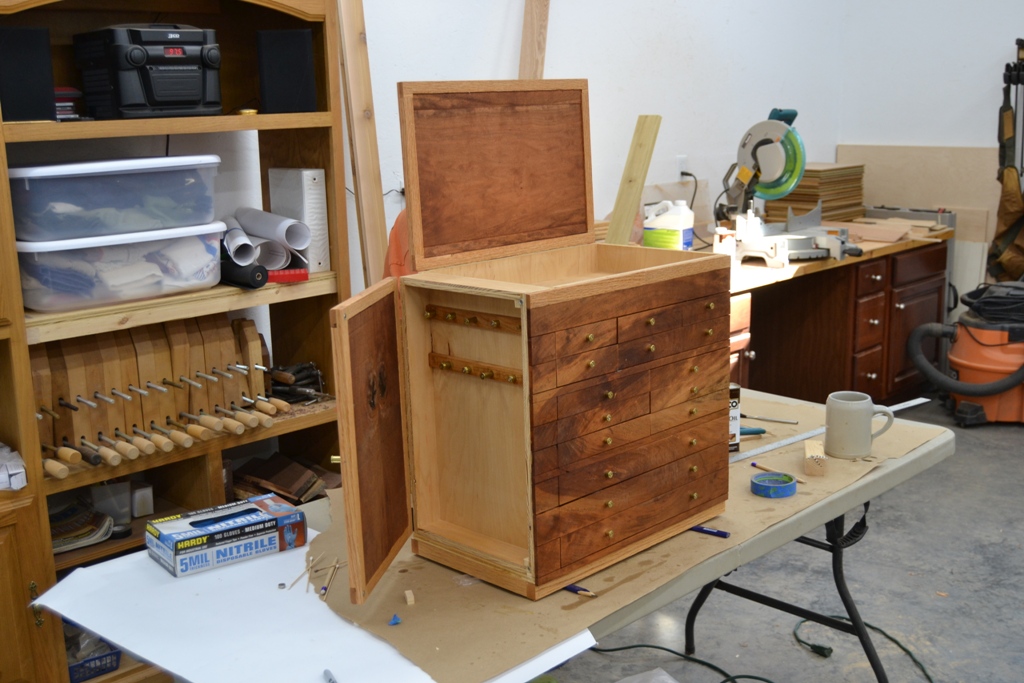
The longest and most stressful part of the day was putting in the drawer pulls. Measuring the locations and marking them, setting up the drill press, and discovering that the drawers were highly unstable due to their height and wobbled. (Drill bit moved and :twisted: :evil: ) Stained the error and it's hard to see.

I figured out a way to put the face of the drawer RIGHT at the bit, clamping a narrow board to the press table and turning the table aside, then hanging the drawer ON the board's edge. Solid as a rock and no movement. PITA, but it worked. Did the rest of the drawers with no problem

Also, but and stained the oak base to raise the box another inch, in preparation for it's reporting for duty tomorrow.
As I said, it's pretty much done. I will take a pic or two tomorrow once it's inside, in position and ready to start filling up with tools.
But, it's basically DONE.
13.jpg
13.jpg (313.34 KiB) Viewed 1554 times
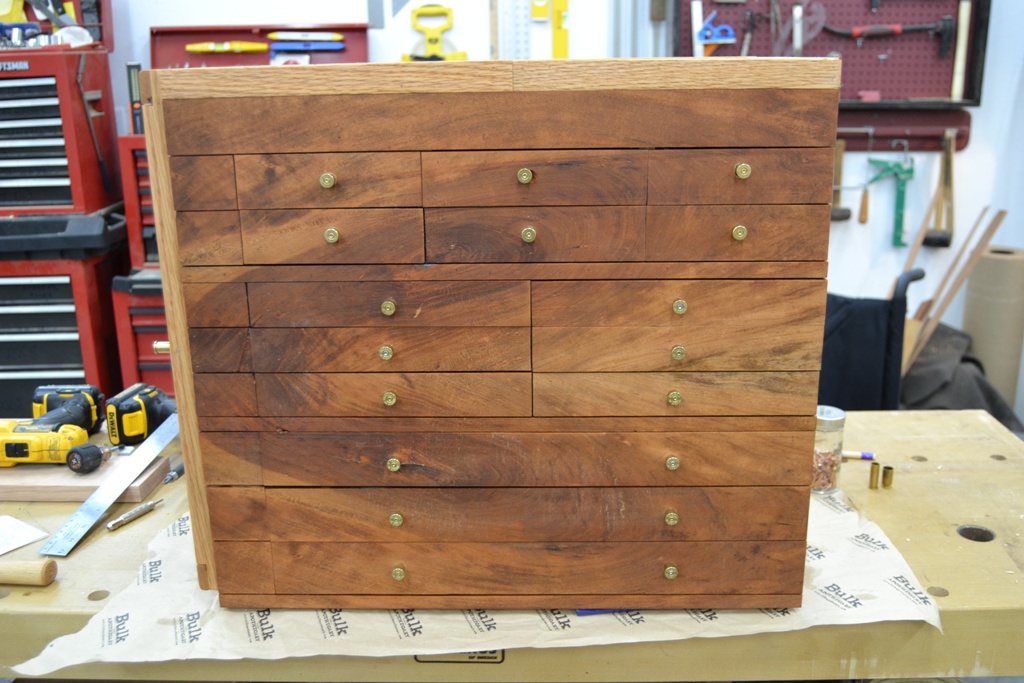
btw, here is a better view of the drawer pull layout, just in case some were interested... :)
14.jpg
14.jpg (278.93 KiB) Viewed 1554 times
You can tell a lot about the character of a man...
by the way he treats those who can do nothing for him.

I don't look back at the things I can no longer do, I just look forward to the things I still can.

User avatar
BrokenolMarine
Ranch Foreman
Posts: 7494
Joined: Sat Nov 26, 2016 8:28 am
Location: South Central Oklahoma in the mountains
United States of America

Re: The Armorer's ToolBox Project

Post by BrokenolMarine » Thu Aug 24, 2017 5:58 pm

Sorry, left out a really good pic of the completed project... :roll:
9.jpg
9.jpg (316.18 KiB) Viewed 1551 times
It doesn't show the added oak base, but it doesn't show the door and top installed.
BTW, I decided I really didn't like the cherry stain on the top, so the SECOND thing I did this morning, was add a pass with the walnut stain to the cherry, I think it looks much better. :lol:


Here is a pic with the oak base.
15.jpg
15.jpg (257.72 KiB) Viewed 1551 times
You can tell a lot about the character of a man...
by the way he treats those who can do nothing for him.

I don't look back at the things I can no longer do, I just look forward to the things I still can.

User avatar
CT_Shooter
Administrator emeritus
Posts: 5777
Joined: Mon Mar 21, 2016 8:42 am
Location: Connecticut
United States of America

Re: The Armorer's ToolBox Project

Post by CT_Shooter » Thu Aug 24, 2017 6:40 pm

Absolutely beautiful!

This thread, about such an outstanding project by an accomplished woodworker, is fantastic. It's been a great photographic and descriptive illustration of the process; including the plans, the selection of materials, the execution, the mistakes and their solutions and I thoroughly enjoyed it. I will never do what you can do in your workshop, but I totally enjoy watching you and learning from it.

Thanks.
H006M BBB .357 - H001 Classic .22LR - Uberti/Taylors & Co. SmokeWagon .357 5.5" - Uberti/Taylors & Co. RanchHand .22LR 5.5" - Colt King Cobra Carry 2" - Colt Official Police 38spl 4"

User avatar
PT7
Drover
Posts: 4889
Joined: Mon Mar 21, 2016 8:32 am
Location: The Show-Me State
United States of America

Re: The Armorer's ToolBox Project

Post by PT7 » Thu Aug 24, 2017 7:34 pm

Marine, although my main focus and primary "like" of your projects is beautifully finished wood and the highlighted wood grains, this time I also liked your cleaning rod hangers made out of each caliber's brass casing. That eliminated the need to "label" each one in some way. How simple now to recognize a rod either by the brass size, or by the embedded caliber number on the casing base.
Very cool idea! :)

Thanks for the most interesting, and well-photographed, box build. Enjoyed it a lot.

~Пока~

User avatar
BrokenolMarine
Ranch Foreman
Posts: 7494
Joined: Sat Nov 26, 2016 8:28 am
Location: South Central Oklahoma in the mountains
United States of America

Last Pics of This Project!

Post by BrokenolMarine » Fri Aug 25, 2017 12:18 pm

Here are the last pics of this project!

I went out to the shop this morning and knocked out the last few minor issues and brought the toolbox in to it's address in my office. I spent a little time last night after dinner getting the spot ready, so it was a matter of dropping it in place. The boss was kind enough to pick up a roll of cushioned drawer liner, but it only went so far. She will see if they have any left while she is in town today ... :) She is also going to try and find a battery for my digital caliper, THAT would have been nice to have working when I was setting the magnets and washers in the door. :roll: ( :twisted: :| dead batteries... always at the most inopportune moments. )

Anywho... here is the tour of the new toolbox.. then I'll open the floor for questions... :lol:

First up, the chest at the top of the box, which contains the specialty hammers of brass and nylon as well as a regular old ball peen, plus the nylon armorer's blocks for knocking out pins, and assembly. There are also wedges for prying and whatever.
1.jpg
1.jpg (243.25 KiB) Viewed 1536 times
The second pic is the end closet, the coolest thing on the chest as far as I am concerned. I was always digging thru the center desk drawer, reading the taped labels on the shafts of each of the cleaning rods all thrown in the pile, trying to find the right rod, and the one with the jag and the brush... now, just open the door and tah-dah! There are the rods, all organized, and ready for duty. Laying on the bottom of the closet? My Wilson Combat Lube in the syringe and my fiber optic bore light. (No Batteries needed. )
2.jpg
2.jpg (250.26 KiB) Viewed 1536 times
The rest of the pics will be a tour of the drawers, from top to bottom. Most of the contents are self explanatory. Small screwdrivers in this one, extra cleaning rods in that one. The two last drawers contain the large gunsmithing screwdrivers and the specialty tools, such as the Glock sight tool. Some of you may recognize the Go/No Go gauge for the 50 caliber Machine gun in one of the drawers, a keepsake from my Aerial Gunner days. There are a few other cool things in the drawers.

The drawer with the thick brass rods? Those are range/bore rods for pistol competitors. Have a squib round and get a bullet stuck in the barrel, you use the right caliber rod and you can knock the bullet back out. You can also take one of those rods to the gunshop when looking at used guns, and check cylinder lockup and timing. It will give you a rough idea if the timing on the gun is good, or off.

There are other things that will go in the drawers and there is one that is completely empty. It will be a work in progress like everyone's tool boxes, but there is certainly space to organize. I will have to keep a few things in the desk do to size... bulk supplies, the knife sharpening set ups, and stuff like that. I may end up filling the drawers with shooting files, targets, notes, etc. But the tools are organized. :)
3.jpg
3.jpg (233.45 KiB) Viewed 1536 times
4.jpg
4.jpg (248.5 KiB) Viewed 1536 times
5.jpg
5.jpg (233.57 KiB) Viewed 1536 times
6.jpg
6.jpg (264.63 KiB) Viewed 1536 times
7.jpg
7.jpg (256.72 KiB) Viewed 1536 times
8.jpg
8.jpg (251.16 KiB) Viewed 1536 times
9.jpg
9.jpg (256.9 KiB) Viewed 1536 times
10.jpg
10.jpg (240.19 KiB) Viewed 1536 times
The last two shots are long shots of the two work space (desks) to give you an idea why I moved the closet to the left side of the chest so I could place the tool chest on the left side of the desk. AS you can see, I have the rifle cradle on the right side of the main work space. When working on the cradle, I work between the desk on the left and the desk on the right. If I had placed the chest to my right (strong) side as I had originally planned, it would have been in the way and interrupted the flow between the cradle and the work area on the main desk.
11.jpg
11.jpg (229.13 KiB) Viewed 1536 times
12.jpg
12.jpg (212.53 KiB) Viewed 1536 times
I am very happy with the final results of the project. I learned a lot and enjoyed myself, even when things went wrong. I sat in the rocker... drank a diet pepsi or bottle of juice and figured out the problem. If I did it again, for some reason, there are a few things I would do differently. Lessons learned, so to speak. I plan to make notes on the back of the plans to remind myself if the project comes up again. 8-)

To tell the truth, I'm glad it's done because I couldn't wait to see how it turned out, and wanted to get those tools organized.
But... I'm sorry it's over, it was great fun. ;)
You can tell a lot about the character of a man...
by the way he treats those who can do nothing for him.

I don't look back at the things I can no longer do, I just look forward to the things I still can.

User avatar
CT_Shooter
Administrator emeritus
Posts: 5777
Joined: Mon Mar 21, 2016 8:42 am
Location: Connecticut
United States of America

Re: The Armorer's ToolBox Project

Post by CT_Shooter » Fri Aug 25, 2017 1:18 pm

Marine, I admire you for so many reasons, not the least of which is your signature. I'm very glad you're here and sharing your life, wisdom, skills, and knowledge with us. Thanks - a lot.
H006M BBB .357 - H001 Classic .22LR - Uberti/Taylors & Co. SmokeWagon .357 5.5" - Uberti/Taylors & Co. RanchHand .22LR 5.5" - Colt King Cobra Carry 2" - Colt Official Police 38spl 4"

MuddyWaters62
Cowhand
Posts: 326
Joined: Thu Jun 09, 2016 11:37 am
Location: Texas
United States of America

Re: The Armorer's ToolBox Project

Post by MuddyWaters62 » Fri Aug 25, 2017 1:25 pm

:mrgreen: :mrgreen: Marine;
I have really enjoyed all of your projects that you have put up for our perusal. I think each one is better than the last. I am basically a wood butcher. I see all of your fine work and I am envious. One question, if I may, how do you secure the brass drawer knobs in place? I would think you would have to glue them in place, rather than just trusting a friction fit.
Once again, thank-you for your wonderful tutorials, they give me inspiration to experiment on my own projects.
Muddy Waters 62

Post Reply