Site seems to be OK. Load issue should be resolved now.

The Armorer's ToolBox Project

Sit back and talk with friends. Same rules as before. Rule #1-Relax with friends on the front or back porch.
Rule #2-No Politics, religion or anything above a G level.
User avatar
BrokenolMarine
Ranch Foreman
Posts: 7494
Joined: Sat Nov 26, 2016 8:28 am
Location: South Central Oklahoma in the mountains
United States of America

The Armorer's ToolBox Project

Post by BrokenolMarine » Fri Aug 11, 2017 3:39 pm

I have started my next shop project. THIS one I will be using, a lot. :) I have my cleaning and armorer's tools in several drawers in the desk I use for both cleaning my guns and performing what maintenance I feel qualified to perform. I felt the need to organized them a bit better, and a tool chest something LIKE this one was what I wanted.
oak tool chest.jpg
oak tool chest.jpg (56.58 KiB) Viewed 1972 times
I have seen several designs, but I had a number of modifications in mind, to meet MY needs, and in drawing up the various plans, I finally arrived on a working plan and have gotten almost to the cutting and assembly part. My chest will have three drawers at the bottom, 17 inches wide, 11 inches deep and 2 inches high. Then a horizontal divider for stability and support. The next level will have a vertical center divider, and six eight inch wide, 11 inch deep and 1-1/2 inch deep drawers. Then another horizontal divider. This next level will have two stacks of three five inch wide by 11 inch deep drawers 1-3/4 inches tall, flanking a three tall stack of six inch wide by 11 inch deep and 1-3/4 inch deep drawers. The top will open and give access to a two inch deep bin for storing armorer's blocks and wedges.

On the right side of the chest will be a vertical closet.. two inches deep, twelve inches wide and eighteen inches high. It will store all the cleaning rods for the various calibers, with the brass cleaning brushes and jags already installed... sorted and stored on pegs, by caliber.

I won't bore you will the step by step photo spread, but will post a picture or three of the completed project if ya'll might be interested. 8-)
Last edited by BrokenolMarine on Sat Aug 12, 2017 8:56 pm, edited 1 time in total.
You can tell a lot about the character of a man...
by the way he treats those who can do nothing for him.

I don't look back at the things I can no longer do, I just look forward to the things I still can.

User avatar
Sir Henry
Administrator / Owner
Posts: 14719
Joined: Sun Mar 20, 2016 10:58 pm
Location: Price County Wisconsin
United States of America

Re: A New Woodworking Project

Post by Sir Henry » Fri Aug 11, 2017 10:23 pm

I don't think you bore people. We just watch and marvel at your talents.
Hi, my name is Gene and I'm a Henryholic from Wisconsin.

Range Reporter: Henry Repeater

User avatar
BrokenolMarine
Ranch Foreman
Posts: 7494
Joined: Sat Nov 26, 2016 8:28 am
Location: South Central Oklahoma in the mountains
United States of America

Re: A New Woodworking Project

Post by BrokenolMarine » Fri Aug 11, 2017 11:40 pm

I watch YOU climb, and marvel at your stamina... you got me beat. Thanks for the compliment.
You can tell a lot about the character of a man...
by the way he treats those who can do nothing for him.

I don't look back at the things I can no longer do, I just look forward to the things I still can.

Les

Re: A New Woodworking Project

Post by Les » Sat Aug 12, 2017 3:52 am

I'll be looking forward to seeing yor pictures, BM. Image

As somebody who can't knock a nail in straight, I am in awe of folks like yourself who can tackle projects such as this. My projects normally just end up as a pile of sawdust on the floor! :lol:

User avatar
BrokenolMarine
Ranch Foreman
Posts: 7494
Joined: Sat Nov 26, 2016 8:28 am
Location: South Central Oklahoma in the mountains
United States of America

Re: The Armorer's ToolBox Project

Post by BrokenolMarine » Sat Aug 12, 2017 9:15 pm

Since there are a couple of you I won't bore, I'll split the difference and put up a couple build along pics every now and then.
:roll:

I started the project today... Cutting out most of the "case" for the tool chest. There are still a few pieces that will need to be cut.
1.jpg
1.jpg (221.88 KiB) Viewed 1945 times
Here are the working drawings to keep me on track. I put a note on the top of the plans... I have decided to move the cleaning rod closet to the LEFT side of the box rather than the right, so I can put the box on the left side of the bench. It will make sense when the project is done and you see it in place. I hope the drawings put a visual with the description I put in the initial introduction above, and they match. :roll: I tried to paint a picture of what I wanted to build, but didn't have the picture to share at that time.

The stack of maple cabinet grade ply cut out on the table is for the casework. Actually, that will be the easy part. Building the drawers and the slides will be the bulk of the work, as well as the door and top. The drawers will be made mostly from the same maple laminate cabinet grade plywood. The drawer fronts and the inserts in the top and door for the cabinet will be Walnut. Highly figured walnut. :) I just can't resist. :P Getting the drawer fronts and the few false fronts lined up and looking just right is always fun. But the results are worth it. It's just a toolbox, really. :? But I like the things I build to reflect a pride in the work. :)
3.jpg
3.jpg (230.36 KiB) Viewed 1945 times
Here you can see I have laid out the lines for the shelves, (the lines with x's) and the dados which the drawers will ride in. Yup, that too will become clear later in the project. It worked really well on the project for the safe. In the progress pics for the safe project, you can see how the drawers work. That project is YEARS old and still works GREAT.
drawers.jpg
drawers.jpg (273.57 KiB) Viewed 1945 times
grain pattern.jpg
grain pattern.jpg (222.91 KiB) Viewed 1945 times
I plan to use the same procedure here for all the drawers.
Including the use of cartridge cases for knobs. The cases are free, and they were very appropriate for that project, and again here for the Gunsmith's / Armorer's chest. ;)
You can tell a lot about the character of a man...
by the way he treats those who can do nothing for him.

I don't look back at the things I can no longer do, I just look forward to the things I still can.

User avatar
BrokenolMarine
Ranch Foreman
Posts: 7494
Joined: Sat Nov 26, 2016 8:28 am
Location: South Central Oklahoma in the mountains
United States of America

Re: The Armorer's ToolBox Project

Post by BrokenolMarine » Sat Aug 12, 2017 11:30 pm

If you look closely at the background of the "drawers" picture, you can see how small and crowded my old woodshop was. But, I worked in that shop for twenty years or so, enjoyed the hobby, and turned out some nice pieces. You make do.
You can tell a lot about the character of a man...
by the way he treats those who can do nothing for him.

I don't look back at the things I can no longer do, I just look forward to the things I still can.

User avatar
BrokenolMarine
Ranch Foreman
Posts: 7494
Joined: Sat Nov 26, 2016 8:28 am
Location: South Central Oklahoma in the mountains
United States of America

Re: The Armorer's ToolBox Project

Post by BrokenolMarine » Mon Aug 14, 2017 12:46 pm

Back at it this morning, I had taken some time off to decide how to go about cutting the dadoes I needed for the drawer slides in the casing. Screw those up and you have to remake the pieces. ;) Not a huge deal, but why make extra work.

I could use the router, but I don't like it. There was a thread on the woodworking site asking which tool in your shop you "respected" the most. (read that "feared" the most....) :o Most chose the bandsaw or the table saw... I didn't have to think hard. I put router. I rarely use mine, haven't had the router down from storage for three years. I use forming planes, shaping planes and just plain planes to do what the routers do, or just sand the edges over... :)

I opted to use the dado blade on the table saw and with careful setup, the cuts are repeatable in each piece if need be.
1.jpg
1.jpg (265.01 KiB) Viewed 1924 times
The first cuts I made were in the dividers, they needed the dadoes on both sides. I set up the dado blade, and the fence and made the cuts.
Next came the two sides... Lots of cuts here.
2.jpg
2.jpg (244.69 KiB) Viewed 1924 times
Made careful adjustments before each pass, and then took my time and made SURE these cuts were right.

Once the cuts were done, time for assembly.
Wow... it actually looks like the sketches. :)
3.jpg
3.jpg (271.71 KiB) Viewed 1924 times
4.jpg
4.jpg (272.96 KiB) Viewed 1924 times
Now I have to make all the drawers... and the closet for the left side that will hold the cleaning rods.
Then there will be the closet door and top, for the top bin.
No rush. Oh yeah, let's not forget all the drawer fronts. Those, and the door and top will all be in walnut. THAT will be fun. :lol:
You can tell a lot about the character of a man...
by the way he treats those who can do nothing for him.

I don't look back at the things I can no longer do, I just look forward to the things I still can.

User avatar
BrokenolMarine
Ranch Foreman
Posts: 7494
Joined: Sat Nov 26, 2016 8:28 am
Location: South Central Oklahoma in the mountains
United States of America

Re: The Armorer's ToolBox Project

Post by BrokenolMarine » Mon Aug 14, 2017 4:11 pm

Spent some time after lunch working on the drawers, a couple hours anyway. Since all the drawers AREN'T the same size, both in width and height, it makes the task all the more difficult. I got a lot of the work done, but I still need to cut some to length. Next will be setting up the dado blade once again.

The first dado pass will be easy enough, EACH and every piece will get a single pass in the very same location. About 1/4 inch up from the bottom on the inside, a grove will be cut to accept the bottom panel with the drawer is assembled. :) The outside pass on only the sides of the drawers will be a little more complicated and a little more critical. I'll have to match the drawer to it's slot, then MARK the drawer to match the dado in the casing, then cut a matching dado in each side of the drawer where the runner will be glued. :? Little pucker factor there. Get it right, and the drawer will slide smooth and true. Slightly off and the drawer won't line up correctly and bind. Really off? :twisted: Have to cut a plug, glue it in, and hope it fits, or make a new drawer. :evil: :roll:

The afternoon's work.
1.jpg
1.jpg (270.52 KiB) Viewed 1919 times
All for today. Will hit it again tomorrow, if I am able.
You can tell a lot about the character of a man...
by the way he treats those who can do nothing for him.

I don't look back at the things I can no longer do, I just look forward to the things I still can.

User avatar
PT7
Drover
Posts: 4889
Joined: Mon Mar 21, 2016 8:32 am
Location: The Show-Me State
United States of America

Re: The Armorer's ToolBox Project

Post by PT7 » Mon Aug 14, 2017 5:36 pm

"The afternoon's work" is stacking up nicely, Marine! ;)
I'm another interested party, who will not be bored at all with your wood toolbox project.

~Пока~

User avatar
BrokenolMarine
Ranch Foreman
Posts: 7494
Joined: Sat Nov 26, 2016 8:28 am
Location: South Central Oklahoma in the mountains
United States of America

Re: The Armorer's ToolBox Project

Post by BrokenolMarine » Tue Aug 15, 2017 11:06 am

This morning's work included finishing the cutting out of the drawers, and cutting out and attaching the frame for the end closet. A good morning's work.

I dry fitted the drawers and trimmed the width where needed to allow for expansion. You can't have the drawers fit nice and tight or you'll go to pull one open and ... :evil: ... it won't. I usually leave about a 1/16th inch wiggle room. The drawers expand and contract with the changes in moisture in the room, which is why I install the bottoms in dadoes rather than just gluing or tacking them to the frames.

The closet was glued together and then glued to the left side of the chest, and tacked with the brad nailer. The door and top of the box will be one of the last things done, along with the drawer fronts.. All in walnut. Walnut gives me a bit of a sinus headache... :( ... so I like to leave it for last unless the whole project is walnut. I have done those in the past and just had to take a day or two off now and then.
1.jpg
1.jpg (264.94 KiB) Viewed 1906 times
This should give you a better idea of what I mean by cleaning rod closet.. :) ... they will hang in this little cubby on the side of the chest, all organized with the jigs and brushes in place; organized by caliber. I may put a rack in the bottom to hold spares, or just put the spares in one of the drawers with dividers.

Next step, cut the dadoes for the bottoms and assemble the drawers so I can start installing them, which will entail fitting each individual drawer and marking it for it's location... and cutting it's dadoes for that spot... and fitting runners.
2.jpg
2.jpg (291.95 KiB) Viewed 1906 times
You can tell a lot about the character of a man...
by the way he treats those who can do nothing for him.

I don't look back at the things I can no longer do, I just look forward to the things I still can.

User avatar
BrokenolMarine
Ranch Foreman
Posts: 7494
Joined: Sat Nov 26, 2016 8:28 am
Location: South Central Oklahoma in the mountains
United States of America

Re: The Armorer's ToolBox Project

Post by BrokenolMarine » Tue Aug 15, 2017 3:41 pm

Got back to work after lunch, working on cutting the dadoes for the drawers. Whew.. :roll:
1.jpg
1.jpg (284.66 KiB) Viewed 1536 times
That's a load of dadoes. Carefully... so they would all line up when the drawers were assembled. I cut the drawer bottoms for each section as I was ready to assemble. Each section has a different sized drawer bottom as the drawers are different sizes. :? I could have made life easier and made the drawers the same size, just different depths, then put dividers in them. That would have been... boring.

I got almost done with the assembly, but the lower back and that sorta healed femur told me the last two sections would have to wait for tomorrow.
2.jpg
2.jpg (278.53 KiB) Viewed 1536 times
A couple notes...
Remember that the drawers will get NICE walnut fronts, so don't judge too harshly one the dadoes showing.

I "know" there is a gap at the top of each section. When I fit the runners I will put a small nail under each drawer before I mark the location of the rails, and between the drawers as well. This will prevent binding and allow for universal spacing of the drawers. The drawer fronts will hide MOST of the gaps but will still have a slight gap between them to allow for seasonal movement. :P

A peek inside a drawer.
3.jpg
3.jpg (256.65 KiB) Viewed 1536 times
You can tell a lot about the character of a man...
by the way he treats those who can do nothing for him.

I don't look back at the things I can no longer do, I just look forward to the things I still can.

User avatar
BrokenolMarine
Ranch Foreman
Posts: 7494
Joined: Sat Nov 26, 2016 8:28 am
Location: South Central Oklahoma in the mountains
United States of America

Re: The Armorer's ToolBox Project

Post by BrokenolMarine » Thu Aug 17, 2017 4:08 pm

Another long day in the Wood Shop, but of course... broken up into different sessions. Today's work was runners. As I explained, I needed to put the spacers in place to make sure the drawers would be lined up, then mark them. I used cut up small nails to get the proper spacing.
2.jpg
2.jpg (193.62 KiB) Viewed 1522 times
Placing the nails raises the drawer just off the bottom enough that it won't drag. Then I placed the same cut pieces on the top edges of the drawer and put in the next drawer, and the next, and marked the location of the dadoes on the drawer's front edges. I'll transfer these marks to the sides after I mark ALL the drawers, and am ready to attach runners.
3.jpg
3.jpg (254.03 KiB) Viewed 1522 times
Once all the drawers were marked, it was time to make the runners themselves. I chose oak. Several reasons. I had some. (good reason.) :)
Oak will last my lifetime and then some.
Also, the piece I had would trim to just the right thickness, to cut into two slices... :roll: To safely make the cuts, 1/4" wide, I used the GriPPPER tool. Safety first... last I looked, I still have all my fingers and both thumbs. :P (knock on wood.... )
4.jpg
4.jpg (266.58 KiB) Viewed 1522 times
The first pass cut a 1/4 slice off the 1/2 inch thick board. I made enough passes to cut 18 pieces; you ALWAYS cut extras for these in case you have to remove and replace one when sizing the runners with the plane.

The next pass with the gripper cut the 1/4 slices in half, giving me the slightly oversized runners that will be glued to the drawers for fitting.
5.jpg
5.jpg (267.35 KiB) Viewed 1522 times
6.jpg
6.jpg (288.07 KiB) Viewed 1522 times
Yup, I got a drawer full.... before I started on the first set of drawers, I sat down and carefully transferred the markings from the front of the drawers to the sides. As I said, it was a long day. I only got three drawers, (The wide bottom three,) done.
7.jpg
7.jpg (279.05 KiB) Viewed 1522 times
I will work on fitting those three to the case tomorrow, before working on the rest of the runners to insure this is going to work as planned. If not, then back to the drawing board BEFORE I put all the runners on and THEN discover they didn't work as planned. ;)
You can tell a lot about the character of a man...
by the way he treats those who can do nothing for him.

I don't look back at the things I can no longer do, I just look forward to the things I still can.

User avatar
BrokenolMarine
Ranch Foreman
Posts: 7494
Joined: Sat Nov 26, 2016 8:28 am
Location: South Central Oklahoma in the mountains
United States of America

Re: The Armorer's ToolBox Project

Post by BrokenolMarine » Fri Aug 18, 2017 11:42 am

A couple things this morning.

Getting close now, less than a week or so, I hope. Depends on the door, top and drawer fronts. So, when the boss was out yesterday, I had her pick up the bronze flange washer I needed to modify my worktop for the gun cleaning desk. I wanted to move the light and magnifier to the opposite side. It is really for fly tying and came with another set. I inset a flange washer on the top left side years ago and it has worked out well, and due to it's location there, I originally planned to put the tool chest on the right side of the cleaning desk, but thinking it thru, I decided that would block the flow of work. You'll see in a minute or two.

The first step was to drill the 3/4 inch hole to accept the flange washer.
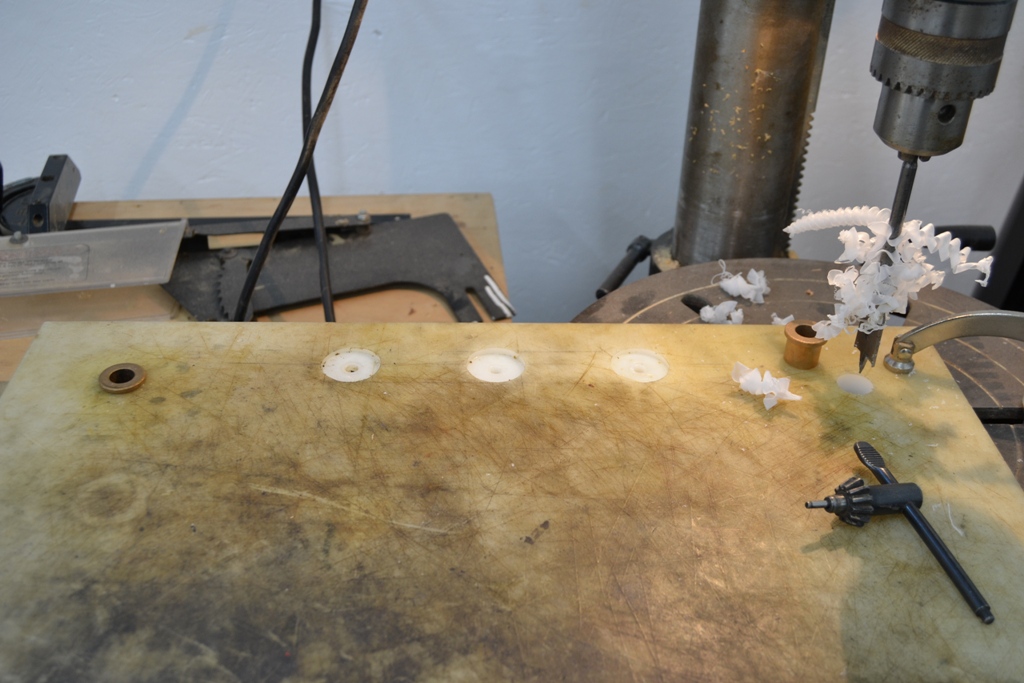
1.jpg
1.jpg (282.95 KiB) Viewed 1510 times
I measured and marked the old cutting board I use for the work surface and clamped it in place and slowly drilled the hole. Too fast and you melt the plastic / Nylon like surface. Easy does it and then you get a perfect fit.
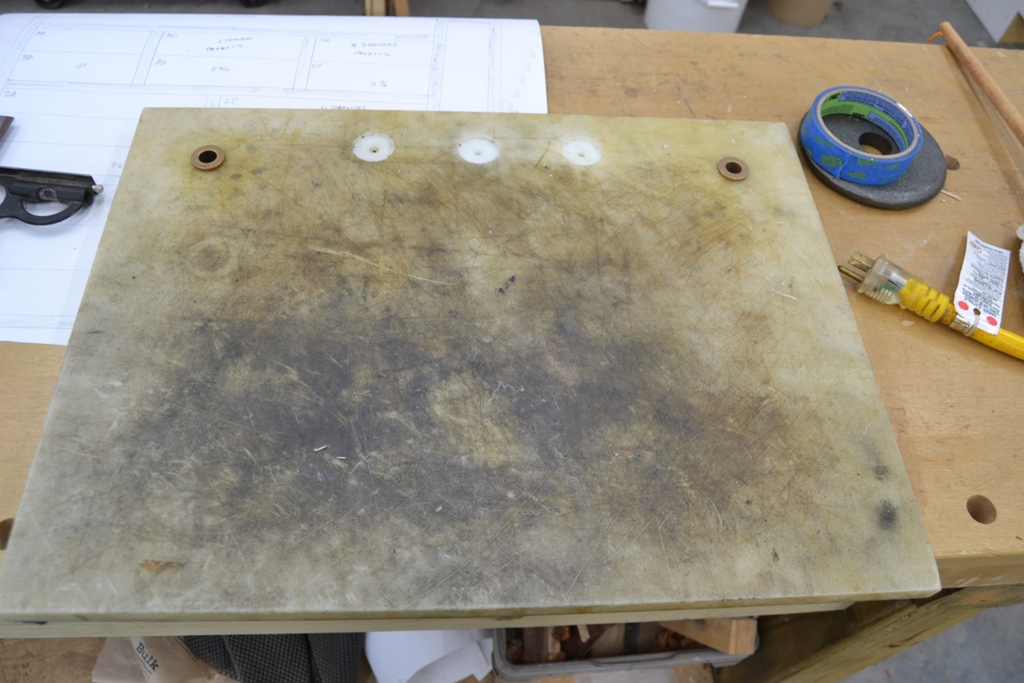
2.jpg
2.jpg (311.45 KiB) Viewed 1510 times
BooYah, fit's right in and mirrors the flange on the other side. A few stripes of super glue down the side and it's locked in place.
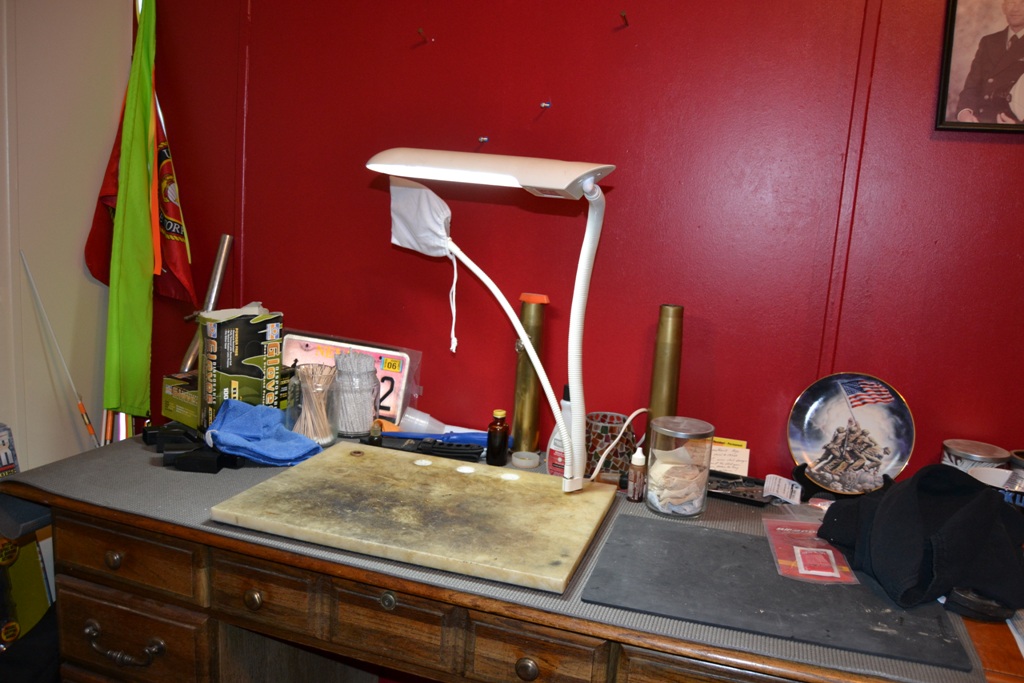
5.jpg
5.jpg (239.59 KiB) Viewed 1510 times
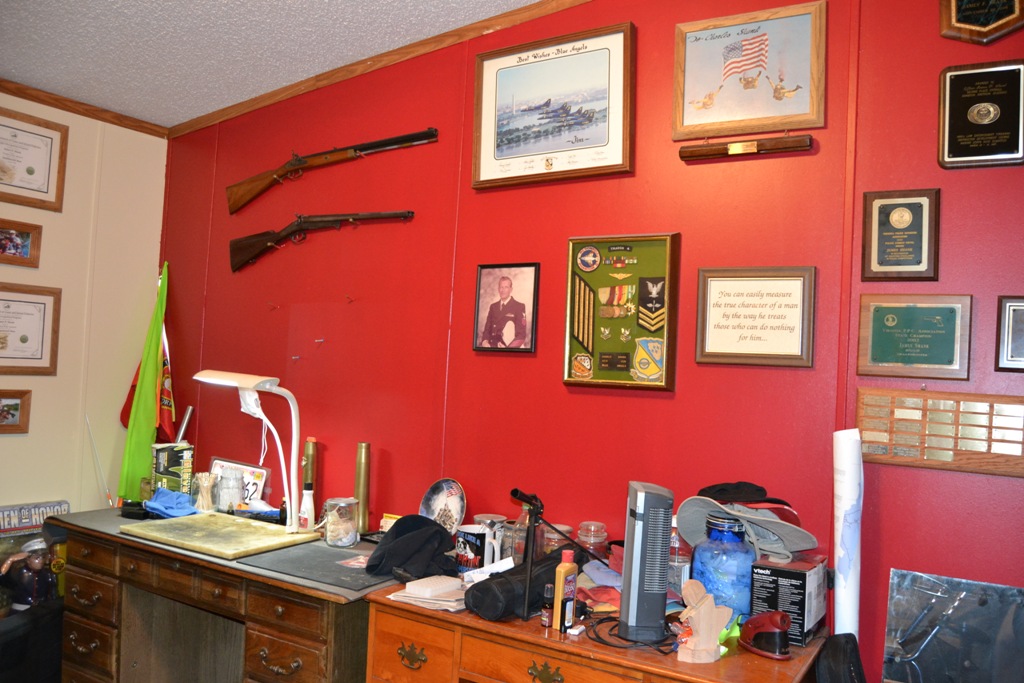
As you can see here on the cleaning desk, I have moved the light and magnifier to the right side of the cleaning board/work surface. The tool chest will sit on the left toward the corner of the room.
6.jpg
6.jpg (245.48 KiB) Viewed 1510 times
The additional space on the second desk is where the rifle cradle sits when I clean the long guns, mount sights, or perform additional maintenance. AS you can see in the long shot, if I had put the chest on the right side of the cleaning/work station, the chest would have been in the way, moving between stations.

Now, on to working on the runners.
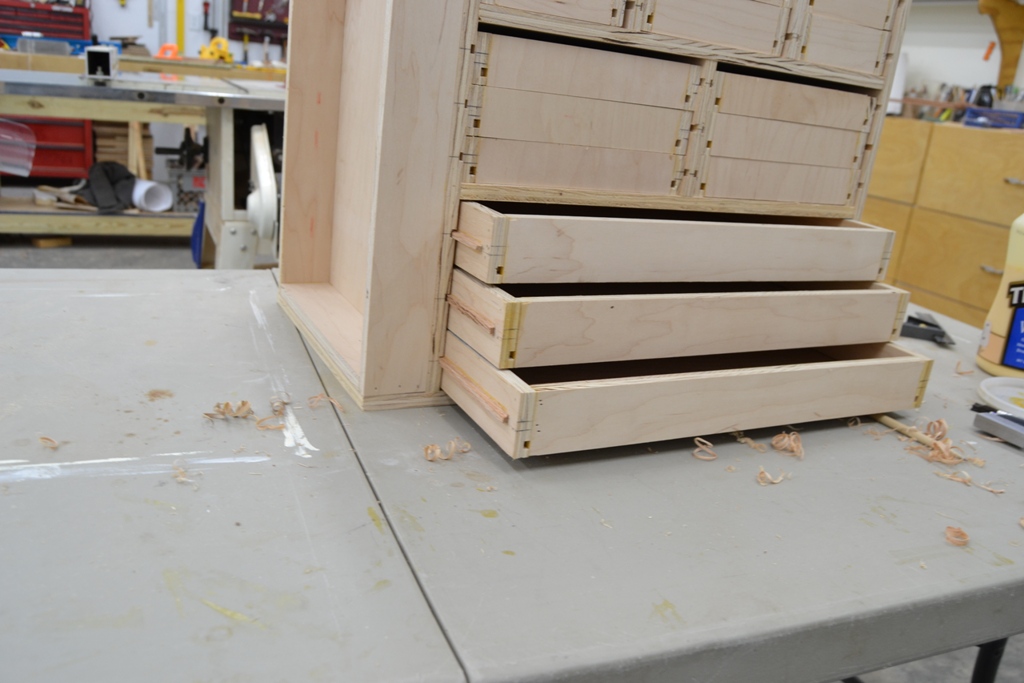
I took my time and carefully fitted each drawer. It took about an hour to get the three fitted, but I developed a working technique. Now they work fine.
3.jpg
3.jpg (240.23 KiB) Viewed 1510 times
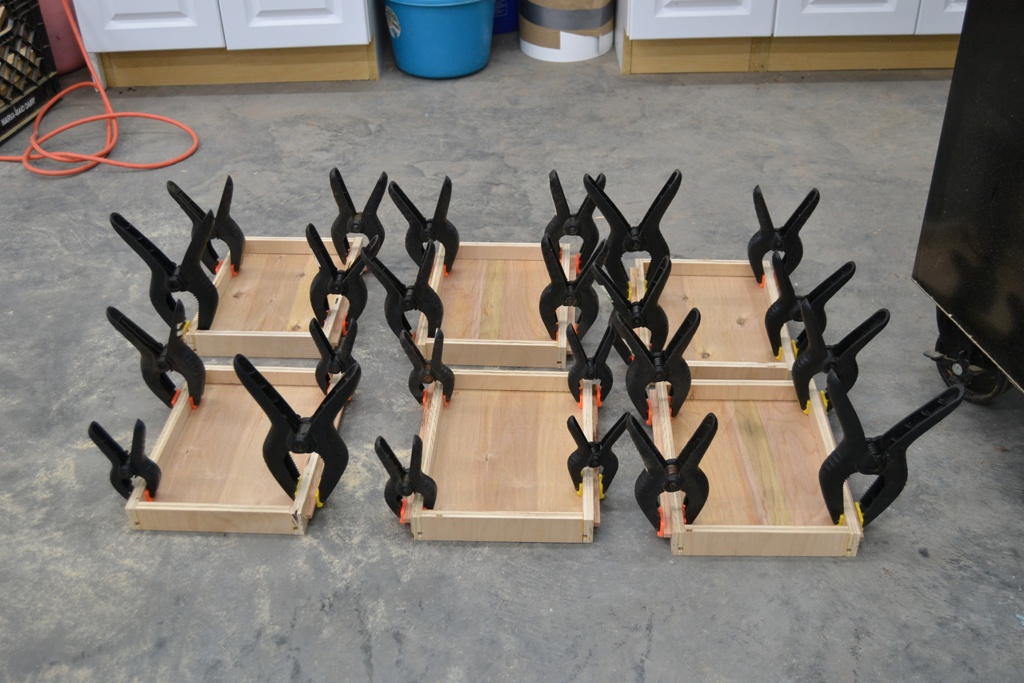
After a quick break, I glued the runners for tier two into place and left them to dry overnight. I'll fit THEM tomorrow and then glue tier three's runners in place.
4.jpg
4.jpg (271.85 KiB) Viewed 1510 times
IF, if I feel up to working after lunch, I'll start prepping the walnut for the drawer fronts, the door to the closet, and the top. Always something to do. ;)
You can tell a lot about the character of a man...
by the way he treats those who can do nothing for him.

I don't look back at the things I can no longer do, I just look forward to the things I still can.

User avatar
BrokenolMarine
Ranch Foreman
Posts: 7494
Joined: Sat Nov 26, 2016 8:28 am
Location: South Central Oklahoma in the mountains
United States of America

Re: The Armorer's ToolBox Project

Post by BrokenolMarine » Fri Aug 18, 2017 4:54 pm

Back in the shop, the drawers were calling. I thought I'd show you a tad more about how I did the runners. First I transferred the markings to the sides of the drawers using a mini square, and then slid the square the length of the side of the drawer with a pencil against the end, to mark the side. To combat errors, I would place an UP arrow on the proper side of the line where I wanted to place the runner. Seems like a small thing, but ask any carpenter why they place an X on the cutoff side of their measurements... :twisted:
1.jpg
1.jpg (254.71 KiB) Viewed 1506 times
2.jpg
2.jpg (254.08 KiB) Viewed 1506 times
It only takes one mistake, hopefully... :roll: :? :o ... for you to learn from that type of mistake and try and find ways to avoid them in the future. Especially if the wood is VERY expensive. ;)

Anywho, marking and gluing, marking and gluing, clamping, and marking and gluing. Whew. Ran out of clamps near the end and had to make do. :roll:
3.jpg
3.jpg (335.19 KiB) Viewed 1506 times
They will ALL dry overnight and I can fit them in the morning... while the Boss goes to a chicken swap. Hopefully only selling chicks and not buying more. She has a boatload of chicks to unload. :lol:

So... the next step will be the drawer fronts and the doors and top... HERE is the KIT for that portion.
4.jpg
4.jpg (283.58 KiB) Viewed 1506 times
I'll choose the best section of the Walnut, and bookmatch that to make the drawer fronts look their best. I'll choose a section to make the top and the closet door. There should easily be more than enough wood in that board to do all that and have enough left over for a box, or two. :P Ah... unless I screw something up... then there should be enough to FIX the mistakes. 8-)

I thought about making the drawer fronts and the like from the rest from Australian Lacewood... (sometimes known as Snakewood since the finished wood looks like snake scales.) That wood is Expensive, good finely grained wood like this is hard to come by, and it's a Beotch to work with. (Splinters easily, and the oily wood doesn't glue easily.) I'll save that Lacewood for a more appropriate project. 8-)
5.jpg
5.jpg (295.99 KiB) Viewed 1506 times
I have worked with it in the past and had success, it just takes a lot of work and TIME.
lacewood box rear.jpg
lacewood box rear.jpg (268.94 KiB) Viewed 1506 times
You can tell a lot about the character of a man...
by the way he treats those who can do nothing for him.

I don't look back at the things I can no longer do, I just look forward to the things I still can.

User avatar
RanchRoper
Forum Ambassador
Posts: 12964
Joined: Mon Mar 21, 2016 12:14 am
Location: Land of Shining Mountains, Alberta
Canada

Re: The Armorer's ToolBox Project

Post by RanchRoper » Fri Aug 18, 2017 5:01 pm

You sure do nice work. Thanks for sharing your talent. I'm more of a wood butcher myself. :)

Kibler Colonial Flintlock .50

Ohkínohkomit - Shoot skillfully

User avatar
BrokenolMarine
Ranch Foreman
Posts: 7494
Joined: Sat Nov 26, 2016 8:28 am
Location: South Central Oklahoma in the mountains
United States of America

Re: The Armorer's ToolBox Project

Post by BrokenolMarine » Sat Aug 19, 2017 12:24 pm

This Saturday Morning workout was a long one. First, I finished the last two drawers. That last one was a beast, not wanting to track smoothly. It's all a matter of fitting. :roll: Sometimes they don't want to cooperate at all, and they end up becoming....

Firewood. :twisted: In the end, we reached an agreement.. but it took some doing. Adjustments... adjustments, with test fittings in between. Don't want to overdo. ;)
2.jpg
2.jpg (283.98 KiB) Viewed 1498 times
Just to give you guys an idea of what's involved here, a peek at a few of the tools used in this last phase of the project....

A couple clamps...
1.jpg
1.jpg (317.97 KiB) Viewed 1498 times
The table saw to trim the runners to width.
4.jpg
4.jpg (311 KiB) Viewed 1498 times
Final adjustment on the runners involved a few tools. A narrow shoulder plane, a mini plane, a couple chisels for the tough ones... and patience..
3.jpg
3.jpg (349.75 KiB) Viewed 1498 times
But... :) ... eventually, got all the drawers fitted. I used the air driven pinner to pop a pin in each end of the runner, and one in the middle to add just a little extra strength to each runner, since I DIDN'T cut dadoes in the drawers as I did in the gunsafe drawer sets. (I forgot to cut them before I shot the drawers together. MY mistake. Doh.) :roll: :?

Next up... prepping the Walnut to make the drawer fronts and the Top ....
First I had to Book Match the two pieces.
Band Saw, You're up.
5.jpg
5.jpg (334.27 KiB) Viewed 1498 times
Careful passes on the bandsaw resulted in four pieces from two, and they have pretty nice grain. I think they will work out very nicely.
TWO will become drawer fronts, and the other two will most likely become the doors and top.
6.jpg
6.jpg (280.91 KiB) Viewed 1498 times
What I forgot to show was the tabletop planer used to match these in thickness after the pass thru the band saw. I never have gotten that technique down pat. My halves are never the same thickness. Some guys are magic with the band saw... it laughs at me.

Just like the Gun Case, there will be a lot of finish work on the drawer fronts, etc... we are just beginning. But, we ARE beginning. In the home stretch. :P I can't wait to see how it turns out.
You can tell a lot about the character of a man...
by the way he treats those who can do nothing for him.

I don't look back at the things I can no longer do, I just look forward to the things I still can.

User avatar
CT_Shooter
Administrator emeritus
Posts: 5775
Joined: Mon Mar 21, 2016 8:42 am
Location: Connecticut
United States of America

Re: The Armorer's ToolBox Project

Post by CT_Shooter » Sat Aug 19, 2017 5:22 pm

Thanks, Marine. I love seeing your woodworking photos as much as RanchRoper's cowboy photos and Sir Henry's hiking photos. You guys are awesome!
H006M BBB .357 - H001 Classic .22LR - Uberti/Taylors & Co. SmokeWagon .357 5.5" - Uberti/Taylors & Co. RanchHand .22LR 5.5" - Colt King Cobra Carry 2" - Colt Official Police 38spl 4"

User avatar
BrokenolMarine
Ranch Foreman
Posts: 7494
Joined: Sat Nov 26, 2016 8:28 am
Location: South Central Oklahoma in the mountains
United States of America

Re: The Armorer's ToolBox Project

Post by BrokenolMarine » Sat Aug 19, 2017 6:07 pm

WALNUT!

I couldn't help it, I had to get out there and get started tonight! :lol: Miss Tina went out to her shop to work on Soap.. and :roll: I was so interested in seeing what the drawers would look like with the fronts that I had to do a couple to see. :?

This is the SLOW and CAREFUL time. Not that much wood cut and sized at this point and book matching more and getting it the right size would be a pain in the :o , Sorry... language. :oops: So slow and careful. 8-)

Measure twice and Cut... oops... measure again just to be sure. :lol:
1.jpg
1.jpg (299.4 KiB) Viewed 1491 times
I got two drawers done, and then decided to stabilize the cracks that will match up in the edge trim on the closet before cutting them them tomorrow, so I don't have to patch them together or have a piece shatter... :twisted: I stopped at two. BUT... it's enough to get a feel. We'll get a better look at the grain when they are all done, it will flow across the drawer fronts.

Here is a close view. I'll still sand and smooth, perhaps fill a few gaps here and there, and there are still the drawer pulls to put in place... but we are moving.... :mrgreen:
2.jpg
2.jpg (287.21 KiB) Viewed 1491 times
I should finish the installation of the fronts tomorrow, and move to the door and top.

THEN I will start the sanding and finishing of the entire project. :)
You can tell a lot about the character of a man...
by the way he treats those who can do nothing for him.

I don't look back at the things I can no longer do, I just look forward to the things I still can.

User avatar
PT7
Drover
Posts: 4889
Joined: Mon Mar 21, 2016 8:32 am
Location: The Show-Me State
United States of America

Re: The Armorer's ToolBox Project

Post by PT7 » Sat Aug 19, 2017 6:45 pm

Not only looking forward to the finished wood cabinet.....it will be fun to see photos of the drawers all filled with your tools, too! Lookin' to be a great & handy storage box!!

~Пока~

User avatar
BrokenolMarine
Ranch Foreman
Posts: 7494
Joined: Sat Nov 26, 2016 8:28 am
Location: South Central Oklahoma in the mountains
United States of America

Re: The Armorer's ToolBox Project

Post by BrokenolMarine » Sun Aug 20, 2017 11:25 am

Sunday Morning...

Miss Tina had to get up at Four AM and drive a friend to the Airport... 90 minutes away. Her husband had to work. I saw her off and then couldn't go back to bed. Made coffee and read a couple hours of the First Virgil Flowers Novel, starting that series over. Finished all the Lucas Davenports, including the newest. "Golden Prey."

Got out into the shop once Miss T made it home and got back to work on the drawer fronts.
Got about half done, then ran out of the first panel of walnut. Had to do some more stabilizing on the second panel, and my back and knees needed a break anyway. Here is where we are, you can really see the grain across the drawer fronts now. :)
1.jpg
1.jpg (305.38 KiB) Viewed 1481 times
Although I had Glued the knot area on the first panel, when I cut thru, it broken in half right at the knot. :twisted: However, since the fronts are GLUED to the solid drawer front panel, I cut both the broken sections to the right width, and glued them to the front of the drawer. I had also snapped one of the solid walnut drawer fronts early along, and did the same thing. During finishing, I'll be able to hide the crack lines, unless you know where to look, you'll never know. :roll:

Plus, it will be MY working tool chest and I'll take pride in the appearance, but not going to worry about the MINOR flaws. ;)

Here is the repair on the second panel. This is the second treatment. I may do several more, hoping to avoid the Pain in the Buttocks of having to deal with the cracked sections later.
2.jpg
2.jpg (223.33 KiB) Viewed 1481 times
Here is a hint what the drawer fronts may look like in the end. Due to the 1/8 inch each pass across the table saw takes from the wood, I think we'll come up about an inch short, maybe more. :( No matter, I'll use a strip from another panel and make allowances in the door or top stiles and rails.
8-)
3.jpg
3.jpg (299.84 KiB) Viewed 1481 times
Getting close. :P
You can tell a lot about the character of a man...
by the way he treats those who can do nothing for him.

I don't look back at the things I can no longer do, I just look forward to the things I still can.

Post Reply