Site seems to be OK. Load issue should be resolved now.

Henry Gun Case Project

Sit back and talk with friends. Same rules as before. Rule #1-Relax with friends on the front or back porch.
Rule #2-No Politics, religion or anything above a G level.
User avatar
BrokenolMarine
Ranch Foreman
Posts: 7480
Joined: Sat Nov 26, 2016 8:28 am
Location: South Central Oklahoma in the mountains
United States of America

Re: Henry Gun Case Project

Post by BrokenolMarine » Wed Jul 26, 2017 4:48 pm

Back in the shop several times today, finished up the final filling of the small details, then used a Nickel to draw the radius on each corner, after I used the small clamps to clamp the top and bottom of the case together. Carefully cutting a flat on the widest part of the radius, I then sanded the corners to round them off. One final pass over the entire case and ....
corners edges and stain.jpg
corners edges and stain.jpg (269.72 KiB) Viewed 1753 times
The stain is now soaking in and I'll wipe it down tomorrow. Then I'll wax it and let the wax haze a bit and buff it out by hand.
I'll fit the hinges and latches if I don't think it needs a second coat of wax.
After that, it's time to start on the interior.
The interior will be last, as I wanted to wait so I avoid as much sawdust as possible. 8-)
You can tell a lot about the character of a man...
by the way he treats those who can do nothing for him.

I don't look back at the things I can no longer do, I just look forward to the things I still can.

User avatar
BrokenolMarine
Ranch Foreman
Posts: 7480
Joined: Sat Nov 26, 2016 8:28 am
Location: South Central Oklahoma in the mountains
United States of America

Re: Henry Gun Case Project

Post by BrokenolMarine » Fri Jul 28, 2017 9:19 pm

Went out this morning and waxed the case. :P She is looking good. Then I went out to the wood shed and found the hard foam that the boss told me she stuck out there. Measured and marked the foam and ran it thru the bandsaw to get the width correct, than a pass across to get the length right. I ended up with a 5" thick piece that fit. :lol:
2.jpg
2.jpg (300.95 KiB) Viewed 1732 times
The next step was to measure the depth of the top. Meh... 3/4" or so. I marked that on the side of the block of foam and ran 'er through the bandsaw... she fit the top very well.
1.jpg
1.jpg (322.62 KiB) Viewed 1732 times
I laid the Big Boy Carbine on top of the top, so I could measure the thickness of the rifle, and see how much of a base I would be allowed in the bottom, and how thick the secondary foam would be. :? :roll: ;) Calculations... Bottom needed to be 1/4" and the rest of the thickness would be for the insert for the rifle. The top will come down and secure the Carbine in it's slot when the case is on it's side in "carry" mode. 8-)

(Like I'll actually carry it around that much.... :) )
3.jpg
3.jpg (303.44 KiB) Viewed 1732 times

Made the appropriate cuts, then checked the fit. Yup, they fit. Outlined the Carbine once I decided where I wanted it. I cut out the slot for the rifle VERY carefully with a razor sharp exacto knife. Miss Tina says she will help cover the foam with the Burgandy Velvet. If I screwed it up, I have plenty of Foam, and can start over. NOTHING will be glued in place until it all fits just so.
5.jpg
5.jpg (309.17 KiB) Viewed 1732 times

By the way, here is a peek at the waxed box, another couple coats of wax will make 'er glow. I'll have time while Miss Tina works on the velvet
7.jpg
7.jpg (329.52 KiB) Viewed 1732 times
You can tell a lot about the character of a man...
by the way he treats those who can do nothing for him.

I don't look back at the things I can no longer do, I just look forward to the things I still can.

User avatar
RanchRoper
Forum Ambassador
Posts: 12958
Joined: Mon Mar 21, 2016 12:14 am
Location: Land of Shining Mountains, Alberta
Canada

Re: Henry Gun Case Project

Post by RanchRoper » Fri Jul 28, 2017 9:22 pm

Classy case for a classy rifle.

Pedersoli Frontier Flintlock .50
Kibler Colonial Flintlock .50

Ohkínohkomit - Shoot skillfully

User avatar
BrokenolMarine
Ranch Foreman
Posts: 7480
Joined: Sat Nov 26, 2016 8:28 am
Location: South Central Oklahoma in the mountains
United States of America

Re: Henry Gun Case Project

Post by BrokenolMarine » Fri Jul 28, 2017 9:26 pm

I have brass piano hinges, brass latches, and a leather trunk handle. Classy, yes?
You can tell a lot about the character of a man...
by the way he treats those who can do nothing for him.

I don't look back at the things I can no longer do, I just look forward to the things I still can.

User avatar
BrokenolMarine
Ranch Foreman
Posts: 7480
Joined: Sat Nov 26, 2016 8:28 am
Location: South Central Oklahoma in the mountains
United States of America

Re: Henry Gun Case Project

Post by BrokenolMarine » Sat Jul 29, 2017 6:58 pm

While Tina worked on the inserts I was working on the hardware installation. First up was the Piano Hinge for the rear of the case. Gather the tools. :) The right tools can make the job so much easier. I used a centering punch, a small brass mallet, cordless drill and pilot bit and a proper screwdriver. Note the magnetic tool tray. It works with the brass "plated" screws.
1.jpg
1.jpg (324.7 KiB) Viewed 1715 times
I held the hinge in place with a light clamp pressure until it was screwed in place. Careful measurements don't matter if the clamp shifts after the first few screws go in and the hinge ends up crooked. :evil:
2.jpg
2.jpg (293.09 KiB) Viewed 1715 times
Once the hinge was in place on the bottom half of the case, I aligned the top half, clamped that in place, and worked my way from left to right, insuring the hinge stayed aligned from one end to the other. Each screw was snugged. Never want to overtighten the small screws. Shear off a head and you have a tough error to correct.
4.jpg
4.jpg (340.51 KiB) Viewed 1715 times
Now that the hinge is installed, time to lay out the front.
5.jpg
5.jpg (279.9 KiB) Viewed 1715 times
Have the latches and the nice leather handle to install. Carefully position each one, then try them for function. Ah... latches will work. Install them.
6.jpg
6.jpg (334.07 KiB) Viewed 1715 times
Hmmm, testing the nice leather handle... :roll: ... it's not going to work. It's too short in length to open up enough. It looks great, but function wise, it's too small for larger hands, and with the weight the case will contain... :evil: It's just not going to get the job done. I'll save it and use it has a handle for a nice custom box. I will order a larger more appropriate handle. Should just take a day or three. Give me time to redo the bottom foam. Testing of the foam pads has proven that the lower foam is just a tad too thick. I'll redo that one and leave a little room for the box to close.
:lol: Closing is always a good thing.

I stated early on...
... that this was a learning process. 8-)
You can tell a lot about the character of a man...
by the way he treats those who can do nothing for him.

I don't look back at the things I can no longer do, I just look forward to the things I still can.

User avatar
BrokenolMarine
Ranch Foreman
Posts: 7480
Joined: Sat Nov 26, 2016 8:28 am
Location: South Central Oklahoma in the mountains
United States of America

Re: Henry Gun Case Project

Post by BrokenolMarine » Tue Aug 01, 2017 10:55 am

I got out this morning and worked on a second try at the bottom of the gun case, and it's foam insert. This time I made sure the foam was JUST a hair below the edge of the rim of the lower half of the case, and rather than try and trim a piece off the bottom of the foam, I cut out the whole outline, then cut a portion of the removed section to pad the back half of the rifle and fitted it back in, then a thicker portion of the barrel section of the rifle and fitted it back. Excellent.
new bottom layer.jpg
new bottom layer.jpg (277.63 KiB) Viewed 1697 times
I cut another section of blue foam, then cut it to width and length and fit it in the bottom, drew around the edge of the rim, and then cut JUST below the line to make it the right height. Rather than use the old piece as a template for cutting out the form for the rifle, I redrew the form after deciding just the right placement. (again... :roll: )

I took my time, and tried to make the cuts as smooth as possible. This will make the velvet fit better than if I had just hacked away the foam and hoped for the velvet to cover my half hearted attempts. :? As you can see, the Big Boy lays in the slot pretty well. Now it's just a matter of getting the Deep Burgandy Velvet to look good laying over the foam insert, to look like someone who had a clue put the package together. :lol:
cut to fit.jpg
cut to fit.jpg (335.45 KiB) Viewed 1699 times
We are ALMOST there. I'm excited... are you?
You can tell a lot about the character of a man...
by the way he treats those who can do nothing for him.

I don't look back at the things I can no longer do, I just look forward to the things I still can.

User avatar
BrokenolMarine
Ranch Foreman
Posts: 7480
Joined: Sat Nov 26, 2016 8:28 am
Location: South Central Oklahoma in the mountains
United States of America

Re: Henry Gun Case Project

Post by BrokenolMarine » Tue Aug 01, 2017 10:59 am

I edited the photos, the first one looked all crunched up and stubby, so I swapped it out for a proper pic....
It looks better now. Sorry.

BOM
You can tell a lot about the character of a man...
by the way he treats those who can do nothing for him.

I don't look back at the things I can no longer do, I just look forward to the things I still can.

User avatar
RanchRoper
Forum Ambassador
Posts: 12958
Joined: Mon Mar 21, 2016 12:14 am
Location: Land of Shining Mountains, Alberta
Canada

Re: Henry Gun Case Project

Post by RanchRoper » Tue Aug 01, 2017 12:54 pm

Looks great.

Pedersoli Frontier Flintlock .50
Kibler Colonial Flintlock .50

Ohkínohkomit - Shoot skillfully

User avatar
BrokenolMarine
Ranch Foreman
Posts: 7480
Joined: Sat Nov 26, 2016 8:28 am
Location: South Central Oklahoma in the mountains
United States of America

It's Finished...

Post by BrokenolMarine » Tue Aug 01, 2017 4:34 pm

Yup! It's Finished! :lol:

Worked again this afternoon with the Burgundy Velvet the wife found for me... and the case is lined.
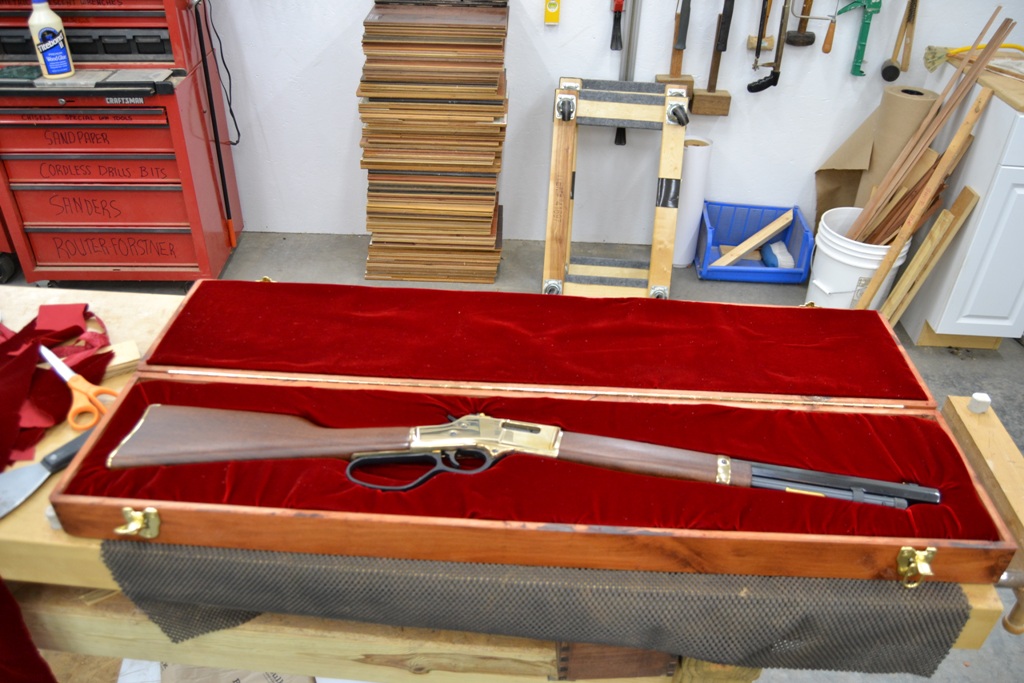
It's done.jpg
It's done.jpg (256.36 KiB) Viewed 1684 times
The Big Boy Carbine 357 fits nicely in it's slot but is flush with the top of the bottom half of the case.
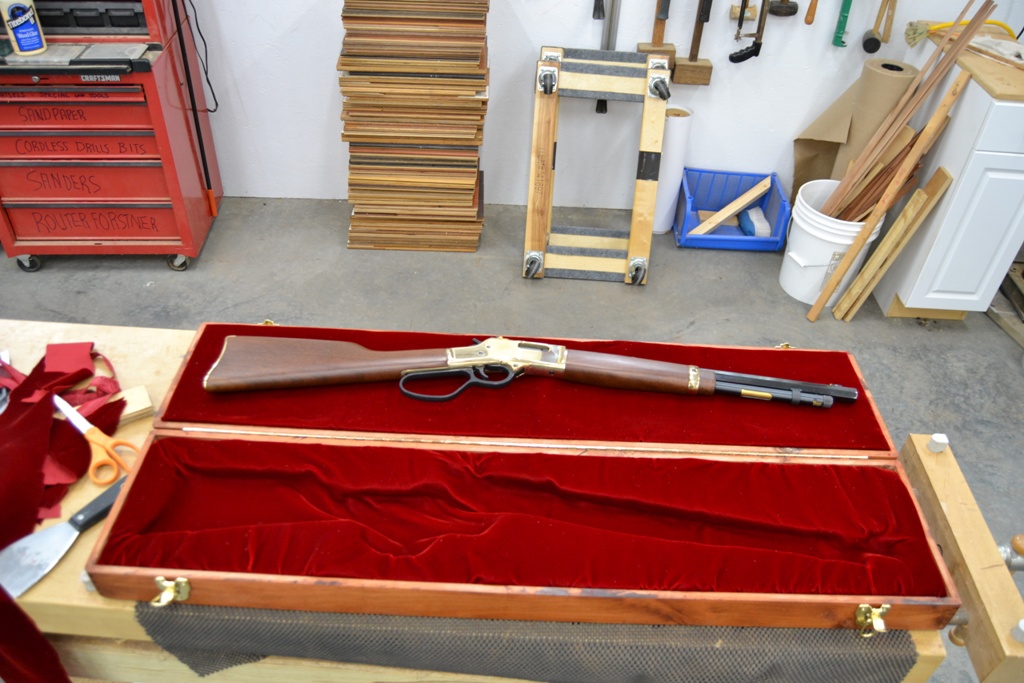
lined with burgandy.jpg
lined with burgandy.jpg (272.37 KiB) Viewed 1684 times
It's nest is padded underneath to protect the Carbine, and the lid closing down pinches it just enough so it doesn't move. No movement means the Skinner Sights won't get banged up. Yes, it does close right up, and you can "feel" the pressure in the last little bit.
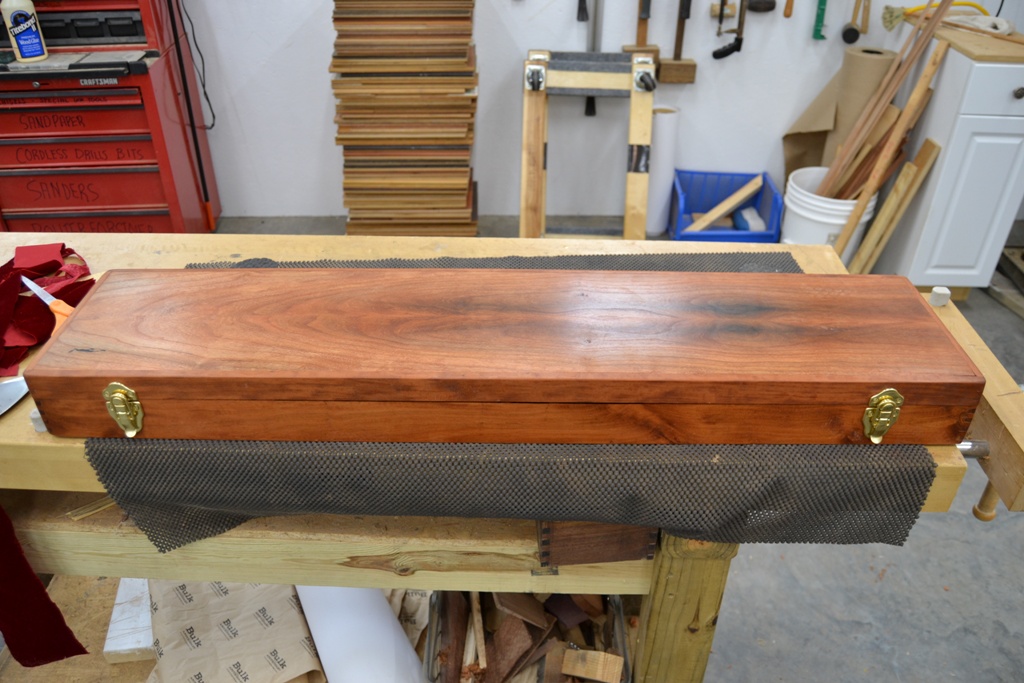
and it closes.jpg
and it closes.jpg (271.47 KiB) Viewed 1684 times
The only question now is...
"What will I do with it now that I am done?" :roll:

I know that I won't actually use it. I don't use cases very often, and I have a couple hard plastic cases and a couple soft cases to bang around if I need them. I certainly wouldn't bang THIS dang thing around... not after all THAT work. :lol: I have an idea where it could end up... 8-) But... if someone has a great idea ... let me know... ;)

When I look at the case, it turned out much better than I expected, but I still see a few flaws. But I see them in EVERY single project I complete.
Every one. I can't help myself. I know how to avoid them in the next case if I was to build one. But... the results answered my question. Yes, I CAN build one. :)

A few notes:

The inserts are held in place by pressure and they can be removed if need be. If I decided later to change the case to fit another gun, wanted to replace the Velvet, or needed to make an adjustment or repair... :roll:

The finish is Watco Cherry Oil Stain followed by about FOUR coats of BeesWax buffed to a satin shine. If it dulls, you just wax 'er again. Dent it, you repair the dent, add a touch of the Watco Oil Stain to match, and then wax and buff to match. Easy Peasy. I did NOT add the handle after all, since I look at this as more of a presentation case... but the handle COULD still be added. It would be another $30 to $60 to do so. :o Yup, quality is expensive.

I enjoyed the build, I hope ya'll enjoyed watching. My next build will be the gunsmith's tool chest for my desk. I don't guess ya'll have to watch "everything" I build. ;)
You can tell a lot about the character of a man...
by the way he treats those who can do nothing for him.

I don't look back at the things I can no longer do, I just look forward to the things I still can.

User avatar
CT_Shooter
Administrator emeritus
Posts: 5768
Joined: Mon Mar 21, 2016 8:42 am
Location: Connecticut
United States of America

Re: Henry Gun Case Project

Post by CT_Shooter » Tue Aug 01, 2017 4:45 pm

Awesome! What a beautiful job. Thanks so much for the descriptions, the photos, and the tips and tricks. It's a GREAT contribution. 8-)
H006M BBB .357 - H001 Classic .22LR - Uberti/Taylors & Co. SmokeWagon .357 5.5" - Uberti/Taylors & Co. RanchHand .22LR 5.5" - Colt King Cobra Carry 2" - Colt Official Police 38spl 4"

User avatar
BrokenolMarine
Ranch Foreman
Posts: 7480
Joined: Sat Nov 26, 2016 8:28 am
Location: South Central Oklahoma in the mountains
United States of America

Re: Henry Gun Case Project

Post by BrokenolMarine » Tue Aug 01, 2017 4:47 pm

Thanks CT, I have enjoyed sharing, even my "learning opportunities." :oops:
You can tell a lot about the character of a man...
by the way he treats those who can do nothing for him.

I don't look back at the things I can no longer do, I just look forward to the things I still can.

User avatar
JEBar
Town Marshal / Deputy Admin
Posts: 20433
Joined: Sun Mar 20, 2016 10:58 pm
Location: central NC
United States of America

Re: Henry Gun Case Project

Post by JEBar » Tue Aug 01, 2017 4:51 pm

nicely done, nicely done indeed .... questions : do you plan to add a handle ? .... any thought to a glass insert in the lid .... it would make a dandy display case

User avatar
BrokenolMarine
Ranch Foreman
Posts: 7480
Joined: Sat Nov 26, 2016 8:28 am
Location: South Central Oklahoma in the mountains
United States of America

Re: Henry Gun Case Project

Post by BrokenolMarine » Tue Aug 01, 2017 5:52 pm

JEBar,

I noted in the very last paragraph that I could add a handle later... but don't plan to right now. The handles I would consider run anywhere from $30 to $60 with shipping. (Leather and Brass) Quality isn't cheap. As for a glass insert... :shock: OMG... bite your tongue. :P I spent hours on end book matching the grain in the top to show it off. If I decided to make a glass top display case, I would make a separate display case for that. ;) I love the interplay of grains and work hard to show them at their best...

I hope folks appreciate the bookmatched top and bottom in this build 8-)
You can tell a lot about the character of a man...
by the way he treats those who can do nothing for him.

I don't look back at the things I can no longer do, I just look forward to the things I still can.

snell

Re: Henry Gun Case Project

Post by snell » Thu Aug 10, 2017 11:59 am

Amazing, I love to see a true craftsman work. Thanks for sharing the project.

User avatar
daytime dave
Administrator / Owner
Posts: 5969
Joined: Sun Mar 20, 2016 10:27 pm
Location: Upstate NY
United States of America

Re: Henry Gun Case Project

Post by daytime dave » Fri Aug 18, 2017 8:08 am

That is a beautiful case. A small engraved brass plaque and it would be the presentation case for whatever rifle you had in there.

I really enjoyed reading this thread with it's bountiful photographs and great descriptions. I'm looking forward to the tool chest.

Very nice work.
Some days I'm Andy, most days I'm Barney........
Eaglescout, NRA Life Endowment member, BCCI Life Member

User avatar
BrokenolMarine
Ranch Foreman
Posts: 7480
Joined: Sat Nov 26, 2016 8:28 am
Location: South Central Oklahoma in the mountains
United States of America

Re: Henry Gun Case Project

Post by BrokenolMarine » Fri Aug 18, 2017 9:18 am

Thank you sir. As you may have seen, the tool chest project is progressing nicely. These things are always somewhat seat of the pants. I decide WHAT I want and start with a rough sketch from measurements. I usually end up thinking about the design over the next day or two and making changes to the design in a final plan drawn to scale. I work pretty much from the drawing, but adapt as problems... ah... challenges... crop up. :roll:

The tool chest, as in the gun case, has been no exception. :D

I just haven't gone into as much detail in my posts with the chest project, not sure of the true level of interest. ;)
I don't mind sharing, as long as there are those who want to watch. :P I'll be working in the shop anyway, and take the pics for my records of each project.

The boss has told me my very next project...
Will be..
A V-Framed bee hive for the back yard. :shock:
You can tell a lot about the character of a man...
by the way he treats those who can do nothing for him.

I don't look back at the things I can no longer do, I just look forward to the things I still can.

User avatar
CT_Shooter
Administrator emeritus
Posts: 5768
Joined: Mon Mar 21, 2016 8:42 am
Location: Connecticut
United States of America

Re: Henry Gun Case Project

Post by CT_Shooter » Fri Aug 18, 2017 10:22 am

BrokenolMarine wrote:...I just haven't gone into as much detail in my posts with the chest project, not sure of the true level of interest. ;)
I don't mind sharing, as long as there are those who want to watch...
I totally enjoy your woodworking threads and really hope you keep posting them.

BrokenolMarine wrote: The boss has told me my very next project...
Will be...A V-Framed bee hive for the back yard.
I built a top bar hive five years ago using plans designed by P.J. Chandler, the British "Barefoot Beekeeper". Sadly, my hive has been dormant for the last two years after the bees all died from a suspected pesticide (the whole hive was wiped out in just a few days in the early autumn). I decided to try again this year. So far, they're doing great.

This is the first 3 lb package (10,000 Honeybees and a mated queen) that I installed in April of 2012.
Top Bar Beehive and 10,000 bees.
Top Bar Hive and Honeybees.jpg (85.46 KiB) Viewed 2001 times
H006M BBB .357 - H001 Classic .22LR - Uberti/Taylors & Co. SmokeWagon .357 5.5" - Uberti/Taylors & Co. RanchHand .22LR 5.5" - Colt King Cobra Carry 2" - Colt Official Police 38spl 4"

User avatar
BrokenolMarine
Ranch Foreman
Posts: 7480
Joined: Sat Nov 26, 2016 8:28 am
Location: South Central Oklahoma in the mountains
United States of America

Re: Henry Gun Case Project

Post by BrokenolMarine » Fri Aug 18, 2017 11:27 am

Thanks for the compliment, and the input.

The "Boss" has started reading UP on beekeeping once I told her she would have to BUY bees. She sadly thought that building a hive, it would just fill up. ;) I told her that the way I understood it, without her own Queen, it would be a sad, empty box... she would stare at. :lol: The honey bees she sees flying around would return to THEIR queen.

Probably dirt daubers and hornets would move in. :o One of her online buddies raises bees and told her that once she really decided to do it... she needed to place an order for bees well in advance, and she could get them from HIS source.. very reliable.. not too expensive.. yadda yadda yadda. She told me there was no rush, I could finish my two projects.

This morning she asked me if her HIVE could be the next on the list. No problem, I just like to stay busy. I should finish the tool chest in the next week to ten days and get it on the bench and in use. The box was something she had tried to BUY me for birthdays, Christmas, Father's Day, etc. But I told her I didn't want a knock off cheapo one, and we didn't need to spend the money on a GOOD one. :lol:

Doing the Trigger job on the two Snubbies, I decided I wanted to better organize my tools I I wasn't digging thru the four or five LARGE drawers I have the tools in.... ;) The fifteen drawers in the new box will do a good job of organizing everything, plus the bonus chest in the top and the cleaning rod closet. :P
You can tell a lot about the character of a man...
by the way he treats those who can do nothing for him.

I don't look back at the things I can no longer do, I just look forward to the things I still can.

User avatar
RanchRoper
Forum Ambassador
Posts: 12958
Joined: Mon Mar 21, 2016 12:14 am
Location: Land of Shining Mountains, Alberta
Canada

Re: Henry Gun Case Project

Post by RanchRoper » Fri Aug 18, 2017 11:37 am

The Henry case is beautiful. Maybe HRA would buy it from you to use in a promotion or charity prize.

Pedersoli Frontier Flintlock .50
Kibler Colonial Flintlock .50

Ohkínohkomit - Shoot skillfully

User avatar
BrokenolMarine
Ranch Foreman
Posts: 7480
Joined: Sat Nov 26, 2016 8:28 am
Location: South Central Oklahoma in the mountains
United States of America

Re: Henry Gun Case Project

Post by BrokenolMarine » Mon Aug 31, 2020 9:58 pm

I got distracted by the tool chest build, and didn't get back to this until now, when I posted a link to share with a new member. I missed your suggestion RR. It seems great minds think along similar paths. I offered to donate the case to Henry if they were going to donate a carbine to charity, but they said it didn't fit their plans at that time. :roll: I still have it, take it out and share it now and then. She still looks good to me. :D
You can tell a lot about the character of a man...
by the way he treats those who can do nothing for him.

I don't look back at the things I can no longer do, I just look forward to the things I still can.

Post Reply