Site seems to be OK. Load issue should be resolved now.
Henry Gun Case Project
- BrokenolMarine
- Ranch Foreman
- Posts: 7480
- Joined: Sat Nov 26, 2016 8:28 am
- Location: South Central Oklahoma in the mountains

Re: Henry Gun Case Project
Got out in the woodshop this afternoon for a bit, and got some work in on the rough wood. Got a good start on the project this way, you have to get a start somewhere, and this was it. The first step was to get that one slab squared up. I used the lines of the grain to decide where to mark the wood, and where to trim off the bark coated edges. Marked the lines for the cuts and got it ready for the run thru the bandsaw.
Once the piece was marked and ready, it was time to run it across the bandsaw setup. The large dust collector helps keep the shop a little cleaner and the sawdust out of both the eyes and the lungs.
A pass down one side then the other, and we are golden.
Once that slab was trimmed to the rough size, it was time to set up the planer. Then all three of the boards would make their trips through. This would even them up, take off the roughness, and give me a look at their grain, and remove the water damage from their storage in the tidewater barn.
It's amazing how a board can take your breath away when you see it come out the other side of the planer after a couple passes. That slab I thought might be walnut, turns out to be ... I'm pretty sure, curly cherry.
The other Curly Cherry board was just as nice after it was cleaned up.
Last of all, the black walnut, that I intend to use for the sides of the case. Sure looks different than the rough board doesn't it?
After ninety minutes in the shop, I had to stop for a while, but I got a lot accomplished. Now I have a decision to make. Do I bookmatch that Slab of Curly Cherry and use the two pieces to make the top and bottom of the Gun Case, since the grain is so attractive and at 3/4" it's too thick to be used solo as one panel? Or, do I cut both pieces down to 1/2" and make nice thick top and bottoms for the case, and go that route? I'm not going to rush. I still don't know exactly what method I plan to use for attaching the bottom and top to the sides, and what handle type I want to use. Flying blind here guys. I usually fly blind on MOST projects since I do very little contracted work. That's the freedom of it all.

You can tell a lot about the character of a man...
by the way he treats those who can do nothing for him.
I don't look back at the things I can no longer do, I just look forward to the things I still can.
by the way he treats those who can do nothing for him.
I don't look back at the things I can no longer do, I just look forward to the things I still can.
- BrokenolMarine
- Ranch Foreman
- Posts: 7480
- Joined: Sat Nov 26, 2016 8:28 am
- Location: South Central Oklahoma in the mountains

Re: Henry Gun Case Project
Slipped out to the woodshop after thinking about the project overnight. I decided to try and bookmatch the slab and use the sections for the top and bottom of the guncase. First I set up the tablesaw for the guide cut on the lower and upper edge of the trimmed slab. This would help keep the bandsaw from wandering and ruining the slab.
Using a trimmed off piece of the curly cherry slab I tested my theory and it worked great! Of course the test piece was only 3" tall. The slab on it's side it nearly 12" tall at the long end.
Time to make the cut. I hold my breath and start...
The band saw blade binds and the shop starts to fill with smoke. I DON'T love the smell of Cherry Smoke in the morning.
The blade, in spite of the guiding cuts, has wandered in the first six or eight inches of the cut. Time for the thinking chair and a soda.
Rip... that's what I'll do. I'll rip the board, then bookmatch the individual halves and use THOSE as the top and bottom.
I mark the center as close as I can get, rip it down on the band saw, and then with a six in tall piece, rather than a 12 inch tall piece to run, it cuts smoothly without setting the shop on fire.
That old rule comes to mind. "It's not a mistake until you can't fix it."
So, unless down the road I find I can't fix this, this was a "Learning Experience." If I can't use these on the Gun Case...
I was making side for small boxes all along.
For now... here is a peek at the ROUGH top and bottom.. there is still a lot of smoothing, shaping and such to do, but it gives you an idea what the grain pattern would be IF I can fix the mis... ah, Learning Experience.
The potential Bookmatched Top, if it decides to cooperate and fly right. The applicant for the position of Bookmatched Gun Case Bottom. The resume looks good, but I have to check out references. I'll keep you posted as I go. Corrections my take some passes thru the planer, but since the inside will be covered in Red Velvet to pad the Big Boy Carbine and give 'er some class, no matter. Comments on the grain are appreciated. There is still the untouched curly cherry board on the bench.
A good officer always has a backup.
Using a trimmed off piece of the curly cherry slab I tested my theory and it worked great! Of course the test piece was only 3" tall. The slab on it's side it nearly 12" tall at the long end.
The blade, in spite of the guiding cuts, has wandered in the first six or eight inches of the cut. Time for the thinking chair and a soda.
Rip... that's what I'll do. I'll rip the board, then bookmatch the individual halves and use THOSE as the top and bottom.
I mark the center as close as I can get, rip it down on the band saw, and then with a six in tall piece, rather than a 12 inch tall piece to run, it cuts smoothly without setting the shop on fire.
That old rule comes to mind. "It's not a mistake until you can't fix it."
So, unless down the road I find I can't fix this, this was a "Learning Experience." If I can't use these on the Gun Case...
I was making side for small boxes all along.
For now... here is a peek at the ROUGH top and bottom.. there is still a lot of smoothing, shaping and such to do, but it gives you an idea what the grain pattern would be IF I can fix the mis... ah, Learning Experience.
The potential Bookmatched Top, if it decides to cooperate and fly right. The applicant for the position of Bookmatched Gun Case Bottom. The resume looks good, but I have to check out references. I'll keep you posted as I go. Corrections my take some passes thru the planer, but since the inside will be covered in Red Velvet to pad the Big Boy Carbine and give 'er some class, no matter. Comments on the grain are appreciated. There is still the untouched curly cherry board on the bench.
You can tell a lot about the character of a man...
by the way he treats those who can do nothing for him.
I don't look back at the things I can no longer do, I just look forward to the things I still can.
by the way he treats those who can do nothing for him.
I don't look back at the things I can no longer do, I just look forward to the things I still can.
Re: Henry Gun Case Project
I will admit the walnut looks great. But I like the cherry idea and it has some nice grain in it. When it is finished it will look awesome I think. Al
Don't let the old man in
H001T .22LR
H001T .22LR MONUMENT VALLEY
H003T PUMP .22LR
BBS .41 MAG
SS .357
SIDE GATE 38-55
H001T .22LR
H001T .22LR MONUMENT VALLEY
H003T PUMP .22LR
BBS .41 MAG
SS .357
SIDE GATE 38-55
- BrokenolMarine
- Ranch Foreman
- Posts: 7480
- Joined: Sat Nov 26, 2016 8:28 am
- Location: South Central Oklahoma in the mountains

Re: Henry Gun Case Project
There is still hope big al, I may screw up the cherry, and I have lots of walnut in the woodshed. At least the sides are planned black walnut for accent! 
You can tell a lot about the character of a man...
by the way he treats those who can do nothing for him.
I don't look back at the things I can no longer do, I just look forward to the things I still can.
by the way he treats those who can do nothing for him.
I don't look back at the things I can no longer do, I just look forward to the things I still can.
- RanchRoper
- Forum Ambassador
- Posts: 12958
- Joined: Mon Mar 21, 2016 12:14 am
- Location: Land of Shining Mountains, Alberta

Re: Henry Gun Case Project
Man, that's a nice shop and setup. I'm enjoying this thread. Thanks.
Kibler Colonial Flintlock .50
Ohkínohkomit - Shoot skillfully
- BrokenolMarine
- Ranch Foreman
- Posts: 7480
- Joined: Sat Nov 26, 2016 8:28 am
- Location: South Central Oklahoma in the mountains

Re: Henry Gun Case Project
Thanks Ranch Roper.
The shop is fairly new, and a blessing. The contents are a life's work. Been collecting and building it since before I left the Corps. When there were difficult times, hard periods, or times of stress, I could go into whatever workshop I had and lose myself in a project, the smells of the wood, the whispers of the plane across the woods, and the surprise in the eyes of the folks who were on the far ends of the journey.
When I fell in September, the small shop was no longer going to work. The chair wouldn't fit. Miss T set it up for our guy to build the big shop. She had wanted me to build one for years. Finally I had to give in, or give up. It's a gift that few realize it's impact.
The shop is fairly new, and a blessing. The contents are a life's work. Been collecting and building it since before I left the Corps. When there were difficult times, hard periods, or times of stress, I could go into whatever workshop I had and lose myself in a project, the smells of the wood, the whispers of the plane across the woods, and the surprise in the eyes of the folks who were on the far ends of the journey.
When I fell in September, the small shop was no longer going to work. The chair wouldn't fit. Miss T set it up for our guy to build the big shop. She had wanted me to build one for years. Finally I had to give in, or give up. It's a gift that few realize it's impact.
You can tell a lot about the character of a man...
by the way he treats those who can do nothing for him.
I don't look back at the things I can no longer do, I just look forward to the things I still can.
by the way he treats those who can do nothing for him.
I don't look back at the things I can no longer do, I just look forward to the things I still can.
- BrokenolMarine
- Ranch Foreman
- Posts: 7480
- Joined: Sat Nov 26, 2016 8:28 am
- Location: South Central Oklahoma in the mountains

Re: Henry Gun Case Project
Back at it this morning, started with the planer, as the bookmatched pieces needed to be matched in thickness, or at least close. There was a risk. As the pieces are made thinner, and the bookmatched pieces had some rough sections, there was a chance that the planer could crack or tear apart one of the pieces.
I was really pleased with the grain, and didn't want that to happen, and could have used them as is, hiding the rough underside behind the velvet lining, but chose to take the risk. Holding my breath, I ran them through until both the top and bottom pairs were close in thickness and looking good.
Whew, nothing broke, and nothing cracked. I was relieved.
Next came the jointing process. No matter how careful you are when you rip a piece of wood, unless you have a razor's edge, the center line won't be clean and then you get gaps when you bookmatch. It looks like this. The way to fix the gap is to draw a line down the board from top to bottom and cut very carefully,
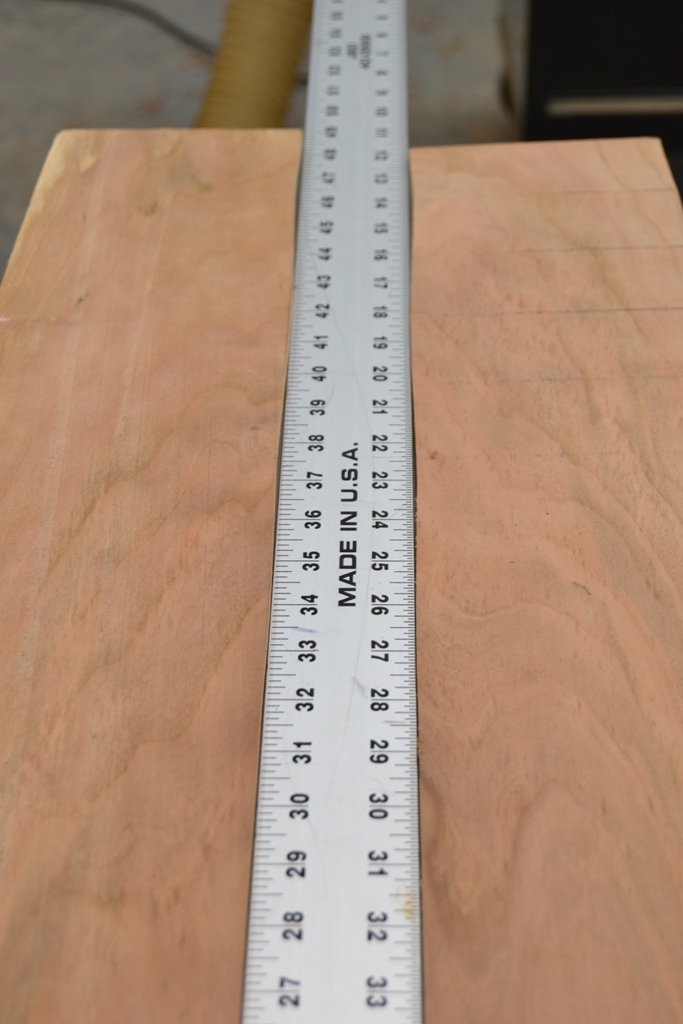
clamp it in the bench and hand plane for an hour or two and hope you can match it,
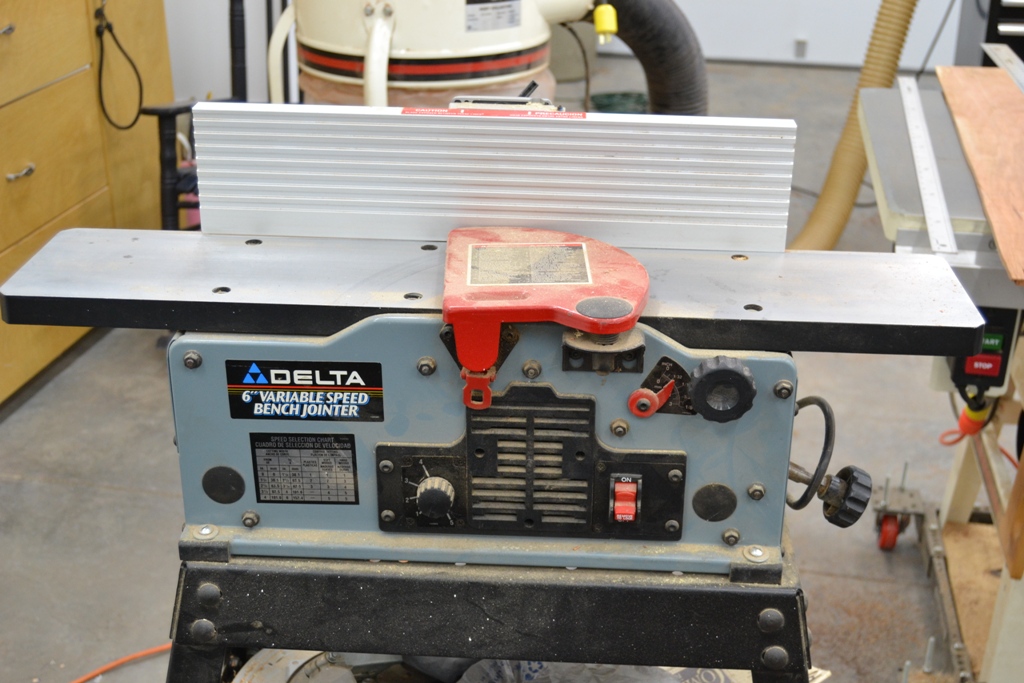
or you can use a power jointer, like this one.
I just happen to have one.
Use of the jointer prepares the faces of two pieces of wood to be joined, hence: Jointer. Making several passes, then checking the edge against the straight edge, takes time, but you want to remove just enough wood to get the edge true. The less wood you remove, the better the book match looks when you join the two halves together.
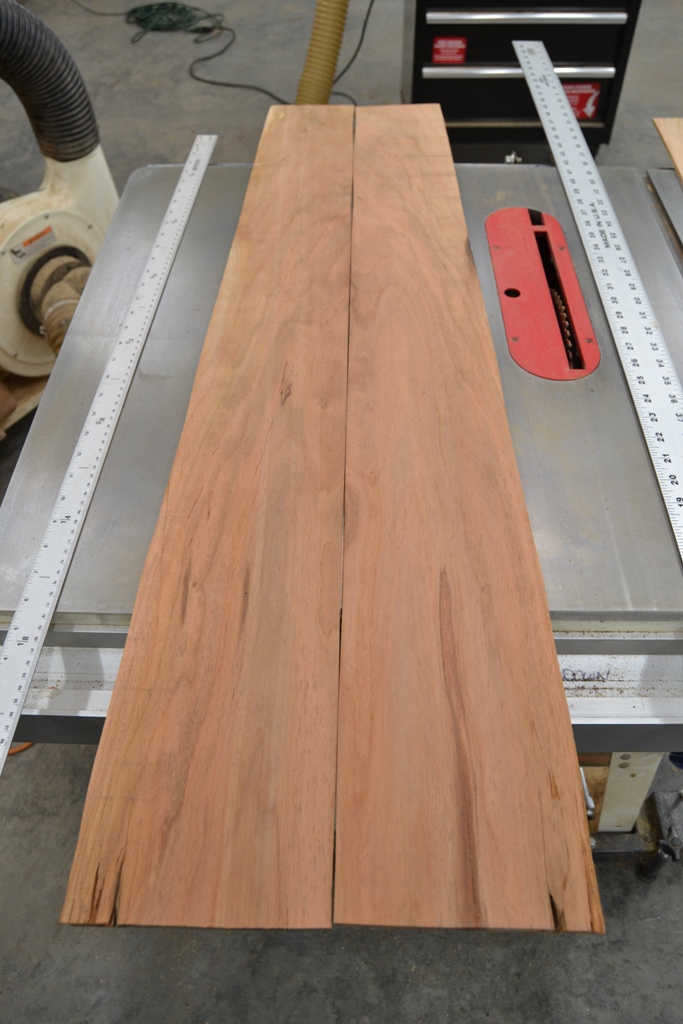
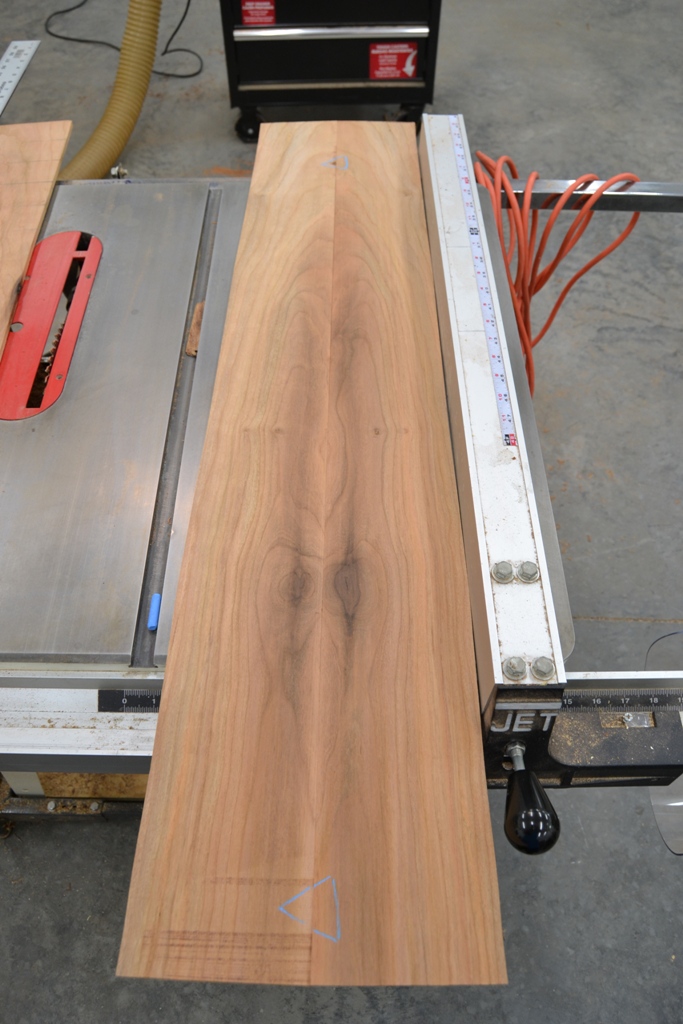
Here is the top of the guncase, if it works out...
... after being bookmatched and jointed.
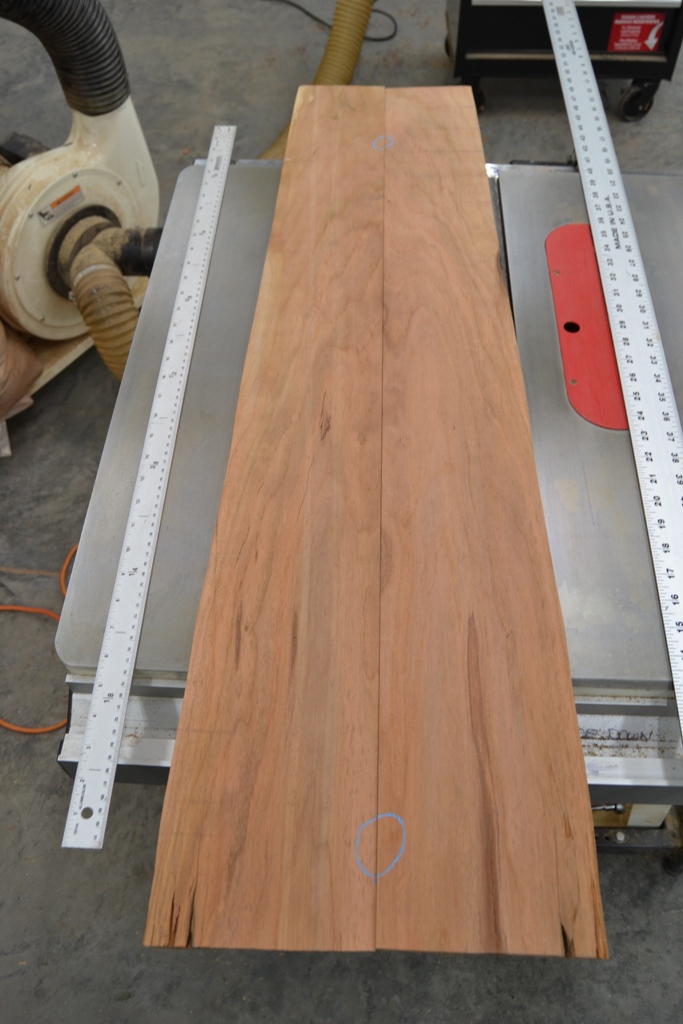
The bottom after the same treatment...
Remember, there are still a lot of steps to go before finish is applied, and these are rough shapes. The case will be about 8" by 39" and these pieces of wood are 9 to 10" at their narrowest, and about 48" long. In addition there is still a lot of final sanding and smoothing to be done. But, you can see the nice grain in the pics.
I worked with the walnut for the sides for a bit and there were some hidden cracks and faults that make me reconsider that piece. I have the other cherry and can use that making this a solid cherry case. I also have plenty of walnut in the wood storage building and will consider looking for another good piece of walnut. I like the idea of the dark walnut sides framing the cherry top and bottom and making them really pop. No rush on the project so this calls for time in the thinking chair, and I also want to think about whether or not to mount the cherry top and bottom on a backing. I am leaning that way to add strength, but not much weight. Anywho, thought you guys would like to see the bookmatched grains. I REALLY like the top.
Next came the jointing process. No matter how careful you are when you rip a piece of wood, unless you have a razor's edge, the center line won't be clean and then you get gaps when you bookmatch. It looks like this. The way to fix the gap is to draw a line down the board from top to bottom and cut very carefully,
clamp it in the bench and hand plane for an hour or two and hope you can match it,
or you can use a power jointer, like this one.
I just happen to have one.
Here is the top of the guncase, if it works out...
I worked with the walnut for the sides for a bit and there were some hidden cracks and faults that make me reconsider that piece. I have the other cherry and can use that making this a solid cherry case. I also have plenty of walnut in the wood storage building and will consider looking for another good piece of walnut. I like the idea of the dark walnut sides framing the cherry top and bottom and making them really pop. No rush on the project so this calls for time in the thinking chair, and I also want to think about whether or not to mount the cherry top and bottom on a backing. I am leaning that way to add strength, but not much weight. Anywho, thought you guys would like to see the bookmatched grains. I REALLY like the top.
You can tell a lot about the character of a man...
by the way he treats those who can do nothing for him.
I don't look back at the things I can no longer do, I just look forward to the things I still can.
by the way he treats those who can do nothing for him.
I don't look back at the things I can no longer do, I just look forward to the things I still can.
- BrokenolMarine
- Ranch Foreman
- Posts: 7480
- Joined: Sat Nov 26, 2016 8:28 am
- Location: South Central Oklahoma in the mountains

Re: Henry Gun Case Project
Got out in the shop again, and worked on the cherry piece for the sides. It was one inch thick and just over four and a half inches wide. First step was to rip it lengthwise, to just about two and a quarter inches and trim up the edges on both pieces. Turning them on edge with the fence set at a half inch and depth of cut the same, I ripped each board on both edges, raised the depth to one inch then ripped them again. Now I had both boards nearly bookmatched, held together by only a quarter inch strip down the middle. A pass for each thru the bandsaw took care of that, but left a seam.
Set up the planer, and all four three eighths pieces ran thru just enough times to clean up their faces. Didn't want to thin them out.
We are close to cutting side components to length, the creating box joints. I swapped blades on the table saw in prep for a practice run with the ibox jig. Pics to follow.
Set up the planer, and all four three eighths pieces ran thru just enough times to clean up their faces. Didn't want to thin them out.
We are close to cutting side components to length, the creating box joints. I swapped blades on the table saw in prep for a practice run with the ibox jig. Pics to follow.
You can tell a lot about the character of a man...
by the way he treats those who can do nothing for him.
I don't look back at the things I can no longer do, I just look forward to the things I still can.
by the way he treats those who can do nothing for him.
I don't look back at the things I can no longer do, I just look forward to the things I still can.
- daytime dave
- Administrator / Owner
- Posts: 5970
- Joined: Sun Mar 20, 2016 10:27 pm
- Location: Upstate NY

Re: Henry Gun Case Project
It is a special gift to have the mind's eye to "see it" before all of these previous and a few more steps.
This is a great thread and a very good read. Thanks for taking the time to document it as you are!
Some days I'm Andy, most days I'm Barney........
Eaglescout, NRA Life Endowment member, BCCI Life Member
- Sir Henry
- Administrator / Owner
- Posts: 14705
- Joined: Sun Mar 20, 2016 10:58 pm
- Location: Price County Wisconsin

Re: Henry Gun Case Project
I'm enjoying it too but don't have anything to add.RanchRoper wrote:Man, that's a nice shop and setup. I'm enjoying this thread. Thanks.
Hi, my name is Gene and I'm a Henryholic from Wisconsin.
Range Reporter: Henry Repeater
- BrokenolMarine
- Ranch Foreman
- Posts: 7480
- Joined: Sat Nov 26, 2016 8:28 am
- Location: South Central Oklahoma in the mountains

Re: Henry Gun Case Project
A productive morning. As promised, This post will have pictures.
First, here are the pictures of the Cherry sides after being worked over on the table saw, the band saw, and the planer. They are waiting for me to cut them to length and joint them for fitting using the ibox jig on the table saw. THAT requires setup and that's how I spent the morning.
The ibox setup is fairly easy if you use it regularly, but I don't. I use it for a couple weeks then put it away. When used properly, it makes beautiful joints, as you can see here....
The spalted maple and mahogany box was put together with the ibox jig...
The key is proper adjustment, and testing before you use good wood. Using some cutoffs from the junk box, I tested, and tested, and tested, until I got the setup correct. The depth of cut on the cutoffs wasn't important as that is determined by the setting on the table saw blade and is set just before you start the cut on your GOOD wood. The important setting is the setup of the ibox pins to the Box Dado blade. As you can see, the box joints themselves are nice and tight.
This took about six or seven attempts to get it where I was satisfied. I want this case to be just right.
Here is a look at the Ibox jig on the table saw, and the box joint dado blade. The special blade cuts a flat bottom cut in the wood, otherwise there would be a gap at the top of the joint. The blade is expensive but worth every penny. I keep it in it's case and put away when not in use. It only gets used with the Ibox.
My next time in the shop, I will be cutting the sides to length and running them across the Ibox to create the box joints, then dry fitting. Once that is done, I will be cutting the tops and bottoms to FIT the sides panels which I will have pre-cut to fit the sides. (The most difficult part about that is I am holding my breath the whole time... one slip... one goof... and I have to find more wood for the sides.
)
NOTHING will be glued or secured until the case has been dryfitted and everything works. Once the dry fit is successful, I'll order hardware, and once all the holes are drilled and any countersinks are cut, sanding has been completed, then the real assembly can begin. Final sanding and finish occurs just before all the hardware is attached. But that is still far ahead...
Unless I screw it up and have to start over in Maple, Walnut, or Some other Wood. Bwah Hah Hah.
The spalted maple and mahogany box was put together with the ibox jig...
The key is proper adjustment, and testing before you use good wood. Using some cutoffs from the junk box, I tested, and tested, and tested, until I got the setup correct. The depth of cut on the cutoffs wasn't important as that is determined by the setting on the table saw blade and is set just before you start the cut on your GOOD wood. The important setting is the setup of the ibox pins to the Box Dado blade. As you can see, the box joints themselves are nice and tight.
Here is a look at the Ibox jig on the table saw, and the box joint dado blade. The special blade cuts a flat bottom cut in the wood, otherwise there would be a gap at the top of the joint. The blade is expensive but worth every penny. I keep it in it's case and put away when not in use. It only gets used with the Ibox.
NOTHING will be glued or secured until the case has been dryfitted and everything works. Once the dry fit is successful, I'll order hardware, and once all the holes are drilled and any countersinks are cut, sanding has been completed, then the real assembly can begin. Final sanding and finish occurs just before all the hardware is attached. But that is still far ahead...
Unless I screw it up and have to start over in Maple, Walnut, or Some other Wood. Bwah Hah Hah.
You can tell a lot about the character of a man...
by the way he treats those who can do nothing for him.
I don't look back at the things I can no longer do, I just look forward to the things I still can.
by the way he treats those who can do nothing for him.
I don't look back at the things I can no longer do, I just look forward to the things I still can.
- Sir Henry
- Administrator / Owner
- Posts: 14705
- Joined: Sun Mar 20, 2016 10:58 pm
- Location: Price County Wisconsin

Re: Henry Gun Case Project
So the good wood will have the dove cut to the proper length or do you sand them down a lot?The key is proper adjustment, and testing before you use good wood. Using some cutoffs from the junk box, I tested, and tested, and tested, until I got the setup correct. The depth of cut on the cutoffs wasn't important as that is determined by the setting on the table saw blade and is set just before you start the cut on your GOOD wood. The important setting is the setup of the ibox pins to the Box Dado blade. As you can see, the box joints themselves are nice and tight.
Hi, my name is Gene and I'm a Henryholic from Wisconsin.
Range Reporter: Henry Repeater
- BrokenolMarine
- Ranch Foreman
- Posts: 7480
- Joined: Sat Nov 26, 2016 8:28 am
- Location: South Central Oklahoma in the mountains

Re: Henry Gun Case Project
Henry, you normally cut them just a bit proud, and then plane or sand them flat. Too long and they are liable to pull on the joint and crack the wood below "flush" when you try to even up the surface. If you goof up and make them too long, you can mark them, and disassemble the joint, then trim away the excess very carefully, but there is a chance of "breaking a tooth." Always a bummer.
You can tell a lot about the character of a man...
by the way he treats those who can do nothing for him.
I don't look back at the things I can no longer do, I just look forward to the things I still can.
by the way he treats those who can do nothing for him.
I don't look back at the things I can no longer do, I just look forward to the things I still can.
- BrokenolMarine
- Ranch Foreman
- Posts: 7480
- Joined: Sat Nov 26, 2016 8:28 am
- Location: South Central Oklahoma in the mountains

Re: Henry Gun Case Project
Diassemble and trim...
Another good reason not to glue til you are absolutely sure you are in the very final stages of the project and don't have to fix something (else.)
You can tell a lot about the character of a man...
by the way he treats those who can do nothing for him.
I don't look back at the things I can no longer do, I just look forward to the things I still can.
by the way he treats those who can do nothing for him.
I don't look back at the things I can no longer do, I just look forward to the things I still can.
- BrokenolMarine
- Ranch Foreman
- Posts: 7480
- Joined: Sat Nov 26, 2016 8:28 am
- Location: South Central Oklahoma in the mountains

Re: Henry Gun Case Project
After setting up the Ibox Jig yesterday and running some scrap thru for practice passes, I went out this morning and, (Gasp), holding my breath, I cut the two pieces I selected based on the beauty of the grain for the Bottom of the case... to length. Then, I clamped the first one in the Ibox and started my careful passes.
With a long piece like this, you must carefully replace the piece over the pins after every pass, then reclamp the board in place before the next pass. It must be SQUARE to the jig, and NOT wobble. Movement... any movement, will ruin the joint.
I had two long sides and two short sides and each and every pass was carefully done. I must have done something right because the bottom turned out fine. I didn't have to chastise myself and start over.
(Ah, yet.
Still a long way to go.)
The corners look decent, even rough. Once the finishing is done, and all the touchup, sanding, stain and finish is applied, and the grain is popping, it should look okay.
After a break for lunch and to rest the aching knees, and other parts that are cursing me....
I have to repeat the whole process to do the frame for the top, then cut the backing for the sides to fit, and then... cut the sides to fit their backing.
Getting close!
What? The blue chalk lines are required reference lines so that the boards face the correct direction IN the Ibox Jig and so I know which sides are the "Show" sides I have chosen to expose for the case. Chalk works much better than pencil.
I had two long sides and two short sides and each and every pass was carefully done. I must have done something right because the bottom turned out fine. I didn't have to chastise myself and start over.
I have to repeat the whole process to do the frame for the top, then cut the backing for the sides to fit, and then... cut the sides to fit their backing.
Getting close!
What? The blue chalk lines are required reference lines so that the boards face the correct direction IN the Ibox Jig and so I know which sides are the "Show" sides I have chosen to expose for the case. Chalk works much better than pencil.
You can tell a lot about the character of a man...
by the way he treats those who can do nothing for him.
I don't look back at the things I can no longer do, I just look forward to the things I still can.
by the way he treats those who can do nothing for him.
I don't look back at the things I can no longer do, I just look forward to the things I still can.
- BrokenolMarine
- Ranch Foreman
- Posts: 7480
- Joined: Sat Nov 26, 2016 8:28 am
- Location: South Central Oklahoma in the mountains

Re: Henry Gun Case Project
Before assembling the bottom and top frame components, one of the things I would do is stabilize any knots that are features in the grain. I do this using a product I have had great success with in the past.
http://www.caglue.com/HST-4-bSuper-T-2o ... _p_16.html
This glue dries clear and can be sanded smooth. It looks like a glass insert. If need be, you can build up layers, until gaps are filled. I had a knot crack and a piece fall out, so I filled the gap last night. When I checked this morning the glue had failed to cure. DOH!
It's about three years old. I ordered two tubes from amazon... and I will clean out the gap and try again with new stuff. Can't get mad, learn and keep movin forward... sigh.
http://www.caglue.com/HST-4-bSuper-T-2o ... _p_16.html
This glue dries clear and can be sanded smooth. It looks like a glass insert. If need be, you can build up layers, until gaps are filled. I had a knot crack and a piece fall out, so I filled the gap last night. When I checked this morning the glue had failed to cure. DOH!
It's about three years old. I ordered two tubes from amazon... and I will clean out the gap and try again with new stuff. Can't get mad, learn and keep movin forward... sigh.
You can tell a lot about the character of a man...
by the way he treats those who can do nothing for him.
I don't look back at the things I can no longer do, I just look forward to the things I still can.
by the way he treats those who can do nothing for him.
I don't look back at the things I can no longer do, I just look forward to the things I still can.
- BrokenolMarine
- Ranch Foreman
- Posts: 7480
- Joined: Sat Nov 26, 2016 8:28 am
- Location: South Central Oklahoma in the mountains

Re: Henry Gun Case Project
Here is a look at the top frame process and the surprises that sometimes jump up...
To complete the top frame, I ran the second set of cherry thru the Ibox Jig without changing anything, and without making any modifications to the second set of cherry boards. Everything went well.
The only problem with the top frames, is that they are just as thick as the bottom.
We can't have that can we. So using the sample template, I find the width that both works for a top, and gives me a full thickness "tooth" on the box joint when I rip. I set the table saw blade and the rip fence to make that cut. (I had already removed the Ibox Jig and the Dado Blade from the table and put both away.)
I make the four rip cuts, very carefully. Holding the four sides tight against the rip fence and moving them smoothly thru the blade. No problem... until one of the knots cracks and a big chunk falls out leaving a big hole in one of the long sides.
Ah... that's one of those unexpected surprises that can crop up. No problem...
No Problem. There is always the old Motto of woodworking... "It's not a mistake until you can't fix it."
Above are the top frame components ripped. Note the size difference. You can't see the damaged section, it's behind another piece.
As I mentioned in the above post, you can fill the damaged knots with CT adhesive.. and when sanded it will look like glass. But it doesn't help that the adhesive is three years old and not curing. I ordered two new tubes so I'll have a backup on hand. Once you open a tube, it has about a six month shelf life.
Here is the damaged area and the repair started. If it doesn't cure and smooth out properly before the new tubes arrive, I'll clean 'er out and start the repair over again.
As you can see in the photo below, when it works, it works great. The knot stabilized in the band saw box had deep pockets in it's face, but is smooth as glass. It really looks nice in the face of the Ying/Yang box and adds to the project.
To complete the top frame, I ran the second set of cherry thru the Ibox Jig without changing anything, and without making any modifications to the second set of cherry boards. Everything went well.
The only problem with the top frames, is that they are just as thick as the bottom.
I make the four rip cuts, very carefully. Holding the four sides tight against the rip fence and moving them smoothly thru the blade. No problem... until one of the knots cracks and a big chunk falls out leaving a big hole in one of the long sides.
Above are the top frame components ripped. Note the size difference. You can't see the damaged section, it's behind another piece.
As I mentioned in the above post, you can fill the damaged knots with CT adhesive.. and when sanded it will look like glass. But it doesn't help that the adhesive is three years old and not curing. I ordered two new tubes so I'll have a backup on hand. Once you open a tube, it has about a six month shelf life.
Here is the damaged area and the repair started. If it doesn't cure and smooth out properly before the new tubes arrive, I'll clean 'er out and start the repair over again.
As you can see in the photo below, when it works, it works great. The knot stabilized in the band saw box had deep pockets in it's face, but is smooth as glass. It really looks nice in the face of the Ying/Yang box and adds to the project.
You can tell a lot about the character of a man...
by the way he treats those who can do nothing for him.
I don't look back at the things I can no longer do, I just look forward to the things I still can.
by the way he treats those who can do nothing for him.
I don't look back at the things I can no longer do, I just look forward to the things I still can.
- BrokenolMarine
- Ranch Foreman
- Posts: 7480
- Joined: Sat Nov 26, 2016 8:28 am
- Location: South Central Oklahoma in the mountains

Re: Henry Gun Case Project
I had been waiting for the special glue to build up the knots and plug a few small holes before the gluing of the framework to move on to the next step, but there has been a shipping delay from Amazon's supplier, so I am moving forward and will fill those later.
We adapt and overcome. No rush, I am just bored, and it's not something that will affect the outcome.
I went out in the shop this morning, and as the parts had all been test fitted, I checked the orientation, confirmed each face side was where I wanted it and then glued each component together, tightening them with a clamp, and then weighting the top and bottom frames with wood to make sure as the glue dried they remained square and didn't flex out of alignment.
The next step in the process is to mark and cut the backing for the sides, and then cut and glue the bookmatched sides to the backings and fit and glue them to the top and bottom frames. We'll be that much closer to the point where I decide on, and order, hardware. Pics will be added to show the glued up frames when they come out of the glue drying stage. They will require sanding and shaping, but that will occur after the side panels are added and glued in place and they will all be shaped and sanded together.
I have NO clue what I am doing, this is a learning process for me, blindly leading myself thru the process, creating the design as I see fit while I stumble through. I know the end product I want and will either have it at the end, or a really beautiful piece of firewood and a nice story to tell about how I got it.
I went out in the shop this morning, and as the parts had all been test fitted, I checked the orientation, confirmed each face side was where I wanted it and then glued each component together, tightening them with a clamp, and then weighting the top and bottom frames with wood to make sure as the glue dried they remained square and didn't flex out of alignment.
The next step in the process is to mark and cut the backing for the sides, and then cut and glue the bookmatched sides to the backings and fit and glue them to the top and bottom frames. We'll be that much closer to the point where I decide on, and order, hardware. Pics will be added to show the glued up frames when they come out of the glue drying stage. They will require sanding and shaping, but that will occur after the side panels are added and glued in place and they will all be shaped and sanded together.
I have NO clue what I am doing, this is a learning process for me, blindly leading myself thru the process, creating the design as I see fit while I stumble through. I know the end product I want and will either have it at the end, or a really beautiful piece of firewood and a nice story to tell about how I got it.
You can tell a lot about the character of a man...
by the way he treats those who can do nothing for him.
I don't look back at the things I can no longer do, I just look forward to the things I still can.
by the way he treats those who can do nothing for him.
I don't look back at the things I can no longer do, I just look forward to the things I still can.
- BrokenolMarine
- Ranch Foreman
- Posts: 7480
- Joined: Sat Nov 26, 2016 8:28 am
- Location: South Central Oklahoma in the mountains

Glue Up Pics
Here are a few pics of the glue up, while it dries... I'll take after pics, AFTER it dries.
I checked the alignment of the top and bottom frame first, then covered the bottom frame with wax paper and placed the top on the bottom.
I used some wooden floor wood samples as weight, to keep them flat. The wax paper hopefully will keep them from getting glued to one another.
Putting all that work in to this point then gluing the top and bottom frames together... wouldn't be good.
Let's just say, I'd be bummed to start all over at this point.

Let's just say, I'd be bummed to start all over at this point.
You can tell a lot about the character of a man...
by the way he treats those who can do nothing for him.
I don't look back at the things I can no longer do, I just look forward to the things I still can.
by the way he treats those who can do nothing for him.
I don't look back at the things I can no longer do, I just look forward to the things I still can.
- daytime dave
- Administrator / Owner
- Posts: 5970
- Joined: Sun Mar 20, 2016 10:27 pm
- Location: Upstate NY

Re: Henry Gun Case Project
Wow, thanks for the great photographs and read. Very nice work!
Some days I'm Andy, most days I'm Barney........
Eaglescout, NRA Life Endowment member, BCCI Life Member