Site seems to be experiencing intermittent load issues. If site doesn't present the login screen, try clicking on 'login'

Memorial Flag Box Project

User avatar
BrokenolMarine
Ranch Foreman
Posts: 7471
Joined: Sat Nov 26, 2016 8:28 am
Location: South Central Oklahoma in the mountains
United States of America

Memorial Flag Box Project

Post by BrokenolMarine » Thu Feb 22, 2018 1:06 pm

I started the Flag Box project yesterday, by working on the formal layout. I don't usually do a full size drawing, unless it's for a special project like this one.
01 formal sketch.jpg
01 formal sketch.jpg (244.12 KiB) Viewed 5615 times
I got out into the shop this morning and went through the mahogany pile and chose the various boards I needed, after going over the drawing and taking careful measurements to determine which boards I'd need in which lengths. I have two widths available, 3" and 3-3/4. Unfortunately, I needed two of the wider ones in the longer lengths, and wasn't going to have but one at that length... so it required some work.

First I chose the ones I did have in the proper lengths based on color and grain patterns.
02 choosing wood.jpg
02 choosing wood.jpg (299.03 KiB) Viewed 5615 times
There is plenty of wood left if I make a mistake or three.
05 some left.jpg
05 some left.jpg (286.65 KiB) Viewed 5615 times
To get the second longer wide board, I first matched a couple of the longer 3" boards for color, then jointed the edges.
03 jointing edges.jpg
03 jointing edges.jpg (323.37 KiB) Viewed 5615 times
Once I got a good match, I test clamped them to insure a gap free joint, then glued and clamped them to insure a good bond.
This will be the bottom panel of the two panel base.
04 clamped up.jpg
04 clamped up.jpg (333.27 KiB) Viewed 5615 times
You may remember from an earlier post, that I took measurements off the actual flag, and created a substitute out of cardboard and sent the real flag HOME with the owner. I didn't want to risk it. The box will be built around this cardboard stand-in. :lol:
folded.jpg
folded.jpg (262.9 KiB) Viewed 5615 times
Watch this space.... for updates.
:)
You can tell a lot about the character of a man...
by the way he treats those who can do nothing for him.

I don't look back at the things I can no longer do, I just look forward to the things I still can.

Henry88

Re: Memorial Flag Box Project

Post by Henry88 » Thu Feb 22, 2018 5:26 pm

Very cool stuff BoM.
Curious about the bubble gum in the second pic, or is that for you? :D

User avatar
BrokenolMarine
Ranch Foreman
Posts: 7471
Joined: Sat Nov 26, 2016 8:28 am
Location: South Central Oklahoma in the mountains
United States of America

Re: Memorial Flag Box Project

Post by BrokenolMarine » Thu Feb 22, 2018 7:14 pm

Henry88 wrote:Very cool stuff BoM.
Curious about the bubble gum in the second pic, or is that for you? :D
I allow myself one piece while working in the shop. I don't have any in the house.
I lost thirty pounds a couple years ago, and am trying to keep it off. Lol.
:lol:
You can tell a lot about the character of a man...
by the way he treats those who can do nothing for him.

I don't look back at the things I can no longer do, I just look forward to the things I still can.

User avatar
BrokenolMarine
Ranch Foreman
Posts: 7471
Joined: Sat Nov 26, 2016 8:28 am
Location: South Central Oklahoma in the mountains
United States of America

Re: Memorial Flag Box Project

Post by BrokenolMarine » Fri Feb 23, 2018 9:44 am

Work session yesterday got me started on the upper section of the flag box, working from the notated sketch using the measurements noted.
02 with measurements noted.jpg
02 with measurements noted.jpg (219.19 KiB) Viewed 5587 times
My plan is to cut out all the sections I can up front, and do the basic sanding. Then work on the accents and the additional necessary tooling, such as the dado at the back for the rear panel. Then mark all the fitting, and drill the needed holes for assembly. I plan to have what screws will be used hidden. The holes will have to be marked and drilled before any assembly begins.

The upper "flag box" was cut yesterday. Turned out okay.
01 flag section.jpg
01 flag section.jpg (309.5 KiB) Viewed 5587 times
I set up the miter saw on the mobile cart so it's right in the work area. Makes things much easier.
03 work areas.jpg
03 work areas.jpg (350.62 KiB) Viewed 5587 times
Will get back at it this morning, after coffee is done. :) Can't work without coffee. :P
You can tell a lot about the character of a man...
by the way he treats those who can do nothing for him.

I don't look back at the things I can no longer do, I just look forward to the things I still can.

User avatar
BrokenolMarine
Ranch Foreman
Posts: 7471
Joined: Sat Nov 26, 2016 8:28 am
Location: South Central Oklahoma in the mountains
United States of America

back at it

Post by BrokenolMarine » Fri Feb 23, 2018 12:31 pm

Back at it this morning... still working on the basic cutting and fitting... NO gluing up. :)
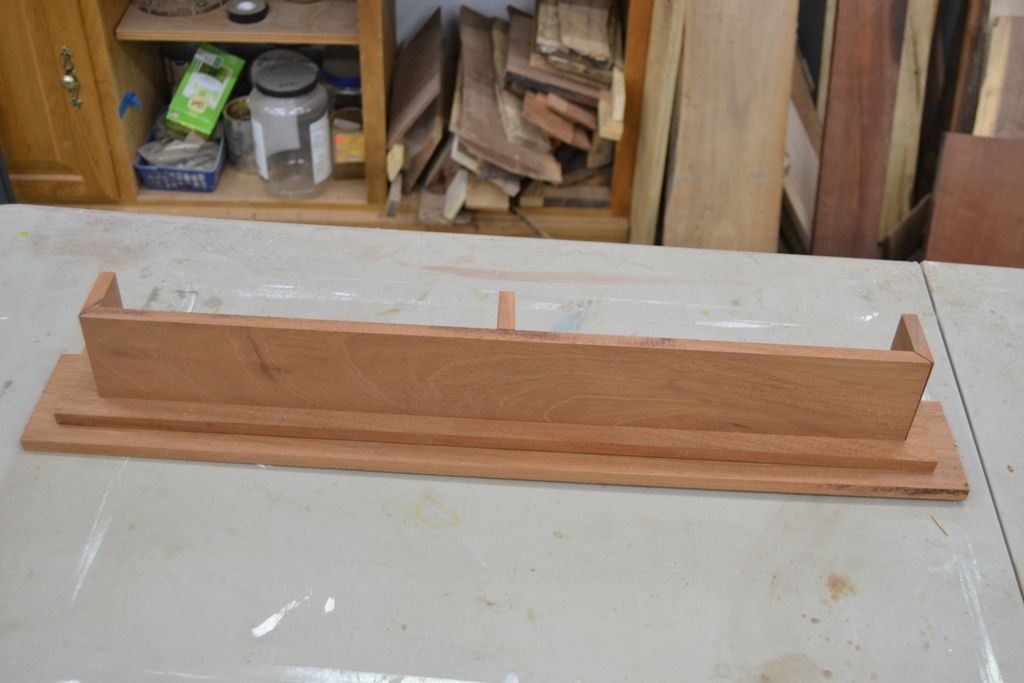
I started by cutting out the basic components of the base. The face and sides, and the first level of the bottom.
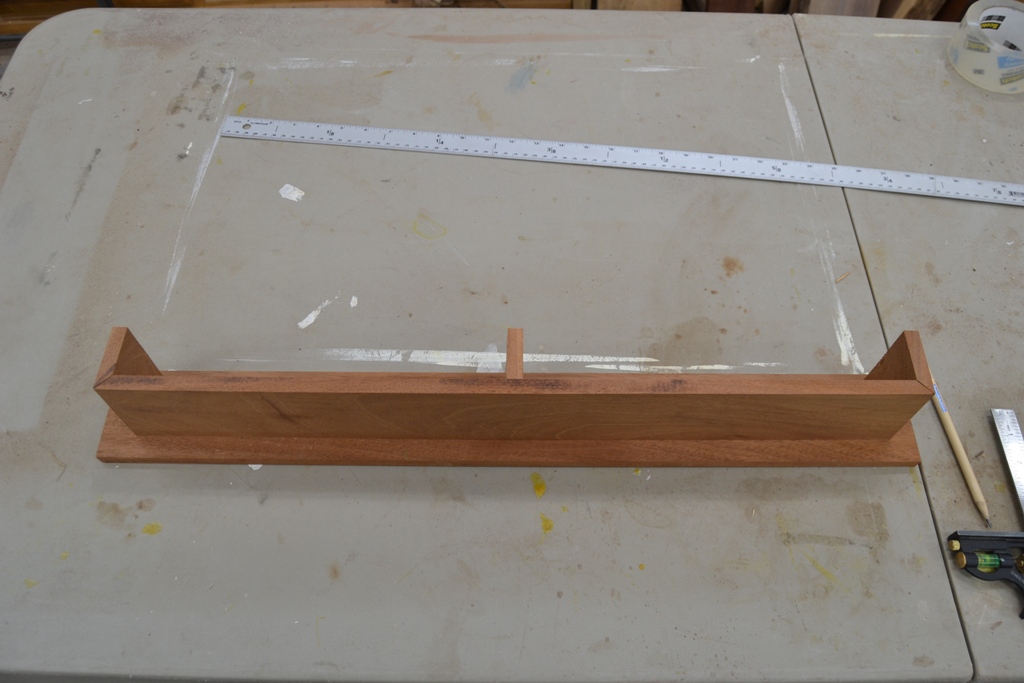
02 base.jpg
02 base.jpg (242.56 KiB) Viewed 5582 times
All the accents will be routed before assembly. I haven't used the router table in about five years, but I think I will use it here for consistency in this project.
Next I took the clamps off the lower wide glue up jointed base panel and trimmed it to size. First I had to use one of the cabinet scrapers to remove the glue lines and smooth the surface.
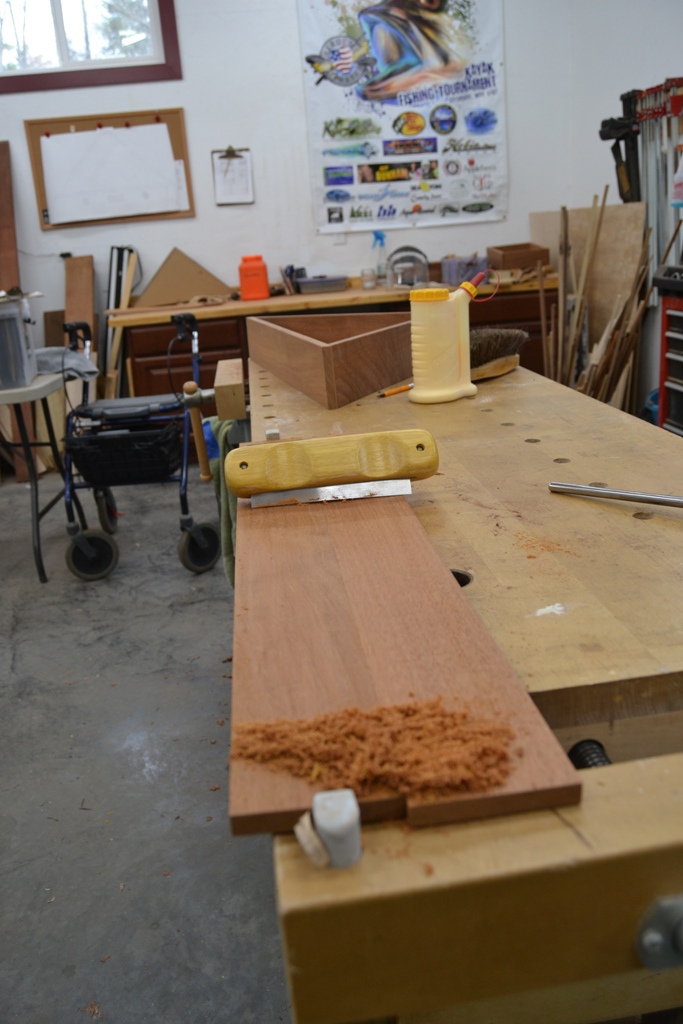
03 scraping jointed base.jpg
03 scraping jointed base.jpg (266.43 KiB) Viewed 5582 times
I saved the scapings to fill in any needed holes or gaps down the road. Assures a good match. ;)

The mock up of the base!
04 full base.jpg
04 full base.jpg (248.04 KiB) Viewed 5582 times
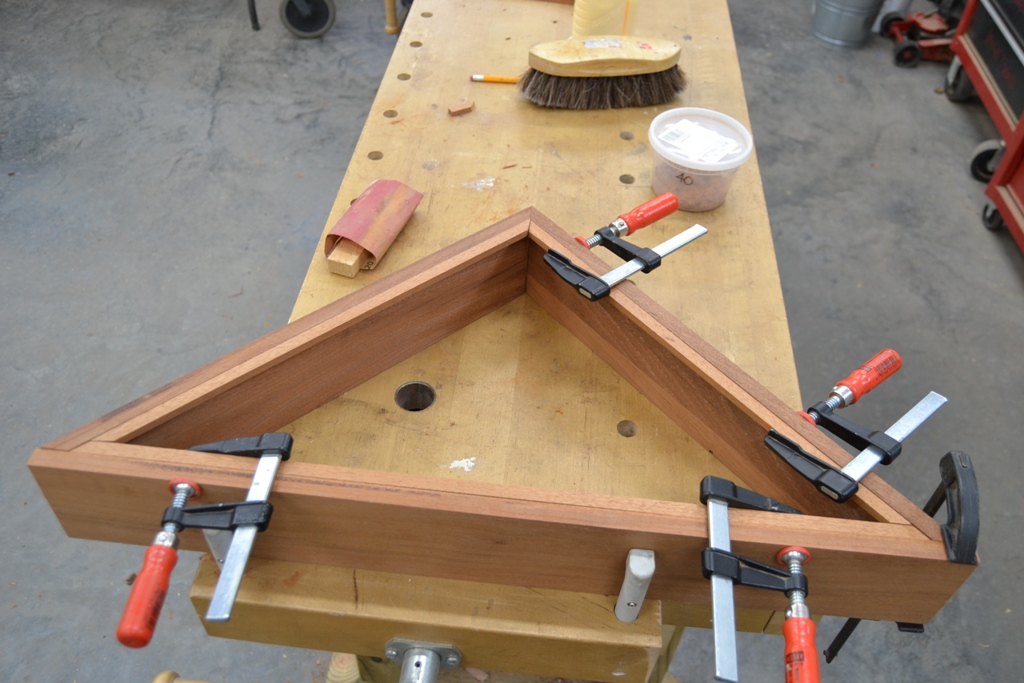
Next task was using the strips I cut from the Off Cuts from the base to cut the trim that will hold the glass in the flag compartment. I used the Veritas trim saw and free hand cut the angles after carefully marking them using the flag compartment as my guide.
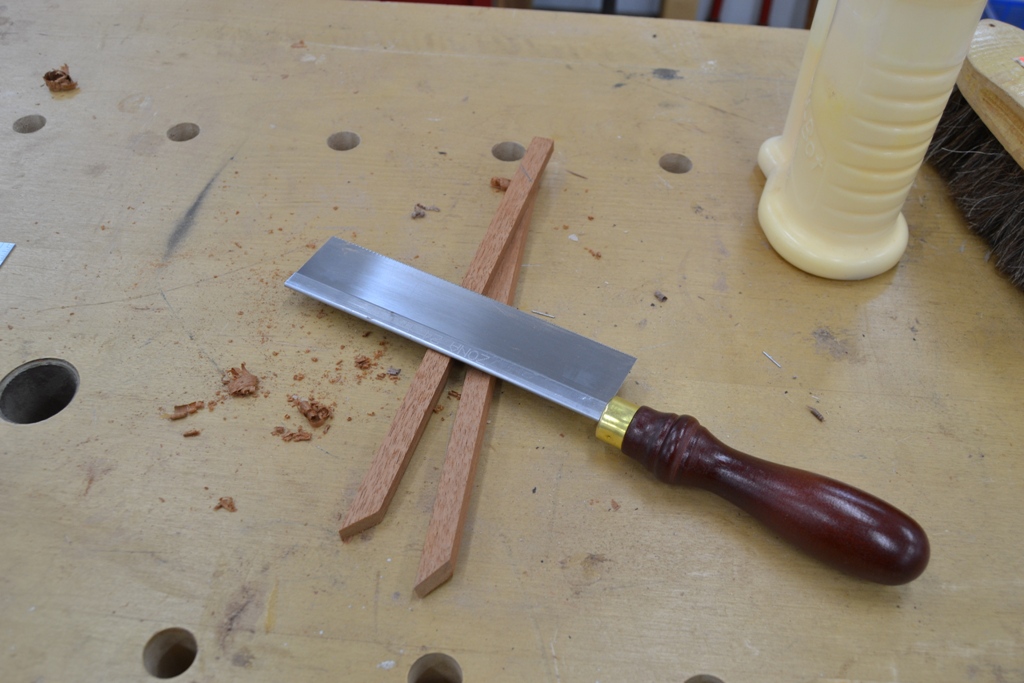
05 veritas saw.jpg
05 veritas saw.jpg (281.37 KiB) Viewed 5582 times
I cut the bottom trim first, then clamped IT in place, cut the right side angled trim, clamped it in place.... and then fit the last trim piece ... NOT perfect, but saw dust will fill the small gaps nicely. 8-)
06 glass trim.jpg
06 glass trim.jpg (290.92 KiB) Viewed 5582 times
Next up?
Routing....
Sanding... (LOTS of sanding.. 200, 400, 600 grits)
Beading... not with beads but accent work on the wood. :P
Still to come?
I'll mark the various locations where holes will be needed, and drill them on the drill press.
I also have to mark the location of the Challenge coins and drill the cavities with the Forstner bits, and drill the pilot holes for the name plate nails.
We are moving right along. :)
You can tell a lot about the character of a man...
by the way he treats those who can do nothing for him.

I don't look back at the things I can no longer do, I just look forward to the things I still can.

User avatar
BrokenolMarine
Ranch Foreman
Posts: 7471
Joined: Sat Nov 26, 2016 8:28 am
Location: South Central Oklahoma in the mountains
United States of America

Re: Memorial Flag Box Project

Post by BrokenolMarine » Fri Feb 23, 2018 11:36 pm

Sheesh... could have sworn I took some pictures of the late afternoon session... but the camera card was empty. I got out for a short forty five minutes. I marked each piece of the flag section in blue chalk, or light pencil marks on the inside as to it's position in the build. Left, right, bottom etc... that way I know the orientation. Then I put a short blue chalk stripe down each edge that needs to be routed BEFORE I took the pieces out of their mock up positions. I did this with the components for the base as well. It's easy to get turned around and mess up a piece by routing an incorrect edge. Sure, I have MORE mahogany, but each of these pieces was chosen for color and grain, especially the three key visual pieces, the two sides to the flag assembly and the FACE plate of the base. :lol: The grain and color of those was special, and I don't think I could replace it from the wood I have stacked on the side bench. :cry:

I'll take my time, THINK about each piece in my hand BEFORE routing, and look at the markings again to insure they are clear before I even set UP the router table. ;) Better to take extra prep time than to rush it... and ruin a piece. :evil: Not as big a deal when I'm making a box just to be filling time and get out of the recliner.... but an important piece like this... an "Honor" piece? :twisted: Check it twice. ;)

I'll check each piece and make sure all the markings are clear.

"Don't Ask Me How I Know This!" :roll:
A common running joke when sharing advice on the woodworking forums... abbreviated DAMHIKT.... :) We have all made our shared mistakes at least once.... and work hard NOT to make the same one TWICE. :?
You can tell a lot about the character of a man...
by the way he treats those who can do nothing for him.

I don't look back at the things I can no longer do, I just look forward to the things I still can.

User avatar
BrokenolMarine
Ranch Foreman
Posts: 7471
Joined: Sat Nov 26, 2016 8:28 am
Location: South Central Oklahoma in the mountains
United States of America

Router Work

Post by BrokenolMarine » Sat Feb 24, 2018 1:59 pm

I was back at it this morning.... and before I started the work, I made sure that all the markings were clear. Blue Chalk saves things.
01 blue chalk saves.jpg
01 blue chalk saves.jpg (280.59 KiB) Viewed 5565 times
As you can see in this pic, as I explained in the earlier post, each piece is identified, and then each edge that will get attention in routing, is marked.
I used a 1/4" roundover bit on the lines marked in this picture.

I also marked the edges on the base, but they will be routed with a different bit. The base was routed with a Roman Ogee
02 base too.jpg
02 base too.jpg (226.76 KiB) Viewed 5565 times
The Flag was brought by this morning, and checked for fit prior to my routing anything. It fits. ;) Keep in mind that there will be glass in the frame, the trim pieces will be set back 1/4 to 3/8" and there will be a back plate behind the flag... it will fit nicely right up against the glass when all is said and done. Also, this is a rough fit for testing, the edges WILL line up during final assembly. :oops:
04 flag fits.jpg
04 flag fits.jpg (291.37 KiB) Viewed 5565 times
I showed the daughter of the vet what the layout of the face would look like with the coins and the engraved plate. Out of respect I have blacked out the engraving on the plate as it had name and DOB on it. Note that the coins will be inlaid in the face.
03 layout.jpg
03 layout.jpg (189.67 KiB) Viewed 5565 times
Here is the base after routing... now the sanding begins ...
05 routing.jpg
05 routing.jpg (256.82 KiB) Viewed 5565 times
Lot's of sanding... then assembly. I may also flock the inside of the flag compartment.
You can tell a lot about the character of a man...
by the way he treats those who can do nothing for him.

I don't look back at the things I can no longer do, I just look forward to the things I still can.

User avatar
BrokenolMarine
Ranch Foreman
Posts: 7471
Joined: Sat Nov 26, 2016 8:28 am
Location: South Central Oklahoma in the mountains
United States of America

panel dadoes

Post by BrokenolMarine » Sun Feb 25, 2018 11:44 am

Shop work this morning would seem like a lot of time expended for so little result. :P
I spent about 90 minutes in the shop, with two pictures to show the work completed. Before I started sanding, I wanted to cut the dadoes for the two back panels. The one for the flag panel will be removable, even though I suspect that it will be installed and not come back off unless someone :o breaks the glass.

The second will be glued and pinned in place and NOT be removed again. The time expended was mostly spend changing to the Box Joint dado blade, setting up the depth of cut and then setting the fence spacing for the Flag box panels and making those cuts, two of which were simple passes, and the base was a stop cut pass which required the panel to be lowered to the blade and moved back and forth to stop lines. (Not a problem with a shallow cut in straight grained knotless woods.) Still, care must be taken and safety gear worn, which I do anyway. :)

Then, the depth of cut was checked again, and the fence reset for the two cuts for the base pieces, and those two SHORT cuts made. Once those were done, I had to remove the dado blade and reinstall the standard blade. As you can see in the first pic, I will need to use a chisel to finish the cut (dado) in the base of the flag compartment as the drop pass leaves a curve in the dado. No matter.
01 back panel dado.jpg
01 back panel dado.jpg (281.78 KiB) Viewed 5552 times
The box dado blade sure leaves a crisp groove huh?
02 base dado.jpg
02 base dado.jpg (218.8 KiB) Viewed 5552 times
Sanding begins after lunch.
:P
You can tell a lot about the character of a man...
by the way he treats those who can do nothing for him.

I don't look back at the things I can no longer do, I just look forward to the things I still can.

User avatar
BrokenolMarine
Ranch Foreman
Posts: 7471
Joined: Sat Nov 26, 2016 8:28 am
Location: South Central Oklahoma in the mountains
United States of America

detail work

Post by BrokenolMarine » Mon Feb 26, 2018 12:07 pm

Back at it this morning... and decided to knock out some of the detail work. First up... cutting the chisel work on the flag box dadoes for the back panel.
Marked the proper angles after carefully measuring where they needed to be... and got busy.
01 marked.jpg
01 marked.jpg (230.29 KiB) Viewed 5539 times
I used two sharp chisels and the mallet, and had to use the Optvisor to see well enough to get the job done. ;) Old eyes.
02 detail work.jpg
02 detail work.jpg (331.59 KiB) Viewed 5539 times
After about an hour of prep work and chisels, it looks pretty good. A little trimming.... and we'll be there.
03 almost there.jpg
03 almost there.jpg (242.67 KiB) Viewed 5539 times
Next, I made up the back for the pedestal. I used some maple ply rather than the thin backer I plan to use for the flag compartment, for strength. I also added some "mini studs." ;) Overkill? Nah, they are placed where I'll be seating the coins, and nailing in the tacks for the faceplate. Okay... overkill. But they were made from scraps and they will help insure the strength of the pedestal and keep it square during glue up. 8-) At least that's the plan... and I have plenty of time.
04 pedestal backing.jpg
04 pedestal backing.jpg (280.48 KiB) Viewed 5539 times
05 pedestal front.jpg
05 pedestal front.jpg (264.04 KiB) Viewed 5539 times
I'll get this glued up after lunch, maybe. :roll:

Then... sanding.
You can tell a lot about the character of a man...
by the way he treats those who can do nothing for him.

I don't look back at the things I can no longer do, I just look forward to the things I still can.

User avatar
RetiredSeabee
Administrator
Posts: 2486
Joined: Mon Mar 21, 2016 5:04 pm
Location: Harrisburg, North Carolina
United States of America

Re: Memorial Flag Box Project

Post by RetiredSeabee » Tue Feb 27, 2018 7:41 am

Looking forward to seeing this one progress. I saw a lot of flag boxes through the years when I wore the uniform. Some really nice, some good, some not so good. This one is looking incredibly nice.
Load on Sunday and Shoot all Week.......okay it's a Mare's Leg I will reload on Wednesday. ;)

User avatar
BrokenolMarine
Ranch Foreman
Posts: 7471
Joined: Sat Nov 26, 2016 8:28 am
Location: South Central Oklahoma in the mountains
United States of America

Re: Memorial Flag Box Project

Post by BrokenolMarine » Tue Feb 27, 2018 8:34 am

Thanks... I try to make them all special. But this gal is a friend of my wife, and her dad was a Navy Vet from the same period as my dad. I want her to be proud of the box, and it not to detract from the memory it holds.

Miss Tina and I went on vacation to Gatlinburg Tn years ago. We spent a week in the Smokies. There, we came across a young veteran of the Corps, making his living doing chainsaw carvings. He was really good... his work was amazing. Earlier in the week I had purchased a small wooden carving of "Chesty," the Corps bulldog mascot. I got it from the truck and asked if he could carve it. He said he could, and quoted a price. I paid half up front, and would pay the balance when he was ready to ship. I asked if he wanted to keep the little chesty for reference. He said he was good.

He carved the bulldog from walnut, 2' tall. When the package arrived, I eagerly tore off the wrapping, and there inside was a two foot tall, sad eyed sitting bulldog. NOT the crouching, campaign covered Marine Mascot. When I called, he was irritated. "Send it back, i'll do it again."

I didn't bother. But I have never forgotten that disappointment nor the feeling of betrayal when the wrapping revealed the work he shipped.
I make sure when I am working on a project for someone ... we both know where it's going, have the same goals... then I try to exceed them. :D
You can tell a lot about the character of a man...
by the way he treats those who can do nothing for him.

I don't look back at the things I can no longer do, I just look forward to the things I still can.

User avatar
BrokenolMarine
Ranch Foreman
Posts: 7471
Joined: Sat Nov 26, 2016 8:28 am
Location: South Central Oklahoma in the mountains
United States of America

moving forward

Post by BrokenolMarine » Tue Feb 27, 2018 8:52 am

Short late evening session yesterday. I got the pedestal glued and clamped up and shot a few pins in to insure stability. They won't show at all once the sanding is done. That's why you save sawdust. LOL.
01 glue up.jpg
01 glue up.jpg (288.64 KiB) Viewed 6242 times
I also did the final detail work on the rear dadoes for the flag compartment. Sloooow careful work with the chisel to get the edges just so... ;) I think we are ready.
02 trimmed and checked.jpg
02 trimmed and checked.jpg (258.73 KiB) Viewed 6242 times
Now, after coffee and toast and the morning routine inside, I'll be going out to sand, and sand, and maybe... I'll sand. Once I am satisfied with that, I'll drill the slots for the coins and the holes for the plate. Also the holes for assembly. I'll pre-stain each piece, careful to keep the stain OFF the areas to accept glue. Then the assembly will begin. :lol:

We are getting there. A couple days, maybe three.
You can tell a lot about the character of a man...
by the way he treats those who can do nothing for him.

I don't look back at the things I can no longer do, I just look forward to the things I still can.

User avatar
BrokenolMarine
Ranch Foreman
Posts: 7471
Joined: Sat Nov 26, 2016 8:28 am
Location: South Central Oklahoma in the mountains
United States of America

Getting Close!

Post by BrokenolMarine » Tue Feb 27, 2018 2:26 pm

:D

Spent a couple hours getting covered in fine mahogany sawdust, measuring, remeasuring, then marking, drilling, and countersinking, the assembly holes.
Then ... with baited breath, measuring... remeasuring, and finally drilling the holes in the face plate for the coins. The test board I drilled showed the forstner bit for the coins would be too tight, so I used the next size up and they will have a "Framed" cubby inset. They will still look good. I will seat them just below the surface. Next up is another bout of sanding with 220 and 400 grit, then applying finish. You get a good idea of what the thing will look like now.
close.jpg
close.jpg (283.49 KiB) Viewed 6239 times
The holes you see on top of the bottom plate of the flag compartment will fully disappear. For one, I made mahogany plugs to fill them once the pedestal is glued and screwed. Secondly, that area will get flocked, and the plugs will be covered, AND the flag will sit directly over that area. Why bother? Because when they take the flag out for any reason, I want it to look like I actually care. :)

Really, the only thing you don't see here are the top angled pieces and the trim. The daughter of the vet ordered the glass today, we should have that in a day or so. I have to cut the back plate, which I'll probably do in the next day or so, otherwise everything but a couple retention blocks for the glass, has been cut and sanded.

Close.... we are close.
:)

I'm happy, so far. 8-)
You can tell a lot about the character of a man...
by the way he treats those who can do nothing for him.

I don't look back at the things I can no longer do, I just look forward to the things I still can.

User avatar
BrokenolMarine
Ranch Foreman
Posts: 7471
Joined: Sat Nov 26, 2016 8:28 am
Location: South Central Oklahoma in the mountains
United States of America

Stained...

Post by BrokenolMarine » Thu Mar 01, 2018 12:27 pm

First step in the stain phase, tape off the areas that will be glued, or flocked. Measure, measure, mark. Tape. :P Geez... lots of measuring.. and double measuring here. :?

The first areas I taped off were the inside of the flag compartment. They will be flocked and the flocking base won't stick to the stain very well. Plus it will have to be painted with a flat black paint to seal it anyway. I also taped off the angled ends, where the glue will go, since that will hold the compartment together. Kind of important. ;)
01 flocking.jpg
01 flocking.jpg (270.57 KiB) Viewed 6215 times
Next, I taped off the coin slots so the epoxy that will hold the coins in, will hold properly.
02 coin.jpg
02 coin.jpg (236.46 KiB) Viewed 6215 times
We are ever so close to staining, but ... we need to decide what stain. I make a test stain board, using a scrap of mahogany. Miss T and I liked the Colonial Maple the best, but we sent a pic to the Daughter of the Vet and she and her boss also liked the maple the best so it's unanimous. Maple it is. Always good to have a solid vote.
03 stain sample.jpg
03 stain sample.jpg (312.95 KiB) Viewed 6215 times
I got busy and carefully stained all the pieces. I would normally have left open areas on the bases, but I didn't want any gaps in the coverage. I'll sand contact areas lightly when I assemble. You'll note if you can see them, that I rolled a little stain over the edges on the pedestal, even though the top and bottom of that piece will be in contact with the base and underside of the flag compartment. I didn't want faint unstained wood peeking to ruin the piece. :roll:
04 stained 1.jpg
04 stained 1.jpg (280.06 KiB) Viewed 6215 times
05 stained 2.jpg
05 stained 2.jpg (298.36 KiB) Viewed 6215 times
I'll let this dry, then assemble the pedestal, then flock the three pieces that are to be flocked.
We are almost there. :D
You can tell a lot about the character of a man...
by the way he treats those who can do nothing for him.

I don't look back at the things I can no longer do, I just look forward to the things I still can.

User avatar
BrokenolMarine
Ranch Foreman
Posts: 7471
Joined: Sat Nov 26, 2016 8:28 am
Location: South Central Oklahoma in the mountains
United States of America

glued and screwed

Post by BrokenolMarine » Thu Mar 01, 2018 3:51 pm

Late afternoon work session. A lot more went into the session than I will write about, but.... the pedestal is glued and screwed, and it's just as I had hoped.
:)

I even got the plugs installed and trimmed. Here are the mahogany plugs in place... awaiting shearing.
01 plugs.jpg
01 plugs.jpg (237.36 KiB) Viewed 6211 times
Oh wait, did I say plugs? :? What plugs.
02 what plugs.jpg
02 what plugs.jpg (245.06 KiB) Viewed 6211 times
The base is done...
03 Assembled.jpg
03 Assembled.jpg (282.82 KiB) Viewed 6211 times
I may go out later this evening and carefully apply another coat of stain, just to make sure it's even all over.... then let it dry overnight. ;) Or not.
Then tomorrow morning, I'll install the trim to each of the components for the flag compartment... then flock those three pieces and let them dry for the day. Once that is completed, I'll assemble the flag compartment, and make the back panel and fit it to the back of the compartment. After that, all that's left to do is wax and buff, then install the two challenge coins and the name plate, and wait for the glass and flag to be delivered. ;)
You can tell a lot about the character of a man...
by the way he treats those who can do nothing for him.

I don't look back at the things I can no longer do, I just look forward to the things I still can.

User avatar
BrokenolMarine
Ranch Foreman
Posts: 7471
Joined: Sat Nov 26, 2016 8:28 am
Location: South Central Oklahoma in the mountains
United States of America

flocking

Post by BrokenolMarine » Fri Mar 02, 2018 1:03 pm

Out this morning and removed the tape from the sections that will be flocked. Then, carefully rechecked the measurements and remarked the borders that needed it. Then, retaped the sections to be flocked and insured that there wouldn't be any overspray of primer on the wooden surfaces where it wasn't needed. Once the base was taped, I primed that and set it aside to dry while I taped the upper sections.
02 primed too.jpg
02 primed too.jpg (271.84 KiB) Viewed 6196 times
I taped both upper sections then primed them at the same time, and set them aside to dry.
01 primed.jpg
01 primed.jpg (279.34 KiB) Viewed 6196 times
Hmmm... I normally use a low sided smaller rubbermaid tub to flock inside of to catch excess flocking. The pedestal base is too large to fit in there. :) The wife went out into the storage building and found me a full sized rubbermaid tub to use for this session. Got the primed pieces laid out and ready for the base coating.
03 ready for the base.jpg
03 ready for the base.jpg (219.38 KiB) Viewed 6196 times
After painting the base coat on the pedestal, I flocked that... then painted both the top pieces and flocked those.... I insured all three pieces had good coverage, OVER flocked is what we shoot for.
04 flocked.jpg
04 flocked.jpg (278 KiB) Viewed 6196 times
I'll leave them overnight to dry in the covered rubbermaid tub. I'll dust the excess flocking off and recover it tomorrow, it can be used in future projects. :P Then I can attach the glass retention trim pieces and assemble the flag compartment and measure for the back panel. We are nearly done.
You can tell a lot about the character of a man...
by the way he treats those who can do nothing for him.

I don't look back at the things I can no longer do, I just look forward to the things I still can.

User avatar
GFK
Drover
Posts: 2297
Joined: Tue Oct 17, 2017 12:56 pm
Location: SE
United States of America

Re: Memorial Flag Box Project

Post by GFK » Fri Mar 02, 2018 8:45 pm

Nice work!
Actions speak louder than words (Matthew 7:16-20).

User avatar
BrokenolMarine
Ranch Foreman
Posts: 7471
Joined: Sat Nov 26, 2016 8:28 am
Location: South Central Oklahoma in the mountains
United States of America

Re: Memorial Flag Box Project

Post by BrokenolMarine » Sat Mar 03, 2018 8:05 am

Thanks GFK, I am very happy with the way things have turned out so far. Like any artist, there are things I would like to have turned out better, but it's the nature of the beast. I still have a bit to do, but we are getting there. The daughter is bringing the flag and glass tomorrow and we can do the fitting in the flag compartment, which I will assemble today. I can't wait to see it. :P
You can tell a lot about the character of a man...
by the way he treats those who can do nothing for him.

I don't look back at the things I can no longer do, I just look forward to the things I still can.

User avatar
BrokenolMarine
Ranch Foreman
Posts: 7471
Joined: Sat Nov 26, 2016 8:28 am
Location: South Central Oklahoma in the mountains
United States of America

Trimming the flag compartment

Post by BrokenolMarine » Sat Mar 03, 2018 12:15 pm

The hardest part is the waiting.... :? I really wanted to work on the box last night, but I had to wait to let the flocking dry... it's really the hardest part. 8-)
Went out this morning, and it was good and dry.
01 dry and ready.jpg
01 dry and ready.jpg (263.5 KiB) Viewed 6163 times
That meant I could move forward. First step is to tilt each piece and give it a hard whack on the bottom, prior to doing anything else, knock off as much of the flocking as you can. Then, with a VERY soft bristled brush, brush off the excess. I use a fine hair shoe buffing brush that I don't use for anything else. It's part of the flocking kit. :) This lets you recover as much of the excess as you can.
02 excess flocking.jpg
02 excess flocking.jpg (291.55 KiB) Viewed 6163 times
04 recovery.jpg
04 recovery.jpg (270.71 KiB) Viewed 6163 times
Here are the flocked pieces, ready to work with. They turned out well, but there were some areas where there was a bit of bleed thru of the paint used as a base. I used an exacto knife to scrape that away. Good to go. Those "bald" areas with no stain and no flocking? For glue adhesion. :)
03 tape removed.jpg
03 tape removed.jpg (306.25 KiB) Viewed 6163 times
I spent the next hour, measuring, marking, drilling pilot holes using a small gold finish nail as a drill, and a 7/64 bit as a countersink. Prep work. Then I remeasured, as I installed each piece of trim on the individual components. There wouldn't be room to drill pilot holes or countersink if they were installed after assembly. Hopefully careful installation will result in a good result. If not, tricks will bring them into line. :roll: 8-)
05 trim installed.jpg
05 trim installed.jpg (311.28 KiB) Viewed 6163 times
After a break, I'll get out to the shop and assemble the flag box section, then measure for the back. :P
We are ever closer to a reveal.
You can tell a lot about the character of a man...
by the way he treats those who can do nothing for him.

I don't look back at the things I can no longer do, I just look forward to the things I still can.

User avatar
BrokenolMarine
Ranch Foreman
Posts: 7471
Joined: Sat Nov 26, 2016 8:28 am
Location: South Central Oklahoma in the mountains
United States of America

Boom!

Post by BrokenolMarine » Sat Mar 03, 2018 5:42 pm

Got out this morning and assembled the box. It's not absolutely perfect, but I think I can touch up the things that are annoying me. :twisted: I got the back on. I guess I'll flock the inside of the back. :? You won't see it, because the flag will be in front of it. But, if the box is empty, it's glaring. :roll: It will just look nicer. Renee is coming with the glass and flag tomorrow. :)
01 assembled.jpg
01 assembled.jpg (275.79 KiB) Viewed 6156 times
I need to soften a couple edges, and fill a gap here and there. I have to apply the finish, then buff that and wax. Mount the coins and name plate. Then... wait, then I'm done. :shock:
You can tell a lot about the character of a man...
by the way he treats those who can do nothing for him.

I don't look back at the things I can no longer do, I just look forward to the things I still can.

Post Reply