Site seems to be OK. Load issue should be resolved now.

Playing with Boxes

User avatar
BrokenolMarine
Ranch Foreman
Posts: 7471
Joined: Sat Nov 26, 2016 8:28 am
Location: South Central Oklahoma in the mountains
United States of America

Playing with Boxes

Post by BrokenolMarine » Sun Jan 28, 2018 11:36 am

Finally decided to start on a box or two, and after getting started, discovered it would be two.
I started out using the finger jointed sides I rejected for the daughter's Christmas present to start the first box. I glued them up and set them aside. The blue tape keeps the glue squeeze out from the inside corners, minimizing interior cleanup.
01 mahogany sides.jpg
01 mahogany sides.jpg (307.07 KiB) Viewed 6045 times
Next morning, I played with ideas for the top, including mahogany with Curly Cherry Inserts, and various other cool inlays, and stumbled across a scrap of spaulted maple that I liked. Wasn't wide enough and it's odd shape interested me... so I thought it needed a filler. I cut off a piece of the thick walnut I had on the side work table and figured it would work.
02 might work.jpg
02 might work.jpg (273.23 KiB) Viewed 6045 times
03 side view.jpg
03 side view.jpg (333.16 KiB) Viewed 6045 times
To make the top square, I could cut it at angles and still use the live edges on the maple. I had cut the maple down the middle to split it, and run it across the jointer, after running the walnut down the jointer, I cut the angles, and jointed both edges.
04 squared up.jpg
04 squared up.jpg (294.57 KiB) Viewed 6045 times
To make sure the joints would be strong and tight.... I pulled out the biscuit jointer I last used making a bench top for the new bench in the brand spanking new shop...last May.
05 biscuits.jpg
05 biscuits.jpg (268.84 KiB) Viewed 6045 times
Since the walnut was much thicker than the maple, I marked the difference and before glue up, blended the edge to that point. More blending after glue up.
The plane worked very well for this task.
06 blending.jpg
06 blending.jpg (314.6 KiB) Viewed 6045 times
Glue up was smooth, just take your time and align it all. Biscuits make it easy.
07 joining.jpg
07 joining.jpg (273.86 KiB) Viewed 6045 times
08 don't spare the sticky.jpg
08 don't spare the sticky.jpg (272.81 KiB) Viewed 6045 times
Glue up done, clamped and weighted should make it stay flat... will let it sit overnight and then start shaping.
One decision is already made.

I won't use this top on the mahogany box. That will get another top. I'll make a Walnut box for this top. I don't want too many contrasting woods to detract from the accent of the spaulted maple. So... there will be two boxes in progress.

Watch this space for developments.
Attachments
09 glued up.jpg
09 glued up.jpg (325.31 KiB) Viewed 6045 times
You can tell a lot about the character of a man...
by the way he treats those who can do nothing for him.

I don't look back at the things I can no longer do, I just look forward to the things I still can.

Henry88

Re: Playing with Boxes

Post by Henry88 » Sun Jan 28, 2018 5:39 pm

Well done BoM,
It must be a joy to work in such a nice shop.
Please keep them coming..............

User avatar
BrokenolMarine
Ranch Foreman
Posts: 7471
Joined: Sat Nov 26, 2016 8:28 am
Location: South Central Oklahoma in the mountains
United States of America

Re: Playing with Boxes

Post by BrokenolMarine » Mon Jan 29, 2018 12:21 am

Thanks H88,

Yes, after decades in the small cramped shops, I finally relented and built a bigger one. It is a joy, and I try to spend as much time as possible in it. :D The good thing is, on almost every occassion, when Miss T has asked, "Honey can you?...." :roll:

I have been able to provide. :lol:
You can tell a lot about the character of a man...
by the way he treats those who can do nothing for him.

I don't look back at the things I can no longer do, I just look forward to the things I still can.

User avatar
BrokenolMarine
Ranch Foreman
Posts: 7471
Joined: Sat Nov 26, 2016 8:28 am
Location: South Central Oklahoma in the mountains
United States of America

Morning's Work

Post by BrokenolMarine » Mon Jan 29, 2018 12:52 pm

I took the top out of the clamps, and after sitting and waiting for it to speak... "Speak Spot, Speak!" :( I wasn't getting anything. It wasn't talking and I needed to torture it a bit. :twisted: I rolled out the power planer and ran 'er thru until the walnut was even with the maple. I didn't like the transitions I had created so carefully with the hand plane. :roll:

Sometimes, you adapt and overcome.
01 out of the clamps.jpg
01 out of the clamps.jpg (284.68 KiB) Viewed 6016 times
Once I got that accomplished, the top started talking. :P That 10,000 rpms giving it a haircut must have gotten it's attention.
So, we came to an agreement and I pulled out the spoke shave for the smoothing of the natural edges on the spaulted maple pieces. I enjoyed this part, more spokeshave practice. Edge one:
02 roll edge 1.jpg
02 roll edge 1.jpg (272.91 KiB) Viewed 6016 times
Edge two:
03 roll edge 2.jpg
03 roll edge 2.jpg (266.64 KiB) Viewed 6016 times
After that was done, I ran the top across the table saw to square up the ends and get rid of the rough gunk hiding there. Just a little around the ears? ;)
04 trimmed the ends.jpg
04 trimmed the ends.jpg (265.07 KiB) Viewed 6016 times
Now, I turned my attention to prepping some walnut for the box... to go with the top. I decided to use the same walnut board I used for the top insert, but the problem was... it was too fat.
05 too fat.jpg
05 too fat.jpg (294.66 KiB) Viewed 6016 times
Book match solution... but rather than the band saw, I decided to use the table saw. First, I needed to get rid of the natural (live) edge. Ripped that off. Once that was done I ripped off just a blade width to insure the bottom edge was also square. Then, book matching is easy if you are patient. I made ONE inch deep passes, on both sides of the vertical board, and then increased by about an inch with each additional pass. This keeps you from bogging the blade, burning the wood, OR ... binding the cut and causing the table saw to turn the wood you are book matching into a big heavy arrow and shooting it into whatever is located behind the table saw. A tool box, the wall, or ... :roll: ... You.

A dozen one inch passes later, the book match was done.
06 tablesaw bookmatch.jpg
06 tablesaw bookmatch.jpg (255.83 KiB) Viewed 6016 times
The main dust collector had done a good job but the shop still had fine walnut dust in the air and I was out of there until the ceiling mounted unit cleared the air. Next up, box building in walnut, AND building a top for the mahogany box already on the bench. I'll figure out something for that. (No, seriously, I will. Wasn't that where you guys came in? :? )
You can tell a lot about the character of a man...
by the way he treats those who can do nothing for him.

I don't look back at the things I can no longer do, I just look forward to the things I still can.

User avatar
dave77
Drover
Posts: 2317
Joined: Mon Sep 25, 2017 12:09 am
Location: Eastern Washington
United States of America

Re: Playing with Boxes

Post by dave77 » Mon Jan 29, 2018 1:23 pm

That spaulted maple sure is pretty, looking forward to seeing it with whatever finish you put on it.

User avatar
BrokenolMarine
Ranch Foreman
Posts: 7471
Joined: Sat Nov 26, 2016 8:28 am
Location: South Central Oklahoma in the mountains
United States of America

Re: Playing with Boxes

Post by BrokenolMarine » Tue Jan 30, 2018 1:00 pm

Out in the shop for a while this morning, working on the walnut box for the walnut and spaulted maple top. I will of course, glue up and fit the pieces a bit better, but here is a test fit. ;)

I ran the four pieces in gang across the jointer to smooth the bottom and tops, first, but they ought to fit nicely.
01 Smoooth.jpg
01 Smoooth.jpg (253.23 KiB) Viewed 5993 times
A view from the front side.
02 test fit.jpg
02 test fit.jpg (309.08 KiB) Viewed 5993 times
A view from the back.
03 back side.jpg
03 back side.jpg (254.05 KiB) Viewed 5993 times
Once I glue the sides and top together, there will be some final fitting of the top to blend, and I'll cut the top loose.. you'll see. 8-)
Last edited by BrokenolMarine on Tue Jan 30, 2018 10:44 pm, edited 1 time in total.
You can tell a lot about the character of a man...
by the way he treats those who can do nothing for him.

I don't look back at the things I can no longer do, I just look forward to the things I still can.

Henry88

Re: Playing with Boxes

Post by Henry88 » Tue Jan 30, 2018 1:46 pm

Priceless...............

User avatar
BrokenolMarine
Ranch Foreman
Posts: 7471
Joined: Sat Nov 26, 2016 8:28 am
Location: South Central Oklahoma in the mountains
United States of America

Re: Playing with Boxes

Post by BrokenolMarine » Wed Jan 31, 2018 11:03 am

Out this morning and back at it. Have a new "toy" to try out, so after gluing up the walnut box to go with the walnut/spaulted maple top, I thought I would give 'er a go. I asked a blacksmith friend of mine about obtaining a piece of heavy metal to make the plate, and he said he would make me a nice heavy dowel forming plate as long as it was no rush. He worked on it between the horses, making goat milking stands, and all the other work he had to do. He stopped by on Monday evening and dropped it off and ... boom. Loved it.
01 dowel forming plate.jpg
01 dowel forming plate.jpg (251.07 KiB) Viewed 5978 times
The forming plate? Basically, you take a piece of wood scrap, cut it to the size dowel you want, say you need "3/8", and drive it thru the appropriate sized hole. The sharp edge of the drilled hole cuts off the square edges and It comes out ... a dowel. :D The key is to round off the tip of the starting blank to make it start easier, and not hammer too hard. ;)
02 quick test.jpg
02 quick test.jpg (318.15 KiB) Viewed 5978 times
another key is to get your wood square, and I just knocked out three test pieces and they weren't exactly 3/8's, but we see that it works. Think we could run into lowes and buy spaulted maple dowels? (Or Lacewood, Ebony, Black Cherry?)

I'll knock out some smaller short dowels to cut plugs from for accents on the box.
03 accents.jpg
03 accents.jpg (295.38 KiB) Viewed 5978 times
The plate already has a new home on the tool wall.
04 new home.jpg
04 new home.jpg (304.79 KiB) Viewed 5978 times
Oh, yeah... the glue up?
Here tis....
05 clamped up.jpg
05 clamped up.jpg (290.97 KiB) Viewed 5978 times
You can tell a lot about the character of a man...
by the way he treats those who can do nothing for him.

I don't look back at the things I can no longer do, I just look forward to the things I still can.

User avatar
BrokenolMarine
Ranch Foreman
Posts: 7471
Joined: Sat Nov 26, 2016 8:28 am
Location: South Central Oklahoma in the mountains
United States of America

Re: Playing with Boxes

Post by BrokenolMarine » Wed Jan 31, 2018 11:04 am

Once the box is set, I'll glue on the top, let that set, and then start shaping the combo so I can then cut the top loose again and continue the box.
It will make sense in the end. Just another box building technique.
You can tell a lot about the character of a man...
by the way he treats those who can do nothing for him.

I don't look back at the things I can no longer do, I just look forward to the things I still can.

User avatar
BrokenolMarine
Ranch Foreman
Posts: 7471
Joined: Sat Nov 26, 2016 8:28 am
Location: South Central Oklahoma in the mountains
United States of America

Re: Playing with Boxes

Post by BrokenolMarine » Thu Feb 01, 2018 9:52 am

Got some work done after lunch yesterday.
Since the dowels I made were too thick to put into the sides, they needed to be smaller. I drilled an additional hole between the 3/8 ths and the 5/16 ths and then drove the dowels thru the intermediate hole and then the 5/16 ths. This reduced the size and gave me nice smooth sides and I should have enough plugs to put three on each side. One in the edge of the top when it's separated, and two on each side, although I might go with three for each corner of the sides. If need be, I can make another dowel. :)

Round the tip...
01 round the tip.jpg
01 round the tip.jpg (340.3 KiB) Viewed 5968 times
Drive it thru...
02 drive it.jpg
02 drive it.jpg (260.79 KiB) Viewed 5968 times
You end up with nice dowels for pins.
03 plugs.jpg
03 plugs.jpg (293.32 KiB) Viewed 5968 times
After removing the box from the clamps, I test fitted the top, then applied the glue and clamped 'er up.
04 glue up.jpg
04 glue up.jpg (304.13 KiB) Viewed 5968 times
05 glue up 2.jpg
05 glue up 2.jpg (273.61 KiB) Viewed 5968 times
I came out last night to set the shop for low teen temps.... Turning Off the main heat and turning ON the backup.
I took off the clamps and checked the box.... it's was ready to be worked today....
I intentionally left a little overhang so it could be cut back to a perfect fit. The LAST thing I wanted was to try and make it a perfect fit up front and come up short. :roll: It's very hard to make the sides of the box smaller after it's all glued up. :twisted:
06 ready to shape.jpg
06 ready to shape.jpg (297.33 KiB) Viewed 5968 times
You can tell a lot about the character of a man...
by the way he treats those who can do nothing for him.

I don't look back at the things I can no longer do, I just look forward to the things I still can.

User avatar
clovishound
Drover
Posts: 2520
Joined: Wed Apr 13, 2016 4:18 pm
Location: Summerville SC
United States of America

Re: Playing with Boxes

Post by clovishound » Thu Feb 01, 2018 11:48 am

BOM, are you concerned about wood movement with the top glued to the box frame?
There is, I think, humor here which does not translate well from English to sanity. - Sanya

User avatar
BrokenolMarine
Ranch Foreman
Posts: 7471
Joined: Sat Nov 26, 2016 8:28 am
Location: South Central Oklahoma in the mountains
United States of America

Re: Playing with Boxes

Post by BrokenolMarine » Thu Feb 01, 2018 12:15 pm

I haven't had a problem but once, and since I haven't been selling the boxes, I don't worry too much. This one will probably go to the Son-in-Law in OK. With a box as small as this, and the rigidity offered by the frame, it's never been an issue.

I have had a box top warp that was just a single piece of wood, unsupported, fitted to the box. But it was one of mine I kept. Tossed the top and kept the box on top of the dresser to toss the wallet, keys and such into ... ;) On most of my designs, the bottoms float in dadoes, but the inserts are glued in place.
For example, the Cherry Gun Case:
and it closes.jpg
and it closes.jpg (271.47 KiB) Viewed 5680 times
It's done.jpg
It's done.jpg (256.36 KiB) Viewed 5680 times
It hasn't moved and the inserts top and bottom are both bookmatched, and glued into place. 8-)
I may have just been VERY lucky. :twisted: (knock on wood?) :roll:
You can tell a lot about the character of a man...
by the way he treats those who can do nothing for him.

I don't look back at the things I can no longer do, I just look forward to the things I still can.

User avatar
BrokenolMarine
Ranch Foreman
Posts: 7471
Joined: Sat Nov 26, 2016 8:28 am
Location: South Central Oklahoma in the mountains
United States of America

Shaping the Top

Post by BrokenolMarine » Thu Feb 01, 2018 12:21 pm

Went out this morning and worked on shaping the top, now that the glue had a chance to set up overnight. Spent some time with the spoke shave and a handplane to make the transition as smooth as I could get it. Before I cut the top loose, I will insert the accent pins, which will both look nice... ;) ... hopefully... and add to the strength of the box. Most certainly. Then I will cut the top loose to allow the access to add the bottom from the inside.

After that, I will build the tray or trays to turn this into a masculine jewelry box. If it turns out decent, it is Oklahoma bound for the Son-in-law. :P
Transition produces nice thin shavings, which I save for the wife to use in her gift baskets....
01 shaping the top.jpg
01 shaping the top.jpg (282.24 KiB) Viewed 5680 times
As always, there is final sanding, but we are getting there...
02 getting there.jpg
02 getting there.jpg (284.79 KiB) Viewed 5680 times
The stains on the sides are from the pressure of the rubber clamps, they will sand away. If not... kindling for a nice big fire. :evil: :cry:
You can tell a lot about the character of a man...
by the way he treats those who can do nothing for him.

I don't look back at the things I can no longer do, I just look forward to the things I still can.

User avatar
BrokenolMarine
Ranch Foreman
Posts: 7471
Joined: Sat Nov 26, 2016 8:28 am
Location: South Central Oklahoma in the mountains
United States of America

Re: Playing with Boxes

Post by BrokenolMarine » Thu Feb 01, 2018 12:22 pm

I should have put wax paper under the clamps. :x
Sux to be senile.
(A senior?)
You can tell a lot about the character of a man...
by the way he treats those who can do nothing for him.

I don't look back at the things I can no longer do, I just look forward to the things I still can.

User avatar
BrokenolMarine
Ranch Foreman
Posts: 7471
Joined: Sat Nov 26, 2016 8:28 am
Location: South Central Oklahoma in the mountains
United States of America

The Dowels go in...

Post by BrokenolMarine » Mon Feb 05, 2018 12:16 pm

Some time in the shop this morning, Dowels and Sheath... :D
Put the new brad point bit in, and after some careful measuring, then remeasuring, I drilled the holes for the custom dowels, made with the new dowel plates.
02 box drilled for dowels.jpg
02 box drilled for dowels.jpg (240.58 KiB) Viewed 5663 times
Then, holding my breath and hoping nothing splits, I carefully drove in the dowels after coating them with glue.
03 dowels in.jpg
03 dowels in.jpg (295.64 KiB) Viewed 5663 times
Once they are dry, I'll trim then flush and sand them.
Then I'll cut the top free and move on to the next phase... if I can remember what that is.
:lol:
You can tell a lot about the character of a man...
by the way he treats those who can do nothing for him.

I don't look back at the things I can no longer do, I just look forward to the things I still can.

User avatar
BrokenolMarine
Ranch Foreman
Posts: 7471
Joined: Sat Nov 26, 2016 8:28 am
Location: South Central Oklahoma in the mountains
United States of America

Cutting off the top...

Post by BrokenolMarine » Fri Feb 09, 2018 10:46 am

Got busy this morning.... and finally got the top free. After some final steps.
First I sanded the entire box with 120, and 220. Then I rolled both sides of the top, as I wasn't happy with the look of the sharp edges. :? Ah... that's better.
01 rolled the sides.jpg
01 rolled the sides.jpg (270.2 KiB) Viewed 5655 times
I also went over the box and filled any cracks with very fine sawdust from the sanding process and used the THIN CT glue to set it, and sanded it smooth. No more cracks. This also stabilizes any cracks to keep them from spreading.

Time to cut the top off. Set up the fence on the table saw and the depth where it would JUST pass thru the sides. I made the first two passes on the long sides.
02 long cuts.jpg
02 long cuts.jpg (267.1 KiB) Viewed 5655 times
Before making the short side cuts, you have to stabilize the box so the top doesn't move and mess up the edges. This can be done several ways. Since my blade is an 1/8" and lowes paint stir sticks are 1/8", I cut spacers on the band saw from a paint stir stick and taped them in place.
03 spacers.jpg
03 spacers.jpg (276.63 KiB) Viewed 5655 times
After I made the first short side cut, I stopped and taped a spacer in place on THAT short side cut as well. Then and only then did i make the last cut.
04 four sides.jpg
04 four sides.jpg (272.95 KiB) Viewed 5655 times
As you can see, even with all four sides cut free, the top stayed in place, I got an even cut all the way around and no distortion.
Now I can remove the tape and the spacers and the top is finally free.
05 top free.jpg
05 top free.jpg (271.07 KiB) Viewed 5655 times
Before I lose orientation, I make a chalk mark inside the top and bottom as a reference until the hinges are installed later.
This is the look I will achieve down the road.
06 it'll open.jpg
06 it'll open.jpg (287.99 KiB) Viewed 5655 times
Now, it's time to build the manly trays that go in the box, the bottom, and do more sanding. Then decide on the finish. The hard part is done.
You can tell a lot about the character of a man...
by the way he treats those who can do nothing for him.

I don't look back at the things I can no longer do, I just look forward to the things I still can.

User avatar
BrokenolMarine
Ranch Foreman
Posts: 7471
Joined: Sat Nov 26, 2016 8:28 am
Location: South Central Oklahoma in the mountains
United States of America

Re: Playing with Boxes

Post by BrokenolMarine » Wed Feb 14, 2018 2:34 pm

I got back out in the shop the last couple days to work on the cane and some work on the box. One of the tasks was to begin planning the interior trays for the dang thing. I have decided on two trays for the left hand side. The uppermost will be 3-1/2 inches wide by 9-3/4" deep and 1 inch tall. The second tray below it, will be 4-1/2" wide and 1-1/2 inches tall. The sides will be walnut, but the bottoms? Highly figured spaulted maple. :) The right side of the box will have the full depth available in case the Son-in-law wants to put a couple watches in the boxes there, or perhaps coin trays or the like stacked on that side. Whatever.

I found two nice pieces of the spaulted maple and just needed to process it into the proper size and shape for the bottoms. The first, which will be used for the 3-1/2 tray, was about an inch and a half wide, and a half inch thick. Perfect for bookmatching.
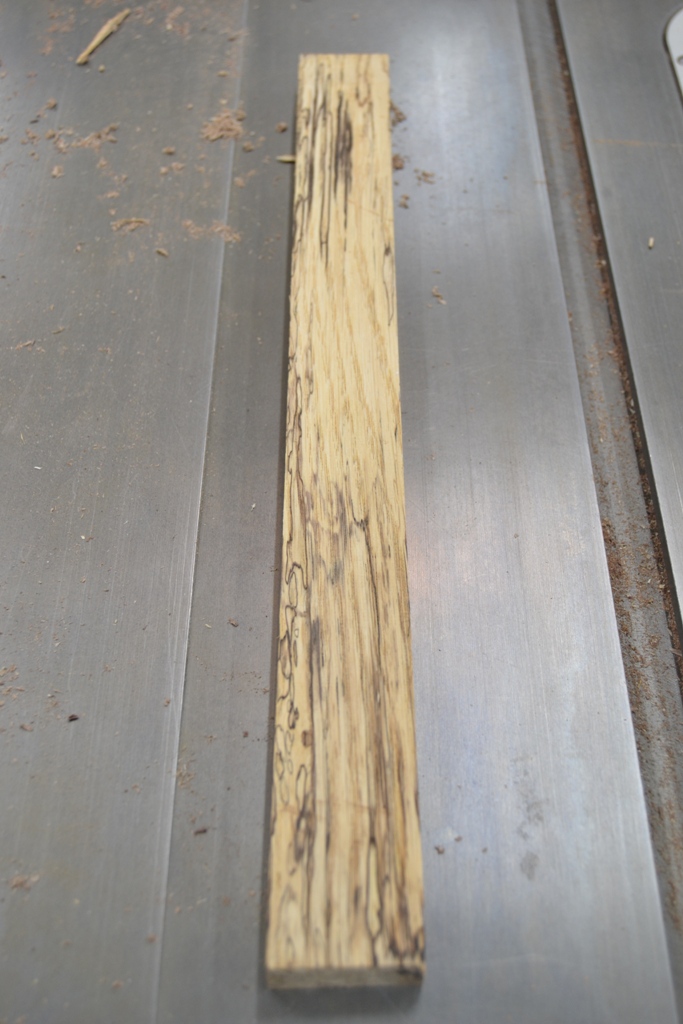
01 to be bookmatched.jpg
01 to be bookmatched.jpg (259.25 KiB) Viewed 5644 times
After careful setup of the table saw and a couple passes over the blade, I had a bookmatched bottom for the smaller upper tray, just needs to be cut to the exact size when the sides are done. Of course, I'll joint the center edges so there is no gap.
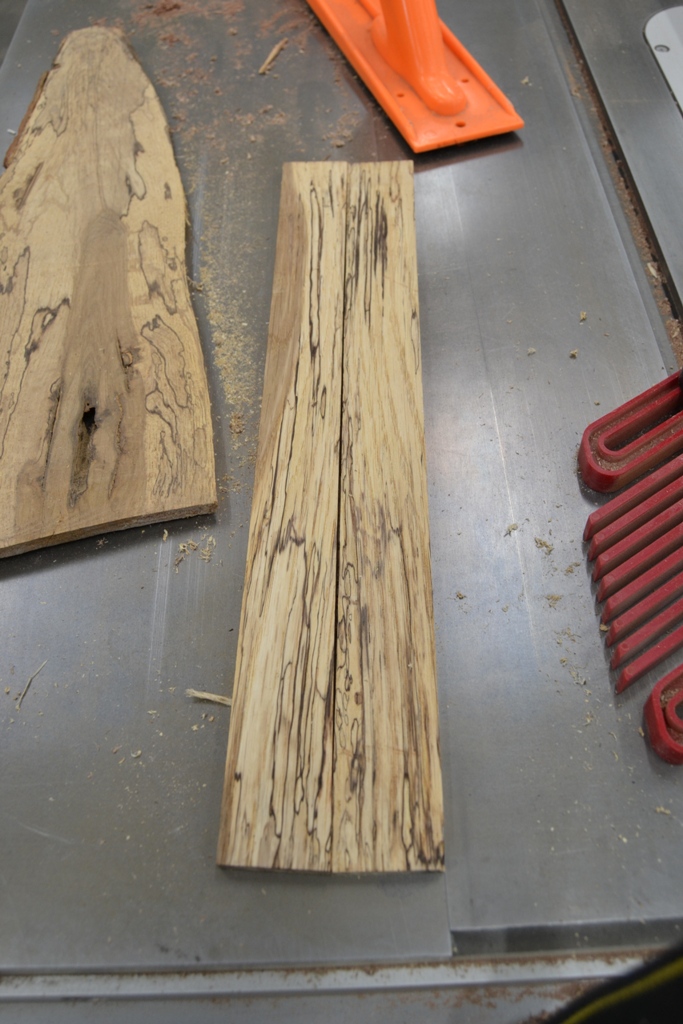
02 two magic passes.jpg
02 two magic passes.jpg (306.08 KiB) Viewed 5644 times
The larger piece will be for the larger tray and I was about to cut the damaged end off, when I decided I could probably save it.
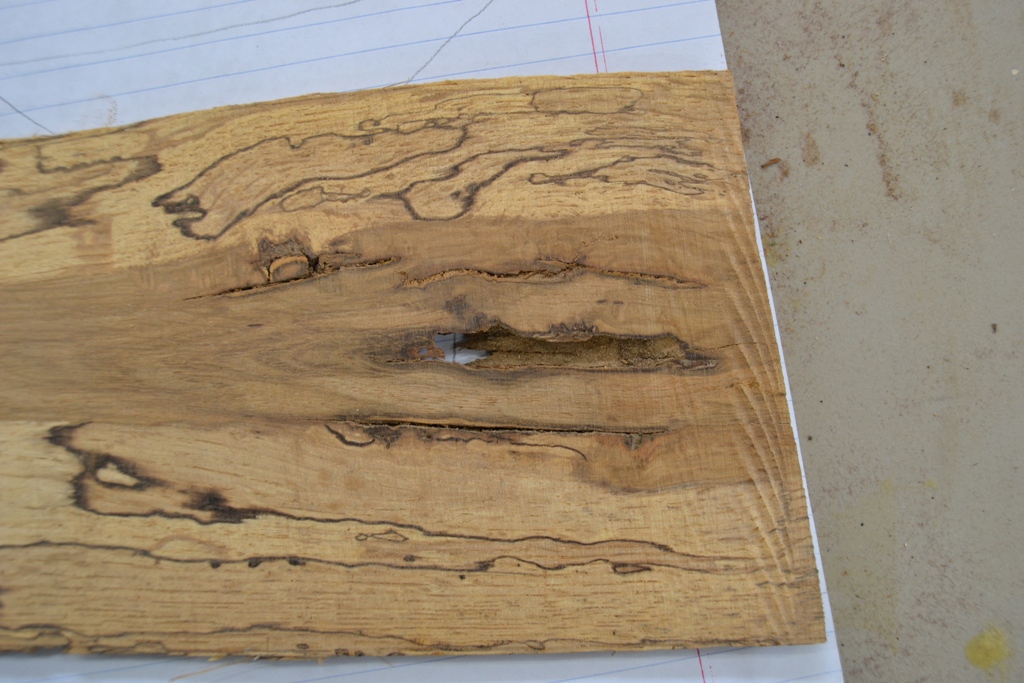
03 save it.jpg
03 save it.jpg (337.63 KiB) Viewed 5644 times
The nicest grain surrounded the hole that went all the way through. Isn't that always the case? :? First I gathered all the goodies I needed to make it happen. The CT glue and Accelerator, the blue tape, some walnut dust I had saved, exacto knife... you know, the goodies.
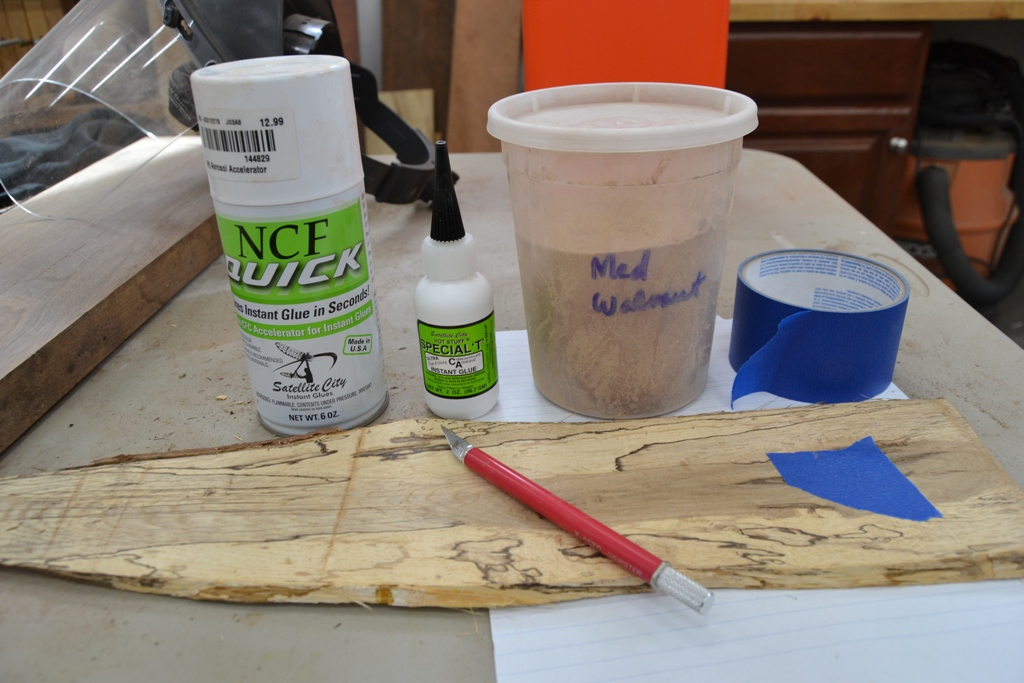
05 goodies.jpg
05 goodies.jpg (298.76 KiB) Viewed 5644 times
The first step was to tape the back closed...
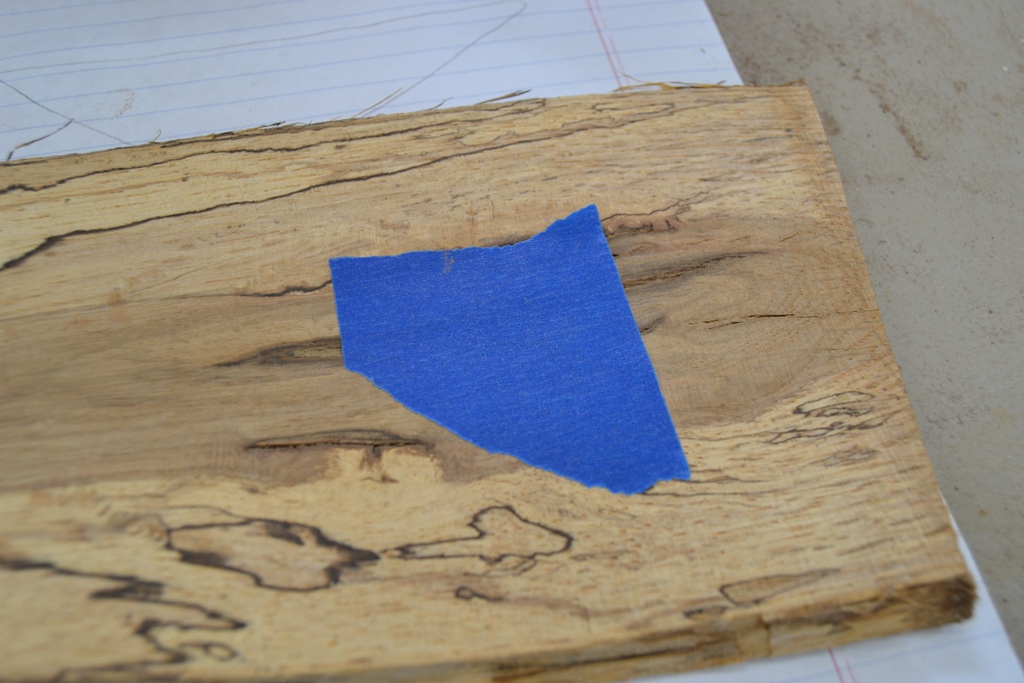
04 first step.jpg
04 first step.jpg (286.99 KiB) Viewed 5644 times
Next I laid in a bottom layer of the Thick CT glue, and sprayed it with the Accelerator. In 15 seconds, it was set.
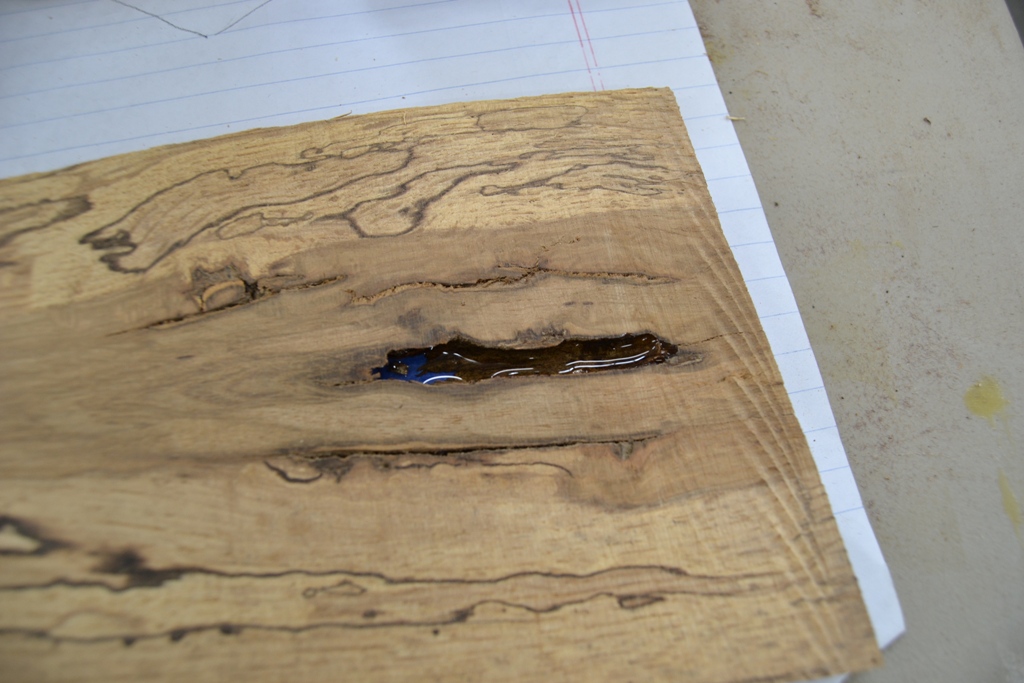
06 bottom layer.jpg
06 bottom layer.jpg (279.21 KiB) Viewed 5644 times
The next step is to pack in a color layer using the fine walnut sawdust. A powder really, saved from a sanding operation from one project or another. I have cups of this dust from various species of wood. Never know when it will come in handy.
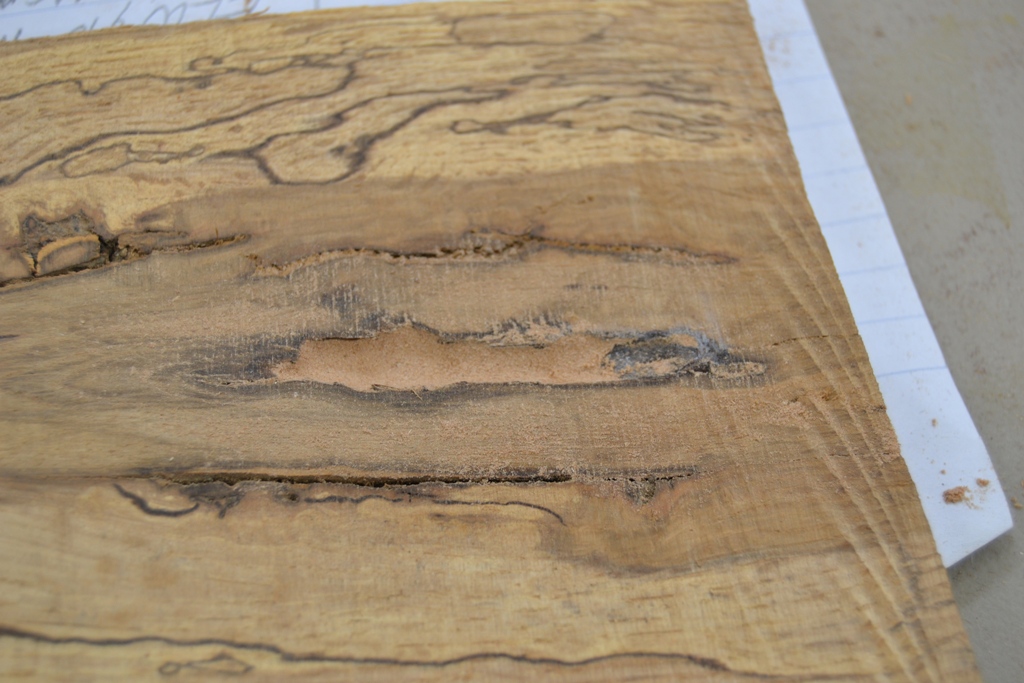
07 color layer.jpg
07 color layer.jpg (300.63 KiB) Viewed 5644 times
Once that is done, you add additional layers of the CT, then spray with the accelerator to cure it, thin layers work best. Once you have built up to just proud of the surface, you sand, and sand, and keep sanding. I also cheat and use the cabinet scraper.
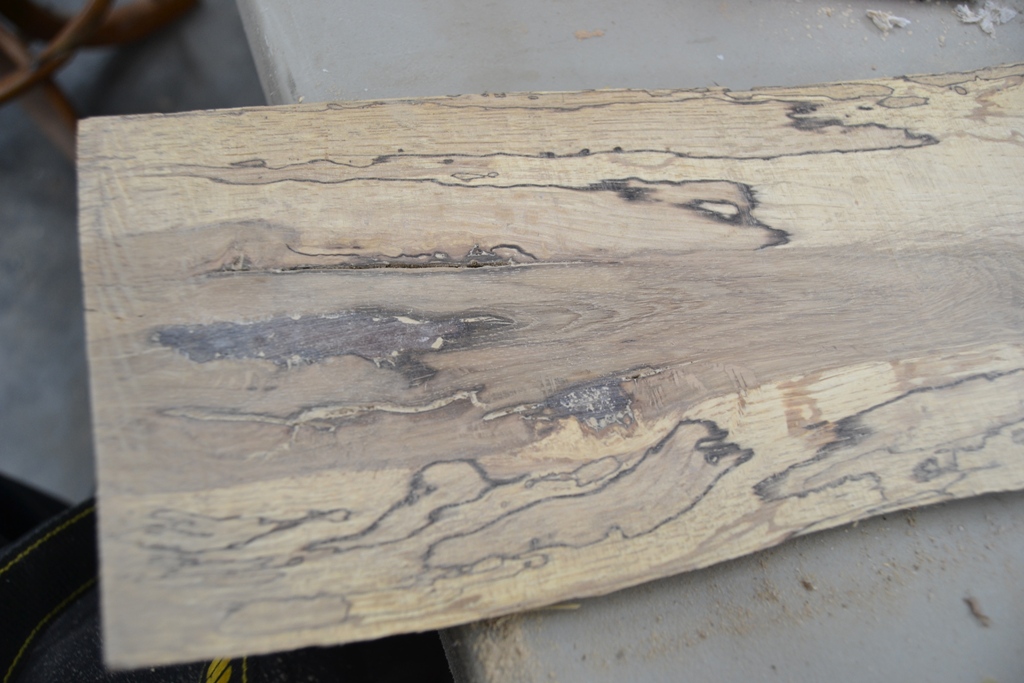
08 keep sanding.jpg
08 keep sanding.jpg (285.71 KiB) Viewed 5644 times


Once I get to the rough finished point, I stop. I'll get the final sanding done when I sand the entire project.
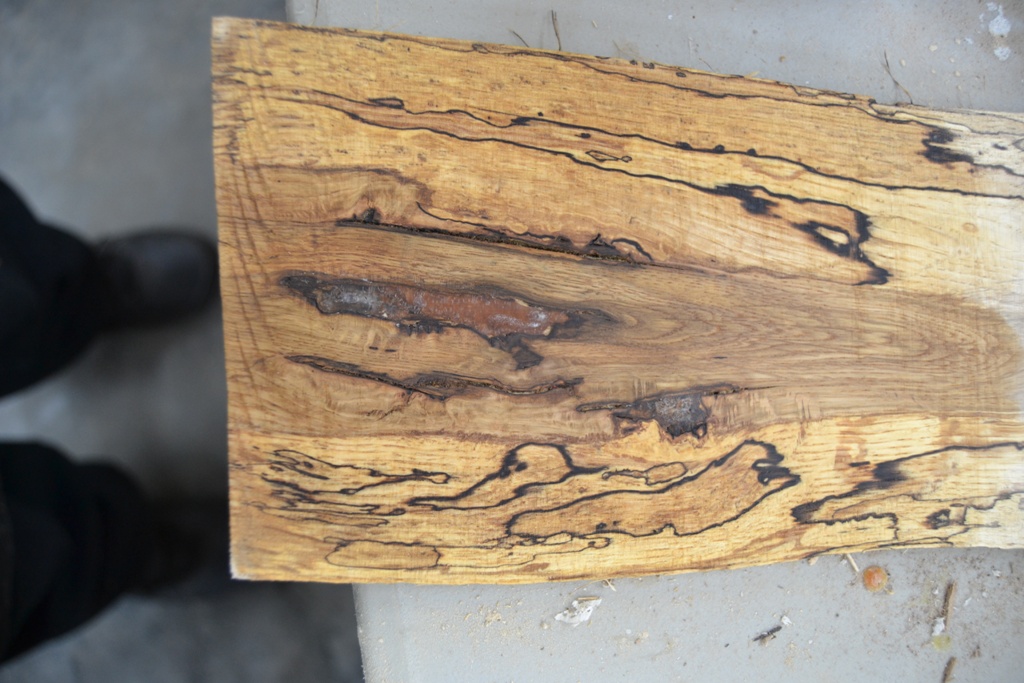
09 rough finished.jpg
09 rough finished.jpg (279.38 KiB) Viewed 5644 times
Not bad for a piece of wood that would have had an entire section tossed due to a big penetrating hole and gouge. I squared off the bottom edge, then squared up the sides... Now the two pieces for the bottoms are just waiting on the bench for the sides to be done so they can be cut to the exact sizes.
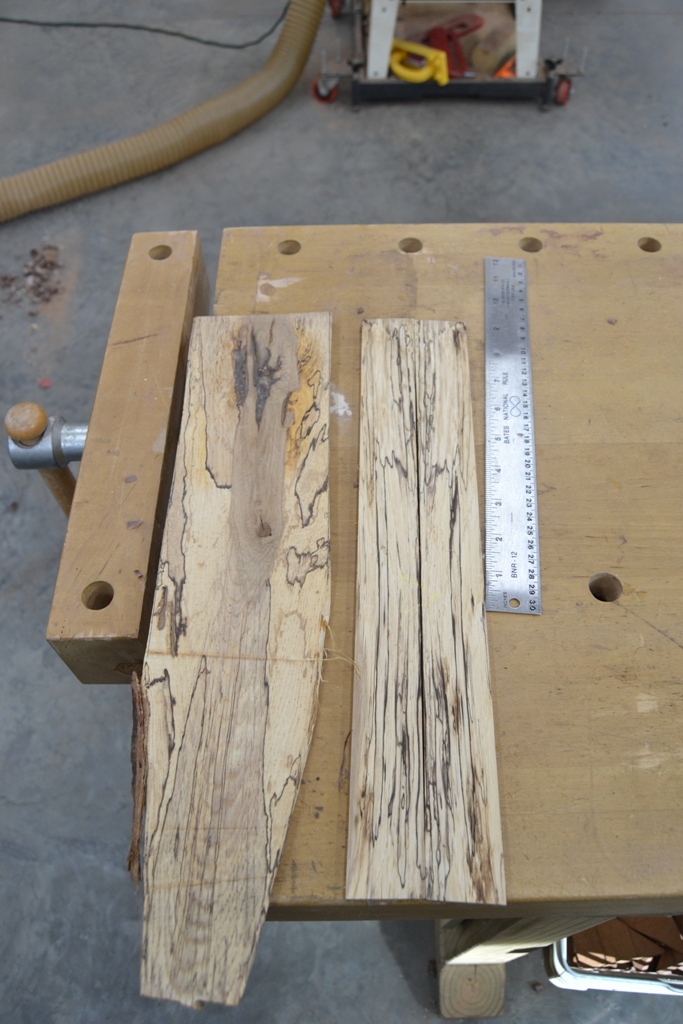
10 waiting to be sized.jpg
10 waiting to be sized.jpg (296 KiB) Viewed 5644 times
You can tell a lot about the character of a man...
by the way he treats those who can do nothing for him.

I don't look back at the things I can no longer do, I just look forward to the things I still can.

User avatar
BrokenolMarine
Ranch Foreman
Posts: 7471
Joined: Sat Nov 26, 2016 8:28 am
Location: South Central Oklahoma in the mountains
United States of America

interior shelf work

Post by BrokenolMarine » Thu Feb 15, 2018 1:20 pm

Out in the shop this morning for two sessions. The first involved jointing and gluing up the bottom for the 3-1/2 ish shelf. It will be sweet, I thought.
01 glue up.jpg
01 glue up.jpg (296.78 KiB) Viewed 5634 times
Then I got to work on cutting out the sides for the two shelves and dry fitting to make sure everything would go together.
02 shelves cut.jpg
02 shelves cut.jpg (270.86 KiB) Viewed 5634 times
During the dry fit process you discover where your problem areas are, without glue in the way to gum things up. (pun intended.) :)
This was also where I cut the bottoms to length and squared the sides of the bottoms. Carefully... I didn't want to have to try and find another pair of beautifully figured bottoms. (Not likely... :twisted: )
03 dry fit.jpg
03 dry fit.jpg (262.68 KiB) Viewed 5634 times
Next up is sanding the tops and sides of the rails to make them prettier, and any dressing up I might do. (Molding plane work?) :roll:
I might run a bead on the one edge that will show on both trays... ;) ... or not.
I will prestain the walnut and the maple since I plan to use two different stains.

Then I'll glue them up and put them in the clamps to dry. Maybe after an afternoon appointment we have to take care of. Sheesh... business does crop up now and then.

Watch this space.
You can tell a lot about the character of a man...
by the way he treats those who can do nothing for him.

I don't look back at the things I can no longer do, I just look forward to the things I still can.

User avatar
BrokenolMarine
Ranch Foreman
Posts: 7471
Joined: Sat Nov 26, 2016 8:28 am
Location: South Central Oklahoma in the mountains
United States of America

tray work

Post by BrokenolMarine » Sat Feb 17, 2018 12:51 pm

More work on the tray inserts this morning. Began shaping them with the molding plane and then sanded the final shaping. Just three sides, wanted that one edge to fit smoothly against that side of the box so left it flat. You'll see when I fit them to the box. ;) Once they were all fitted, I stained the components and once they are dry, I'll assemble them for a test fit one last time and then glue them up and let them dry. THEN I'll manufacture and fit the rails they'll rest on with the little bumps to hold them firmly in place. 8-)

Here is the plane and it's work
01 molding plane.jpg
01 molding plane.jpg (316.81 KiB) Viewed 5626 times
The small tray laid out with a view of what it might sorta look like after shaping...
02 three sides.jpg
02 three sides.jpg (276.07 KiB) Viewed 5626 times
I stained the bottoms with Colonial Maple, and the sides with Special Walnut. (I don't call it that, that's the name of the stain...)
I used the lighter stain on the maple so the grain would POP and not be lost to the darker stain... it seemed to work! :lol:
03 two stains.jpg
03 two stains.jpg (336.36 KiB) Viewed 5626 times
Getting close... I'll stain the box soon and we'll see how SHE looks as well. :)
You can tell a lot about the character of a man...
by the way he treats those who can do nothing for him.

I don't look back at the things I can no longer do, I just look forward to the things I still can.

User avatar
BrokenolMarine
Ranch Foreman
Posts: 7471
Joined: Sat Nov 26, 2016 8:28 am
Location: South Central Oklahoma in the mountains
United States of America

Re: Playing with Boxes

Post by BrokenolMarine » Sat Feb 17, 2018 12:52 pm

That repair of the hole in the larger bottom seems to have blended right in!
You can tell a lot about the character of a man...
by the way he treats those who can do nothing for him.

I don't look back at the things I can no longer do, I just look forward to the things I still can.

Post Reply