Page 1 of 2
A Knife Project (Ah.. Knives?)
Posted: Wed Jan 17, 2018 2:22 pm
by BrokenolMarine
Snowing... time to do something other than watch it fall. So, headed out to the shop. It was a slippery trip, but with the walker and careful steps...
I made it. The snow is still coming down, that small steady flow that you know will build up thick if it keeps up.

- 06 trip to the shop.jpg (295.3 KiB) Viewed 6371 times
Turning to look back out the window on the shop door, it's quite a view. I love the snow, it makes the yards look so nice and the blanket of snow, muffles the sound and makes it quiet outside. Traffic on our tertiary road has ground to a halt. What little we get is crawling.... they put down the chemicals before the storm started, then they forget us until it stops. Main roads, secondary roads get all the attention. Ah... the farmers come out later with tractors and blades to play.

One year VDOT told them NOT to scrape the road for fear they would damage it. Big Mistake... they actually went home like they were told. Folks stayed home til the VDOT guys could clear the roads, and called the Governor and complained.


- 01 view out the shop window.jpg (244.3 KiB) Viewed 6371 times
I laid out the two knives and started working at the fun part, choosing the handle blanks. This first match for the skinning knife seemed like a good match, but in the end, I went with Australian Lacewood.

I wanted something that would pop, and not as common.

- 02 this one.jpg (286.4 KiB) Viewed 6371 times
The kitchen knife for Miss Tina was easy, I went with her favorite. Curly Cherry.

- 04 curly cherry.jpg (2.54 MiB) Viewed 6371 times
Carefully laying out the blanks, to take maximum advantage of grain and flow, I cut them out on the band saw. There will be a lot of work to get them on the knife blanks. I have to glue and drill, then spend a lot of time shaping. In the end, it will all be worth it. Then I get to make another sheath.

- 05 cut out.jpg (317.36 KiB) Viewed 6371 times
Have to stop here, cold and damp doesn't play well with Arthur.

Re: A Knife Project (Ah.. Knives?)
Posted: Wed Jan 17, 2018 2:24 pm
by BrokenolMarine
The farmers? Not only do they clear the roads, but they will break the snow dams at the end's of their neighbor's drives. How's that for community?

Re: A Knife Project (Ah.. Knives?)
Posted: Thu Jan 18, 2018 3:28 pm
by BrokenolMarine
Got out in the shop this morning, and got to work on the first stage of mounting the knife scales. I decided after looking again at the Lacewood scales to book match that one and have an extra set for another knife down the road. That scale was WAY too thick for that knife. I use the screws or rivets that come with the knife kit as a guide. In this case, book matching worked out well. I used a Veritas marking tool and marked a center line down one half of the Australian Lacewood Scales, then cut them carefully in half on the bandsaw.

- 01 bookmatched.jpg (279.07 KiB) Viewed 6355 times

- 02 bookmatched two.jpg (298.63 KiB) Viewed 6355 times
Next up... drilling the holes in one half of each pair of scales, and keeping them centered by placing a screw or rivet in each hole as I drilled. Slow and steady gets the job done. After the half was drilled, I roughed the knife's surface with 80 grit sandpaper in prepar

- 03 drilled and roughened.jpg (312.94 KiB) Viewed 6355 times
Once I was ready to go, I mixed the epoxy and applied it to the side I was going to apply the drilled scale to. I had to be ready as this is FIVE minute epoxy. It's working time is less than five minutes. I needed to be ready to mount both scales in five minutes.

- 04 epoxy.jpg (230.34 KiB) Viewed 6355 times
I used a couple of the screws as guides to center the scale, then clamped it in place and removed the screws before they could become glued into place, dropped them in a prepared mineral oil bath to insure they weren't contaminated by the epoxy, and moved to the next scale.

- 05 guides only.jpg (270.32 KiB) Viewed 6355 times
Once both sets were clamped, I took a break to allow the epoxy to fully set up.

- 06 clamps.jpg (278.6 KiB) Viewed 6355 times

- 07 clamps on the kitchen knife.jpg (298.65 KiB) Viewed 6355 times
I came back out later and mixed a second batch of epoxy and glued on the second scales. These didn't need to be predrilled. I'll use the holes in the first side as a guide to drill thru to the off side.
Note the Curly Cherry handles on the kitchen knife will be thicker, to allow a nice grip for control. I will fade it into the transition in the front at the blade, but leave it nice and thick in the middle for a firm grip.

- 08 second scale cc.jpg (276.66 KiB) Viewed 6355 times
The lacewood handle on the skinning knife will be nicely shaped but not bulky. I'll make a nice leather sheath for that one, after it's all done.

- 09 second scale al.jpg (278.59 KiB) Viewed 6355 times
These will be left to set up overnight, assuring a solid bond. Then it will be shaping and sanding, countersinking with the special bits, and then adding the screws and / or rivets. NOTE the plastic sleeves covering the blades. I'll tape these in place for safety and leave them there until the knives are done. I don't like to bleed on my work.
As an aside... I found some paint pens, and marked the drawers in the rolling boxes to make it easier to find tools. Memory issues. LOL.

- 10 labels 1.jpg (283.07 KiB) Viewed 6355 times

- 11 labels 2.jpg (312.24 KiB) Viewed 6355 times
Skinner Work..
Posted: Fri Jan 19, 2018 12:09 pm
by BrokenolMarine
Out in the shop this morning after coffee and a bagel. Prepped both knives for shaping. First step?
Safety tape on the blades to prevent bleeding. I hate bleeding.


- 01 safety tape cc.jpg (249.8 KiB) Viewed 6341 times

- 02 both taped.jpg (291.72 KiB) Viewed 6341 times
I use the blue painters tape first, to keep the gunk off the blades, and tape the plastic sleeve to the knife. Then a double or triple layer of duct tape. Funny, the brand on this duct tape, is DUCK tape.

Next step is to use the holes in the one scale, to guide the drill press while you drill thru to the other side. A backer board on the off side prevents splitting.

- 03 drilling second side.jpg (243.8 KiB) Viewed 6341 times

- 04 both drilled.jpg (284.08 KiB) Viewed 6341 times
Now, I choose to shape the skinner first, mainly because I want to see if the Lacewood was a good a choice over the Cocobolo as I hope it was.
I took away a good bit of the extra on the bench sander, and because I just don't like the finger grooves, I smoothed them away while I was at it. If the grooves don't match the hand size of the user, they are really annoying, rather than an asset. I have a feeling that the "boss" might acquire this knife when all is said and done. She has already made a few comments about the "great choice" in scales.
I know she hates finger grooves.
Once the rough shaping was done, it was back to the bench and 80 grit cut into strips. Patience. Then 120 and 220.
Once that was done, I had to countersink for the screws, and then apply the Watco Oil. I chose Golden Oak, which won't overpower or hide the grain, but will highlight it.
Once it dries, I will either apply additional coats, or wax the knife and add the screws. Done.

- 05 skinner done.jpg (340.38 KiB) Viewed 6341 times

- 06 back side.jpg (343.44 KiB) Viewed 6341 times
Next up will be shaping the Curly Cherry Scaled kitchen knife with the damascus blade.

- 07 kitchen knife.jpg (318.75 KiB) Viewed 6341 times
Re: A Knife Project (Ah.. Knives?)
Posted: Fri Jan 19, 2018 2:34 pm
by clovishound
You keep your biscuits in the shop? I keep mine in the kitchen. They don't last long there.
Re: A Knife Project (Ah.. Knives?)
Posted: Fri Jan 19, 2018 3:17 pm
by BrokenolMarine
clovishound wrote:You keep your biscuits in the shop? I keep mine in the kitchen. They don't last long there.
I used to keep the dog biscuits there...
Then we sent the Boxer to OK for my granddaughter when she lost her Retriever. She had him since the day SHE was born. We couldn't keep up with the energy level of the boxer. He sleeps in the bed with the kid, keeps her safe from the roaming coyotes when she wanders around the small farm... she in turn, dresses him up and paints his toenails.

He loves her to death so he lets her get away with anything. It wouldn't be a good idea for anyone or anything to mess with little JO... Kelevra is 110 pounds of sheer muscle.
Now I keep the biscuit joiner in that drawer.

The drawer does have a lot of biscuits in it, but they are dry, hard, and wooden.
I tried one once... even with coffee... I didn't like it.

Re: A Knife Project (Ah.. Knives?)
Posted: Sat Jan 20, 2018 1:27 am
by clovishound
BrokenolMarine wrote:
The drawer does have a lot of biscuits in it, but they are dry, hard, and wooden.
I tried one once... even with coffee... I didn't like it.
My wife must have made them.
Re: A Knife Project (Ah.. Knives?)
Posted: Sat Jan 20, 2018 8:13 am
by BrokenolMarine
clovishound wrote:BrokenolMarine wrote:
The drawer does have a lot of biscuits in it, but they are dry, hard, and wooden.
I tried one once... even with coffee... I didn't like it.
My wife must have made them.
I'm just guessin'
She doesn't read this forum, right?
Re: A Knife Project (Ah.. Knives?)
Posted: Sat Jan 20, 2018 8:16 am
by BrokenolMarine
I will get back at it this morning after coffee. That curly cherry is calling.
Re: A Knife Project (Ah.. Knives?)
Posted: Sat Jan 20, 2018 11:52 am
by clovishound
BrokenolMarine wrote:clovishound wrote:BrokenolMarine wrote:
The drawer does have a lot of biscuits in it, but they are dry, hard, and wooden.
I tried one once... even with coffee... I didn't like it.
My wife must have made them.
I'm just guessin'
She doesn't read this forum, right?
I hope not!
This brings up the following issue, If she were to follow the pattern of screen names, with mine being Clovishound, my daughter is Clovispup, then her screen name would be unfortunate.
Re: A Knife Project (Ah.. Knives?)
Posted: Sat Jan 20, 2018 1:52 pm
by BrokenolMarine
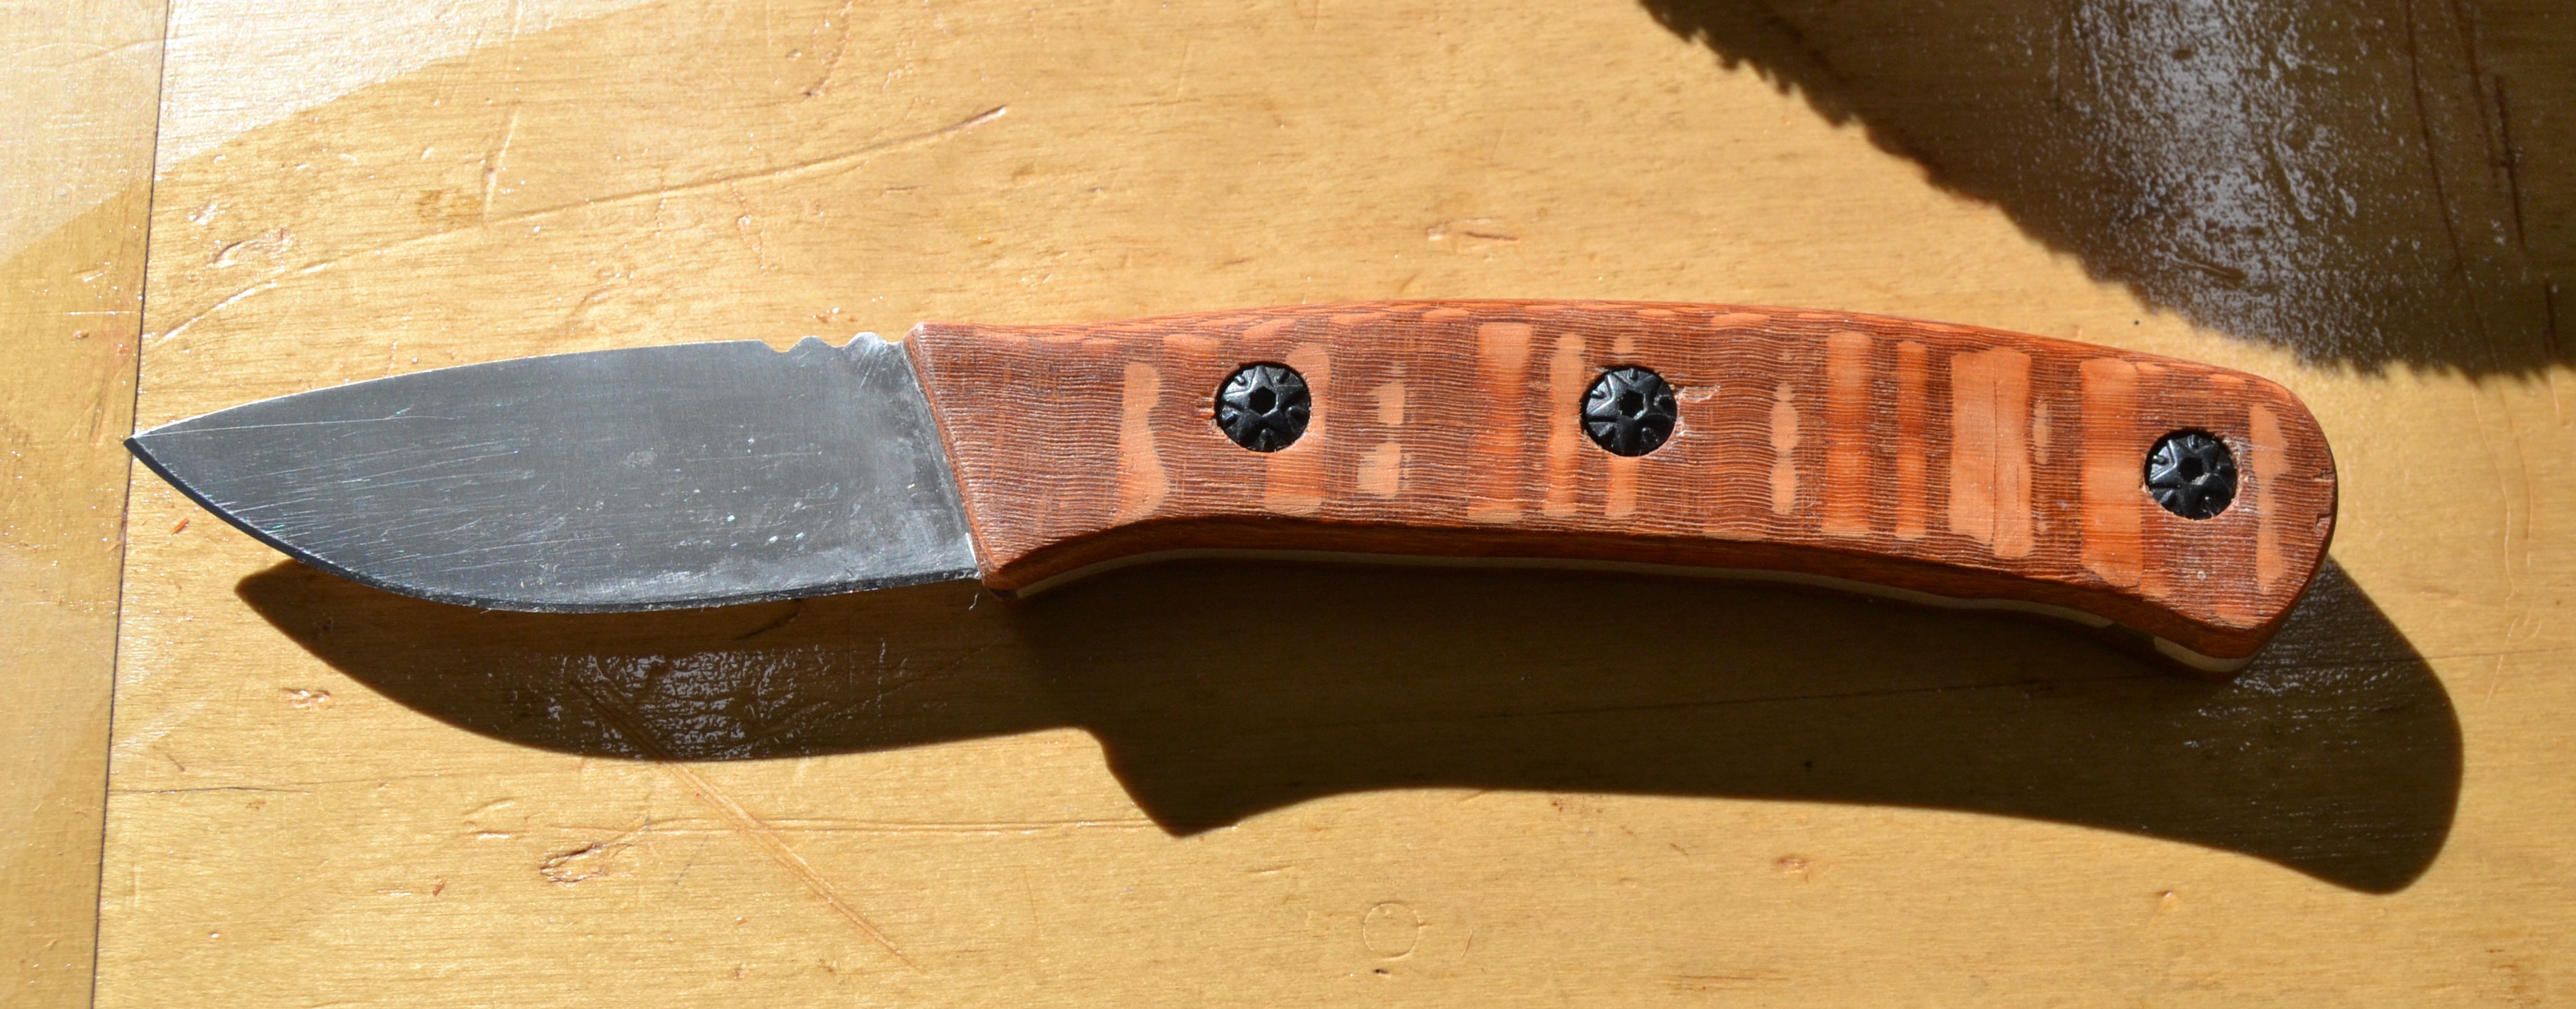
Shop time this morning. Waxed and Buffed the skinner twice, then installed the screws. They are as much for looks as anything else. I think the epoxy would hold the scales on until the next Century.
Next up for the Skinner? Sheath...
Oh, and clean that blade.
- skinner.jpg (1.46 MiB) Viewed 6617 times
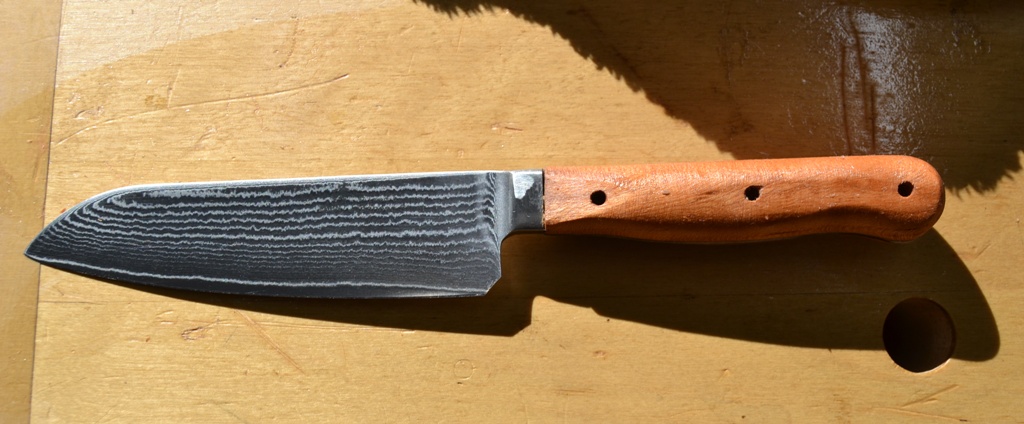
Started on the Chef's Knife. I have begun the shaping, and the 80 grit has done it's work. I have the general shape. I'll let Miss T check the feel of this in her hand when she gets home from her errands. If she likes it, I'll move up thru the grits and get it smoothed out... then apply some finish. Either the Golden Oak, a Natural, or... Medium Walnut. I'll have to test them.
- chef's knife.jpg (193.03 KiB) Viewed 6617 times
Re: A Knife Project (Ah.. Knives?)
Posted: Sat Jan 20, 2018 2:03 pm
by BrokenolMarine
clovishound wrote:BrokenolMarine wrote:clovishound wrote:
My wife must have made them.
I'm just guessin'
She doesn't read this forum, right?
I hope not!
This brings up the following issue, If she were to follow the pattern of screen names, with mine being Clovishound, my daughter is Clovispup, then her screen name would be unfortunate.

I had to clean coffee off my desk...
That is too funny.
Kitchen Knife Done... almost
Posted: Sun Jan 21, 2018 3:37 pm
by BrokenolMarine
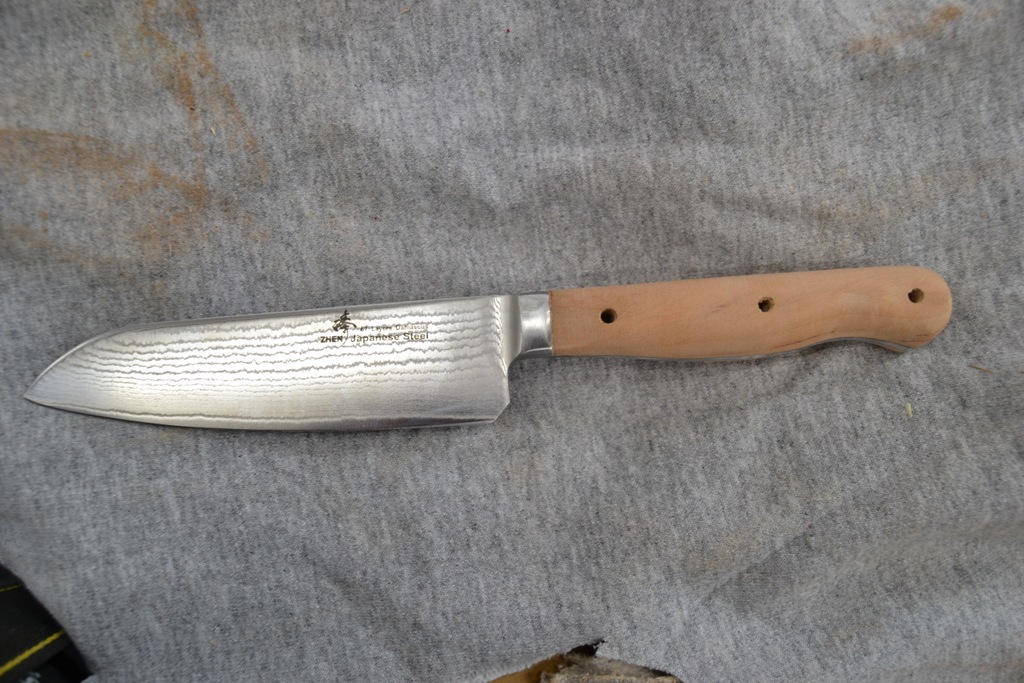
Miss Tina's kitchen knife is done, except for waxing.
Got back in the shop today and went up thru 80, 120 and 220 and did the final sanding and shaping.
- 01 final sanding.jpg (288.6 KiB) Viewed 6606 times
I carried the knife in and got the boss's approval, and she was very pleased with the size and shape of the handle and was fine with the 220 grit, no need to go to 400.
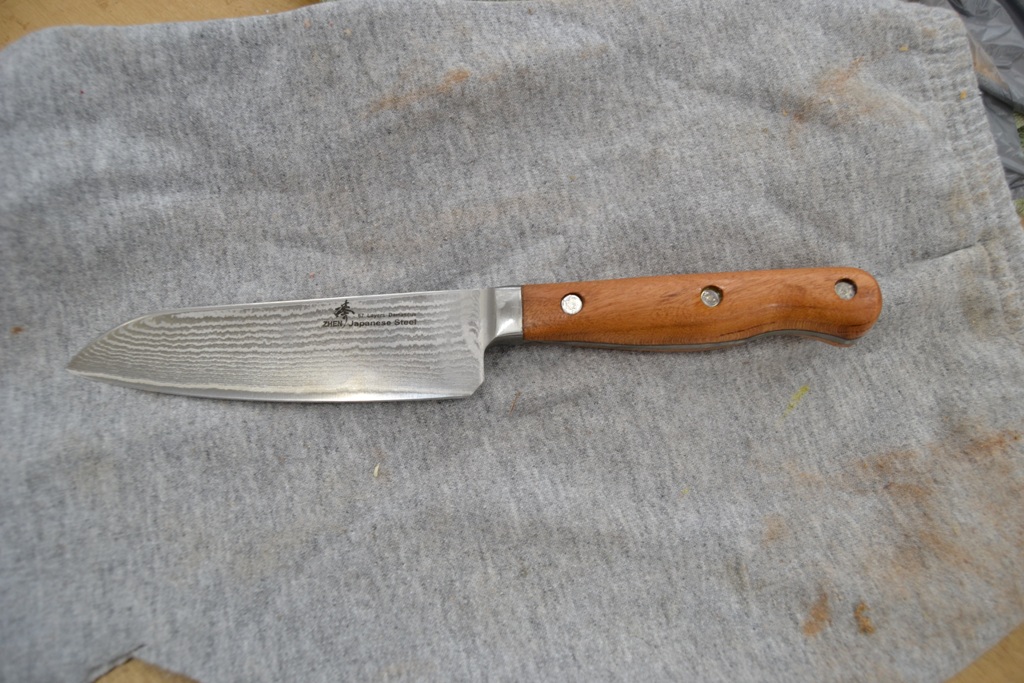
I went back out and wiped it down with mineral oil, and while it dried, I created a test plate with Natural watco as well as Golden Oak and Medium Walnut. The medium really popped the grain but was a little dark, so...
... I wiped it with the medium walnut, then immediately with the golden oak, which left the grain darkened a bit but brought it lighter a tad.
- 02 stained.jpg (294.75 KiB) Viewed 6606 times
As you can see, I also set the rivets... a pain in the patootie.
I needed three or four hands and the vises weren't set up to handle that.
I made it work.
I'll put three or four coats of the wax on 'er, and we'll be done.
Don't know what's next.
A box? I am going to knock out a rack for the Brad point bit set but that is an hour long job at most...
Re: A Knife Project (Ah.. Knives?)
Posted: Sun Jan 21, 2018 4:27 pm
by RetiredSeabee
Love the Damascus blade, look forward to the shined up finish.
Re: A Knife Project (Ah.. Knives?)
Posted: Mon Jan 22, 2018 7:29 am
by BrokenolMarine
I have a friend who is a welder, I might get him to weld a couple small rods on the faces of an extra c clamp. Tah dah, controlled knife rivet tool.
OR...
I could jb weld a piece of an 1/8" bolt between the faces, then once the jb sets, cut the bolt in half and square up the faces.
perfectly aligned homemade tool.
That should work... right?
Done and Done
Posted: Mon Jan 22, 2018 4:37 pm
by BrokenolMarine
Went out to wax that bad boy, and discovered that the holes with the recessed rivets collected the excess wax.

That would be a bad thing in any knife, but a kitchen knife...
... that could be deadly, collecting and incubating something nasty.
I used the rat tail whisk broom to collect a mixture of curly cherry and walnut sawdust, and put a drop of
THIN Hot Stuff CT Glue into each rivet hole, packed in the sawdust mixture then another drop of the glue on top. The Thin CT glue wicks. I then sprayed each hole with the fixer/accelerator as I completed it. In four or five seconds, the glue was cured.
After all six holes were done, I started over with the 80 grit and resanded the scales to make sure the holes were flush and the grips were again smooth as satin. 80, 120, 220... and done. This time, I used the Watco Natural, as there was still a residue of the Medium Walnut and the Golden Oak deep in the wood. Boom... looking good. The holes that were a problem, were now an accent.
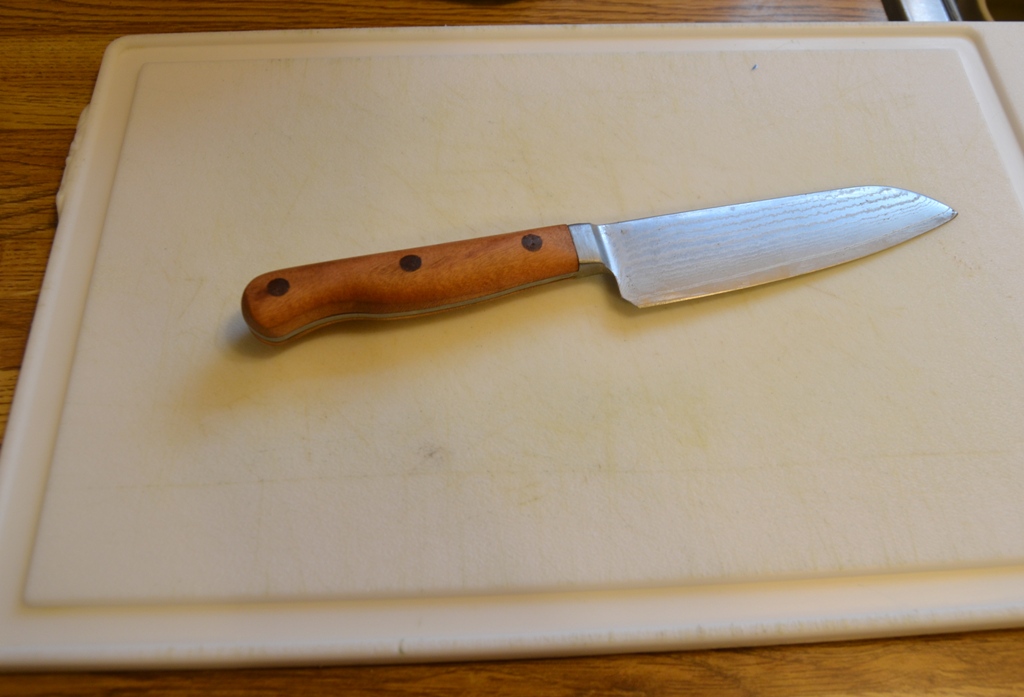
- 01 done.jpg (227.87 KiB) Viewed 6587 times
After the watco oil had time to cure, I waxed and buffed the knife three times and called 'er done for the second time.
She has taken her rightful place in the kitchen, on the magnetic rack above the sink. After careful consideration... I removed several of the excess knives we rarely used, and stored them away.
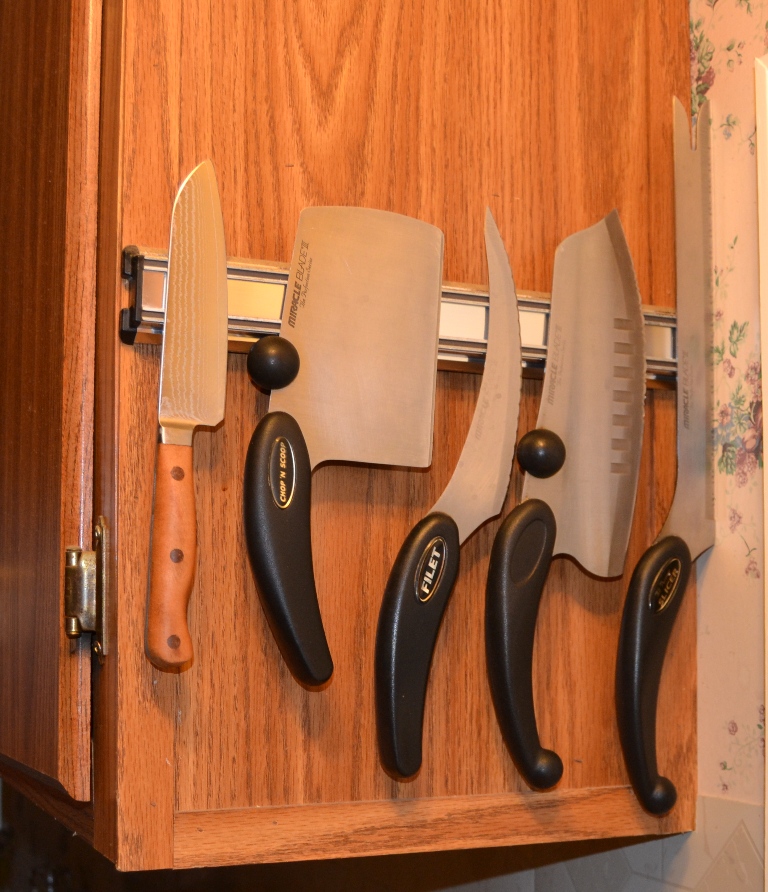
- 02 in place.jpg (349.68 KiB) Viewed 6587 times
Re: A Knife Project (Ah.. Knives?)
Posted: Mon Jan 22, 2018 5:46 pm
by RetiredSeabee
looks great, I was wondering what you were going to do with the recessed rivets.
sheath for the skinner
Posted: Sat Feb 03, 2018 12:46 pm
by BrokenolMarine
Quick inside project when it dropped back into the 20s.
Decided to knock out a sheath for the Skinning Knife, just in case.
Just a quick one, nothing too fancy. Cut out the sheath and went out and drilled the holes for the lacing.
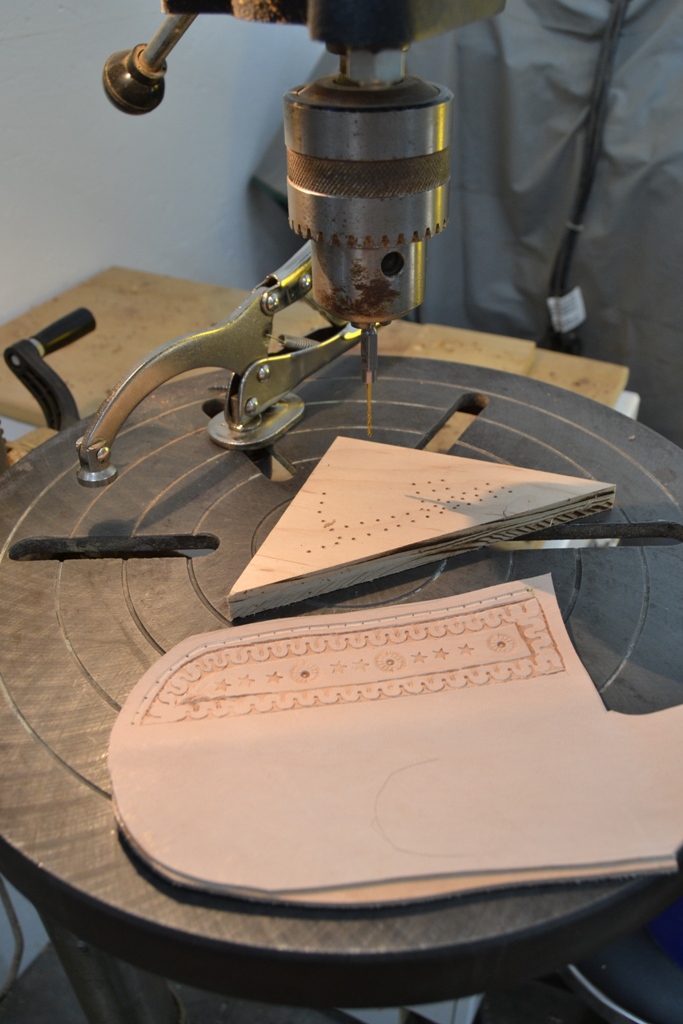
- 01 ready to drill.jpg (275.23 KiB) Viewed 6551 times
After that, I stamped out a basic design so it wouldn't be plain... a running W border and something in the middle.
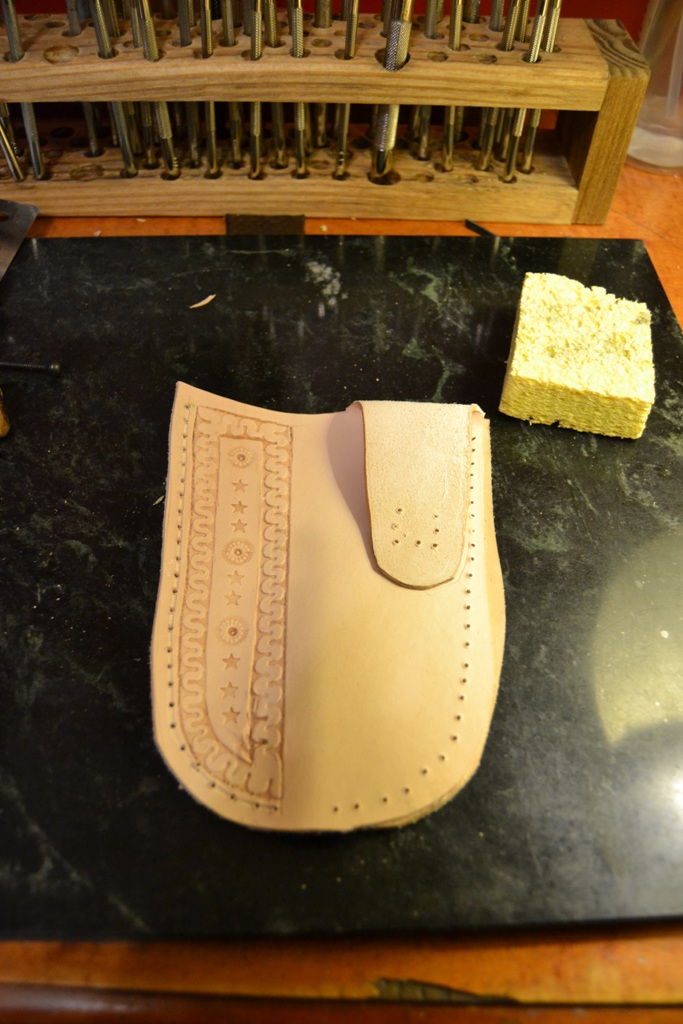
- 02 working.jpg (231.26 KiB) Viewed 6551 times
Stained it dark brown, then laced it up, after burnishing the single ply edges.
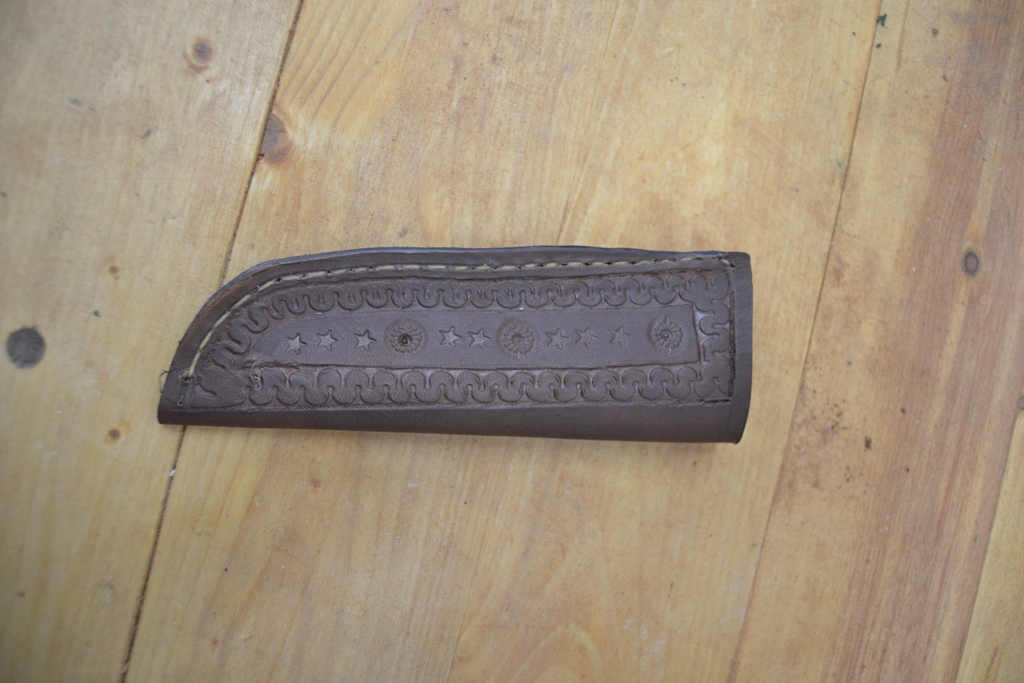
- 03 sewn up.jpg (290.24 KiB) Viewed 6551 times
After the lacing was done, I burnished all the edges and rubbed in the mink oil, then antiqued it, then applied more mink oil.
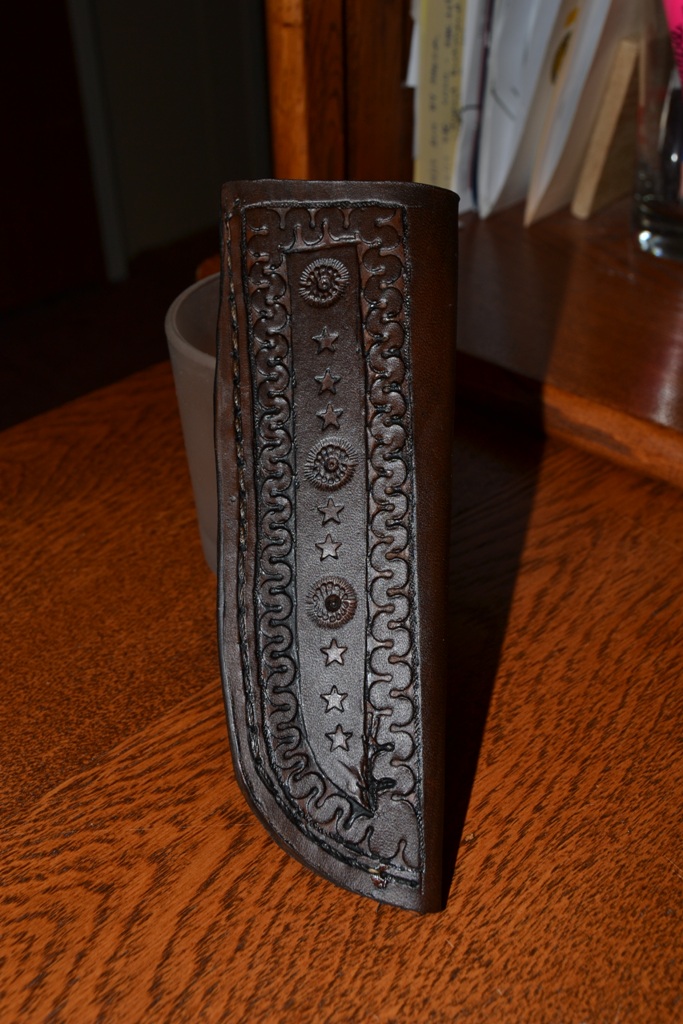
- 04 working sheath.jpg (264.64 KiB) Viewed 6551 times
Not too bad for a working sheath. If it was a gift, I would have remade the dang thing. I wasn't satisfied with the stamped pattern or the lines of the edges. But it's a working sheath for me... So...
"It'll do donkeh, it'll do."
I am putting tung oil on the knife handle, so a picture of the knife in the sheath will come later.
Re: A Knife Project (Ah.. Knives?)
Posted: Sat Feb 03, 2018 10:26 pm
by Jdl447
Looking good!
I really enjoy reading about your projects.
Still playing with the Sheaths
Posted: Sun Feb 04, 2018 12:07 pm
by BrokenolMarine
Ice on the ground outside... ramp is very slick to the workshop.. so working inside.
Practicing leather work, so another shot at the sheath, just for the fun of it.
Cut out another to get started.
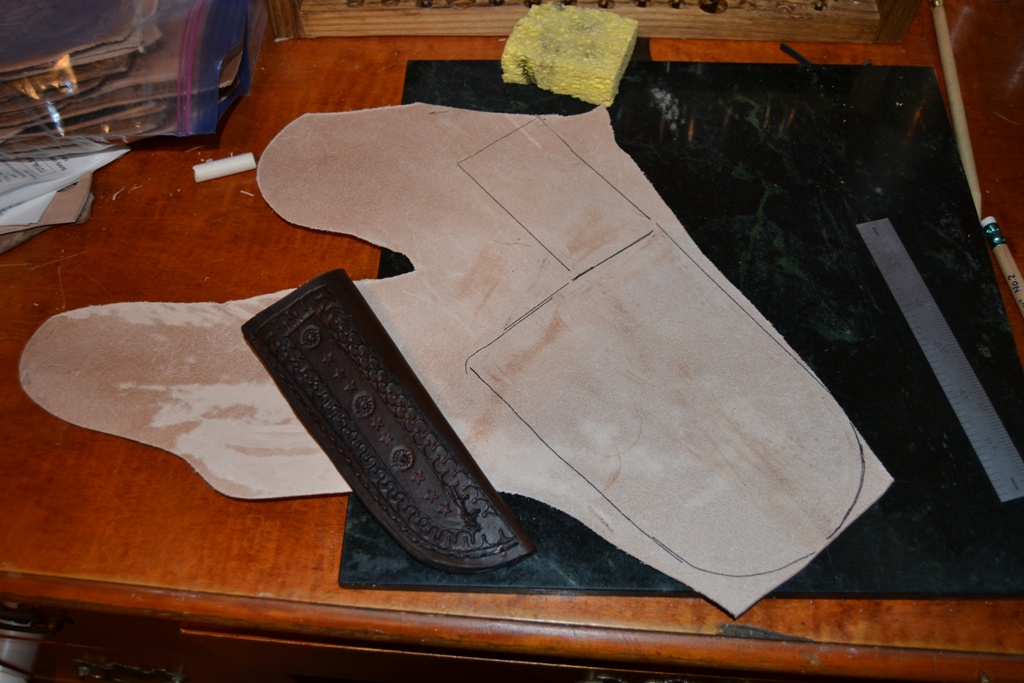
- 01 cut out another.jpg (260.67 KiB) Viewed 6533 times
The running W pattern looks a lot better, and ... the interior design is much more intricate, involving carving.
Ah.. just guessing, but I'd say this is a sheath that would GO TO Miss T?
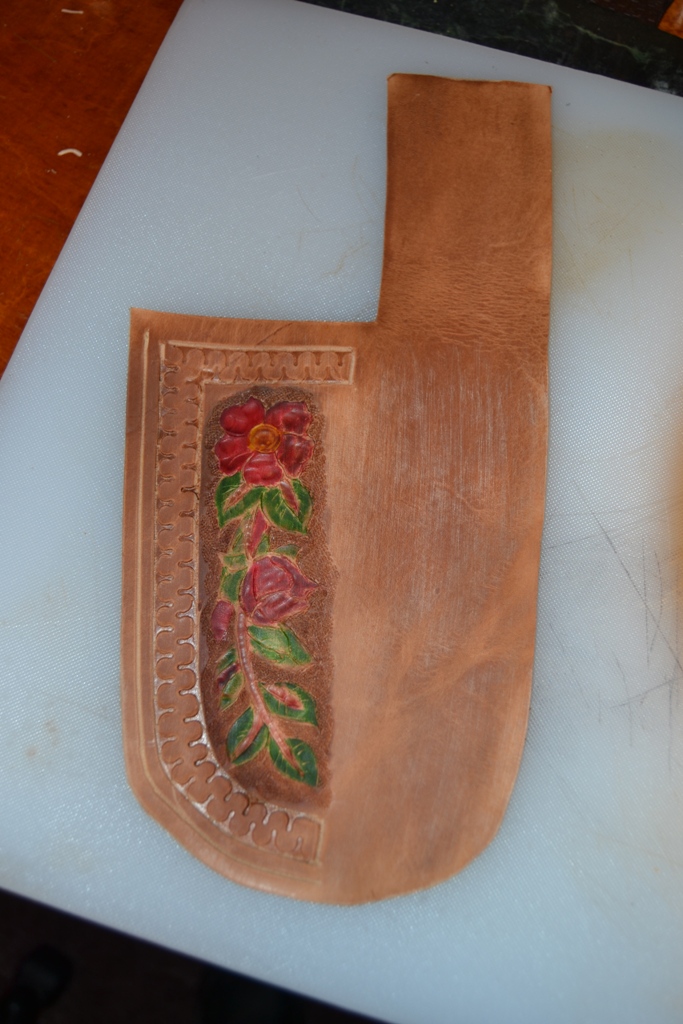
- 02 probably working on this one for Miss T.JPG (302.27 KiB) Viewed 6533 times