Page 1 of 2
A Pair of Med Pouches for My Daughter
Posted: Mon Jun 27, 2022 2:14 am
by BrokenolMarine
As a few of you may remember, one of the reasons we sold the Farm in Va and moved here, is that we have a daughter here in OK with medical issues. Her condition can result in situations where she has respiratory issues and needs an epipen or two immediately. She carries a med-pouch everywhere, that contains the pens. Of late, she has had to include MEDS for the dang service dog. HE has started to have seizures. Cruel World, Huh?

She had found these Ballistic Cloth pouches she likes, but daily use is hard on them, and they aren't cheap. She was up last week and asked if I could make her one out of leather. Just the basic pouch, didn't have to have the zippered pocket. I told her sure, I'd give it a shot. She came up to bring the leather she had picked up for me... and a bag of snake skins. (Sweet.) She told me the GREEN leather would work, BRIGHT was better since the bag needed to stand out if she went down.
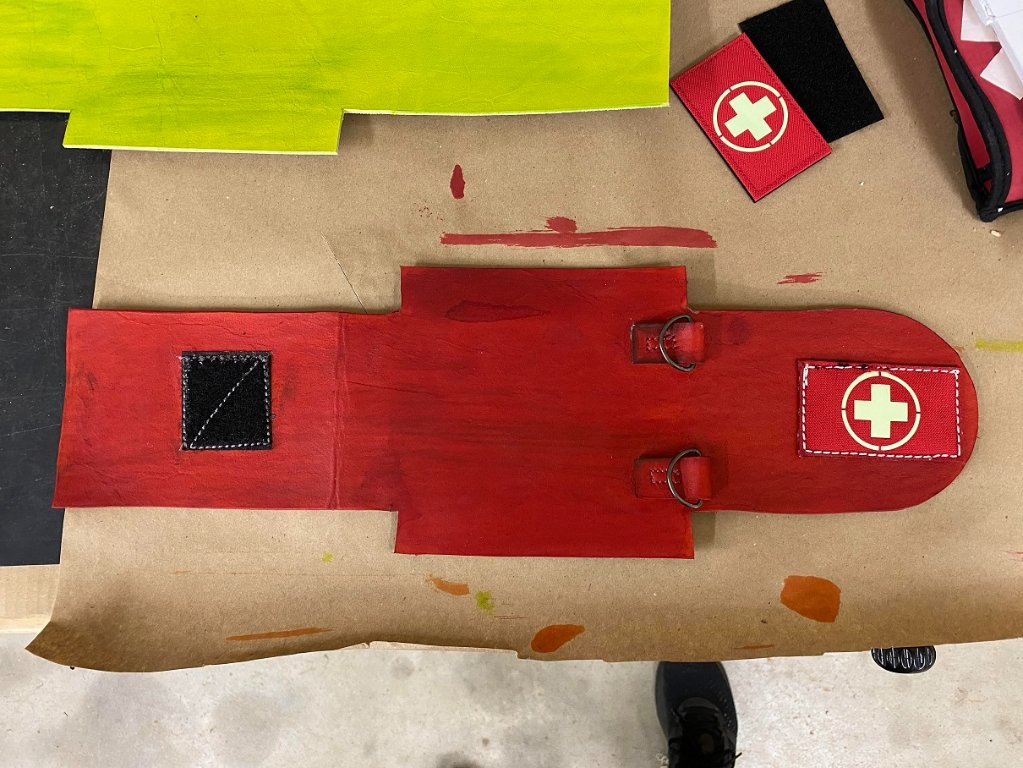
I spent some time going over the original pouch, taking measurements and looking at the layout.
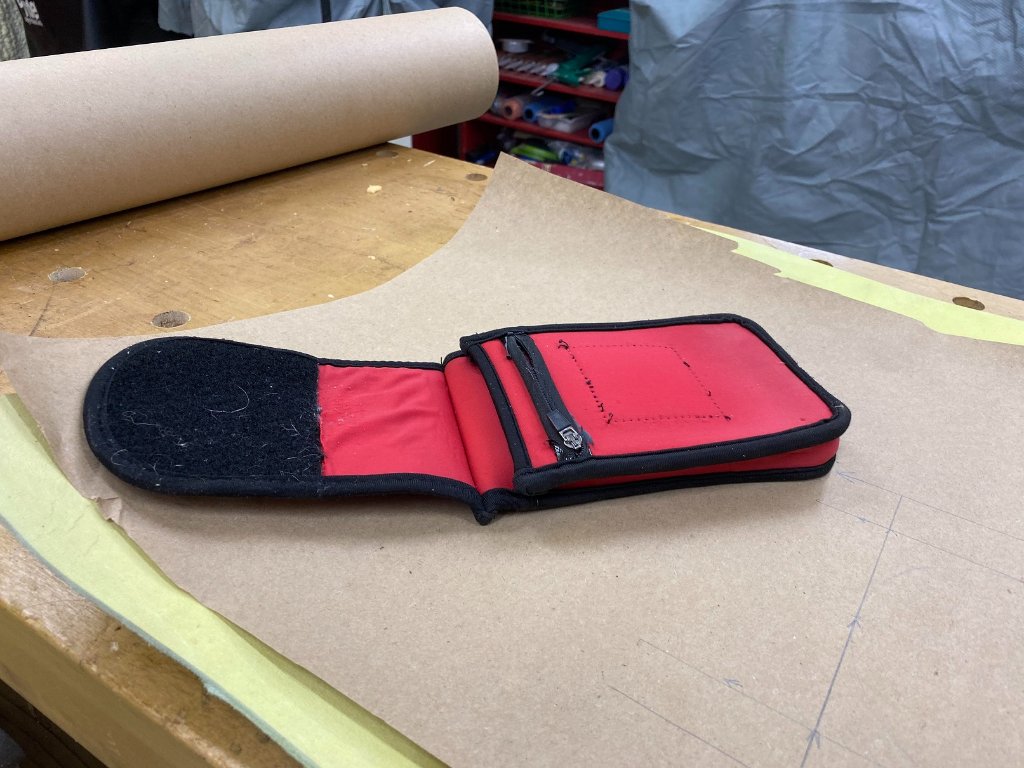
- 01 original pouch.jpg (134.27 KiB) Viewed 9201 times
It would have been easy to cut a number of individual pieces and put them together, but a lot more work, as many of them would have to be hand sewn in the final assembly. So, I worked thru a number of rough sketches to get an idea of a single piece layout, then a firmer idea of the layout with penciled measurements. Then, on butcher paper, I drew it out. Yup... butcher's paper.
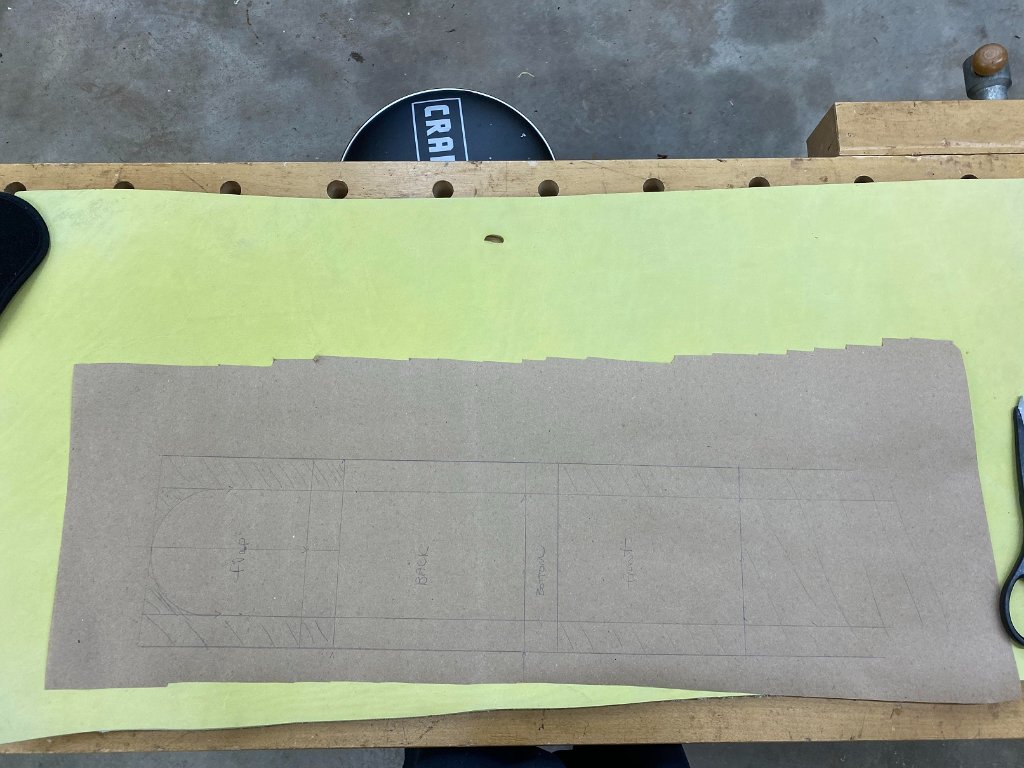
- 02 pattern.jpg (120.75 KiB) Viewed 9201 times
Measured it twice, then thrice, then cut it out. I folded it and checked the design. NOPE. I redrew the design, making corrections from the first paper pattern. Cut it out and folded it. Yup.

- 03 cut out.jpg (64.92 KiB) Viewed 9201 times
Re: A Pair of Med Pouches for My Daughter
Posted: Mon Jun 27, 2022 2:22 am
by BrokenolMarine
Satisfied with the paper pattern, I transferred it to poster board for a permanent pattern. I was very careful as I expect to use this pattern for years as her pouches wear out.
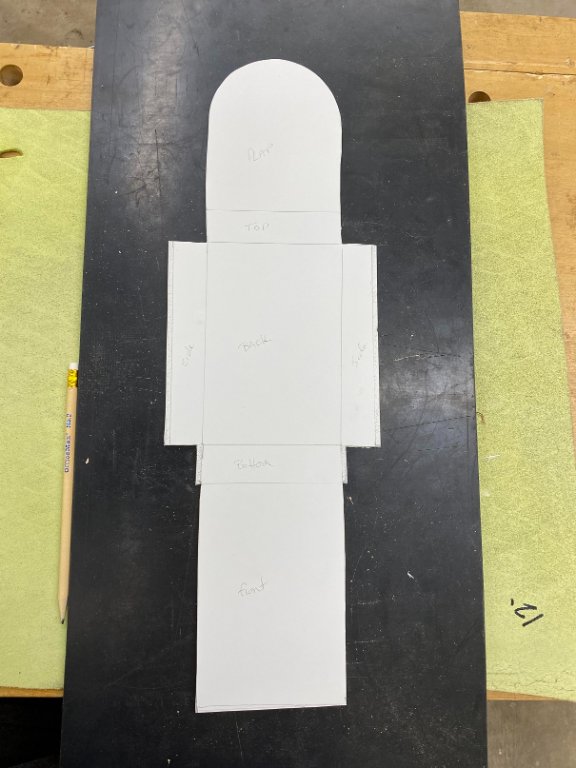
- 04 hard pattern.jpg (61.95 KiB) Viewed 9200 times
I then transferred that to the leather adding an 1/8th at the sides and bottom folds for sewing. Using the template I was as careful as possible so that the leather would conform as closely as possible. Once I had the drawing made, I cut out the leather. Excellent.
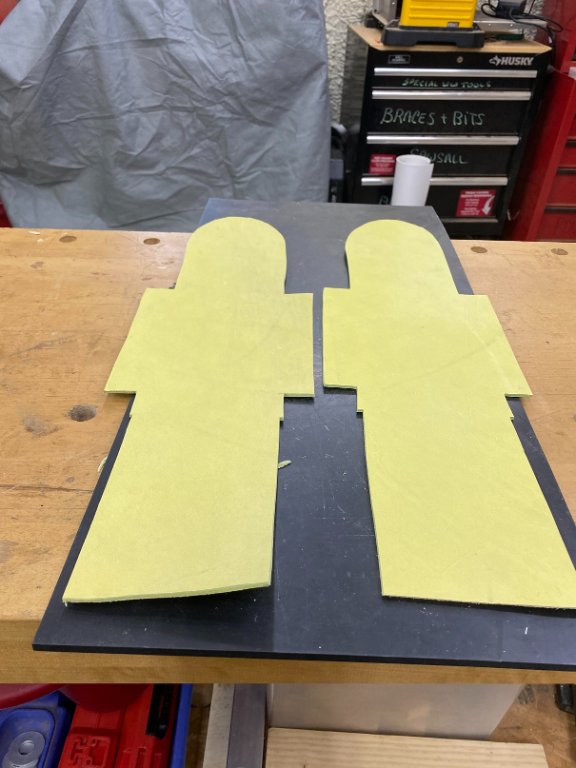
- 05 leather cut.jpg (67.26 KiB) Viewed 9200 times
That really is an UGLY green. I decided to do two things. Change the one green. Make the other a bright orange. I used my leather dyes and mixed colors, and using a scrap from cutting out the patterns, made a test strip.
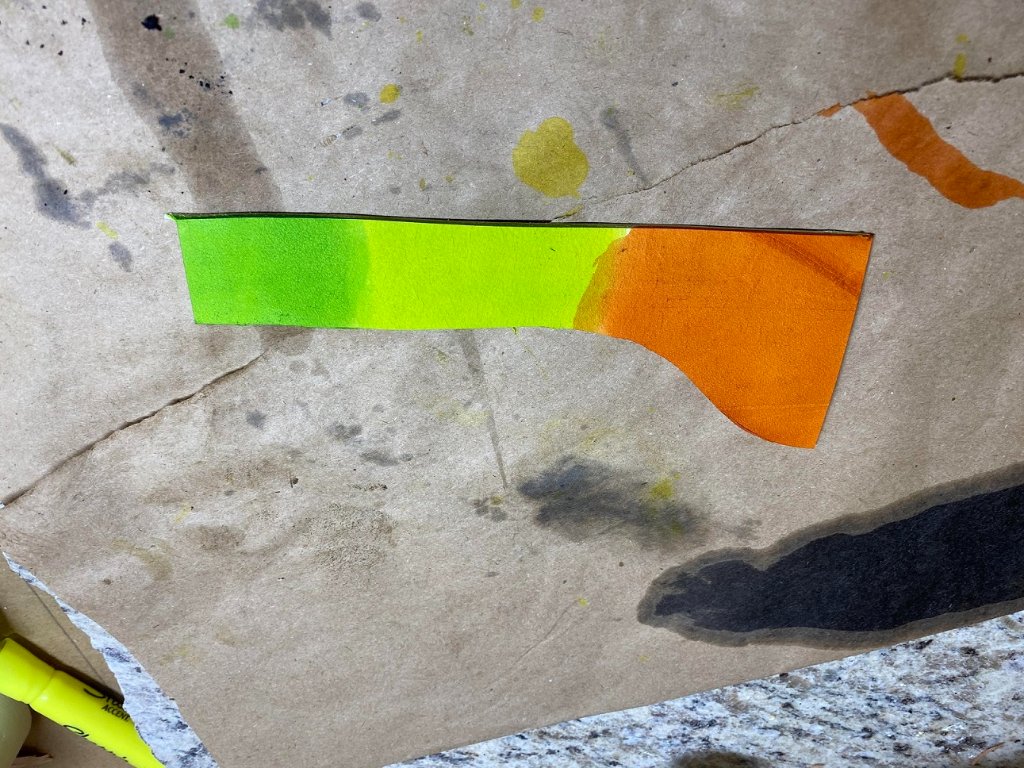
- 06 test strip.jpg (207.9 KiB) Viewed 9200 times
From left to right on the test strip:
Green 2/3 and yellow 1/3 Nah.
Green 1/3 and yellow 2/3 Yup
Orange 1/3 and yellow 2/3 Yup.
Time to dye some leather.
Re: A Pair of Med Pouches for My Daughter
Posted: Mon Jun 27, 2022 2:34 am
by BrokenolMarine
*** You might have noticed that I cut out two patterns and am dying two colors. She is hard on the pouches, and I figured I am making one, might as well make two. They will either turn out, and she'll START out with a backup... if I'll get in a lot of practice and learn some valuable lessons before I

Start Over.
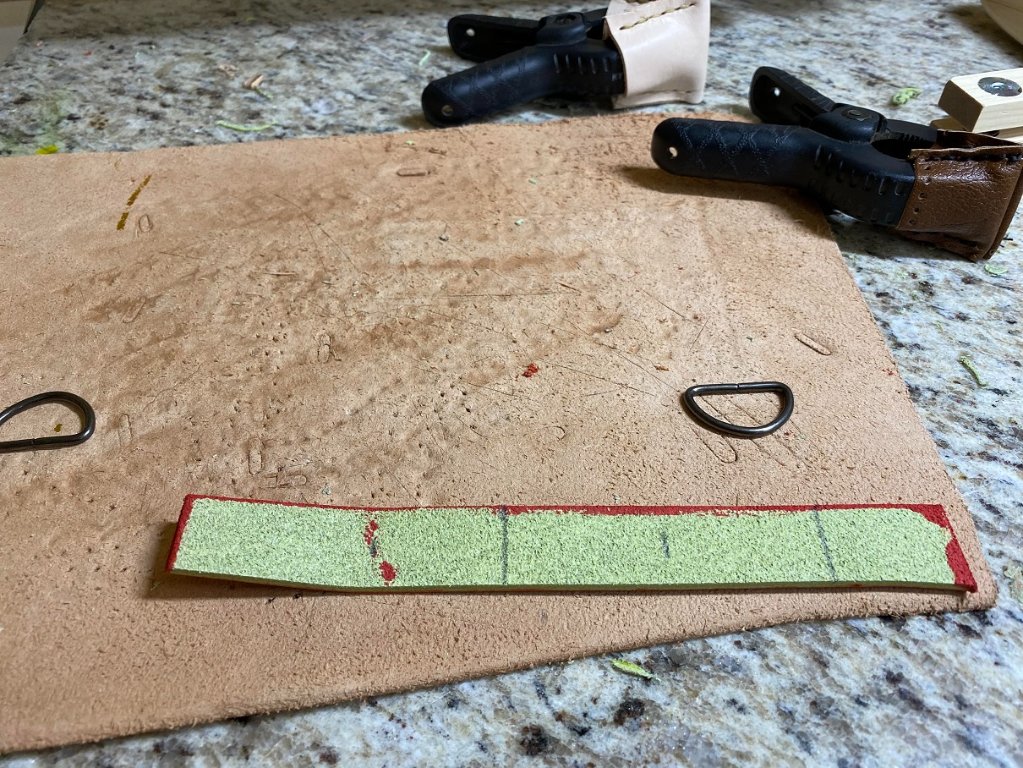
I started with the lime green, and while dyeing the main part of the pouch, I chose a 1" x 8" scrap to dye with it. I will be mounting two D rings at the top of the pouch for her to hook a lanyard to. Jess carries the pouch like a messenger bag. That's what she wanted, it's what she gets. I didn't want to have to go back and try and match the dye, or ... realize later I forgot and dye them black to match the velcro and claim I planned it that way.

I applied the dye back and forth between the two pieces until I had exhausted the dye I had blended.
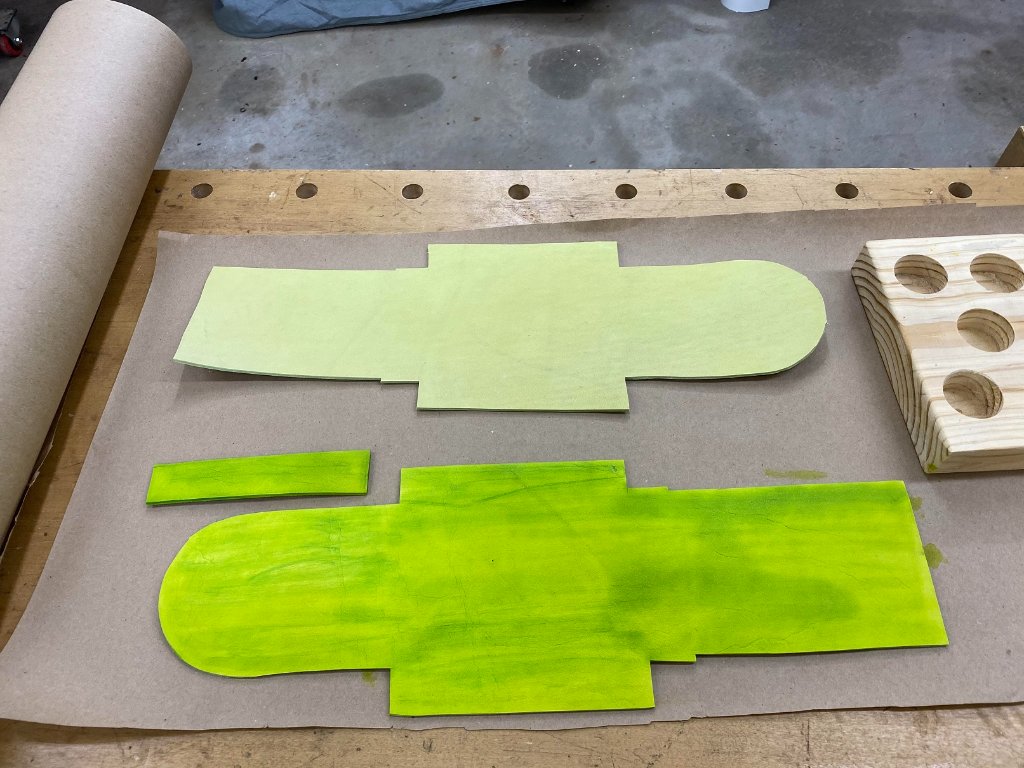
- 07 lime green.jpg (140.22 KiB) Viewed 9199 times
Wow, that lime really pops the green. Much better that that original color. Hoping it evens out a bit once it dries, but either way, it'll work. If it doesn't, it gives it character, and
"I planned it that way." 
Next up was the orange. Same deal, the main pouch cutout and a scrap for the D-Rings. It doesn't pop as well. I think the green underneath muted it. Maybe when it dries?
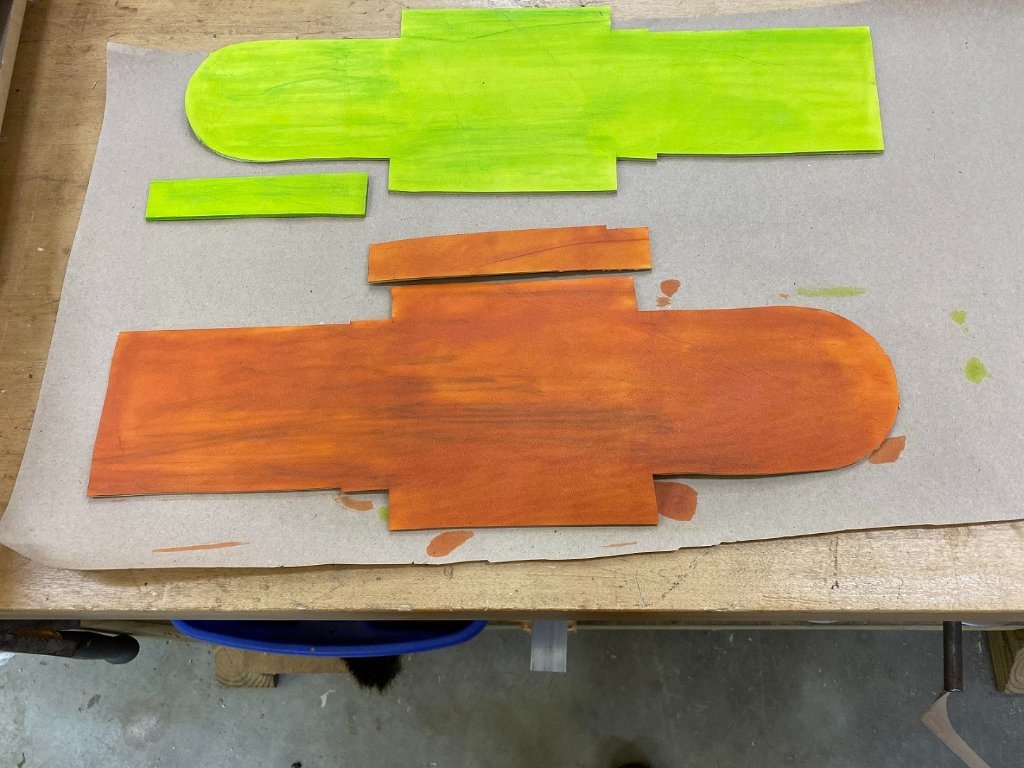
- 08 orange.jpg (147.25 KiB) Viewed 9199 times
I left it to dry overnight... The orange didn't look any better and when I sent a pic to the daughter her reply was "Barf." I dyed it red.
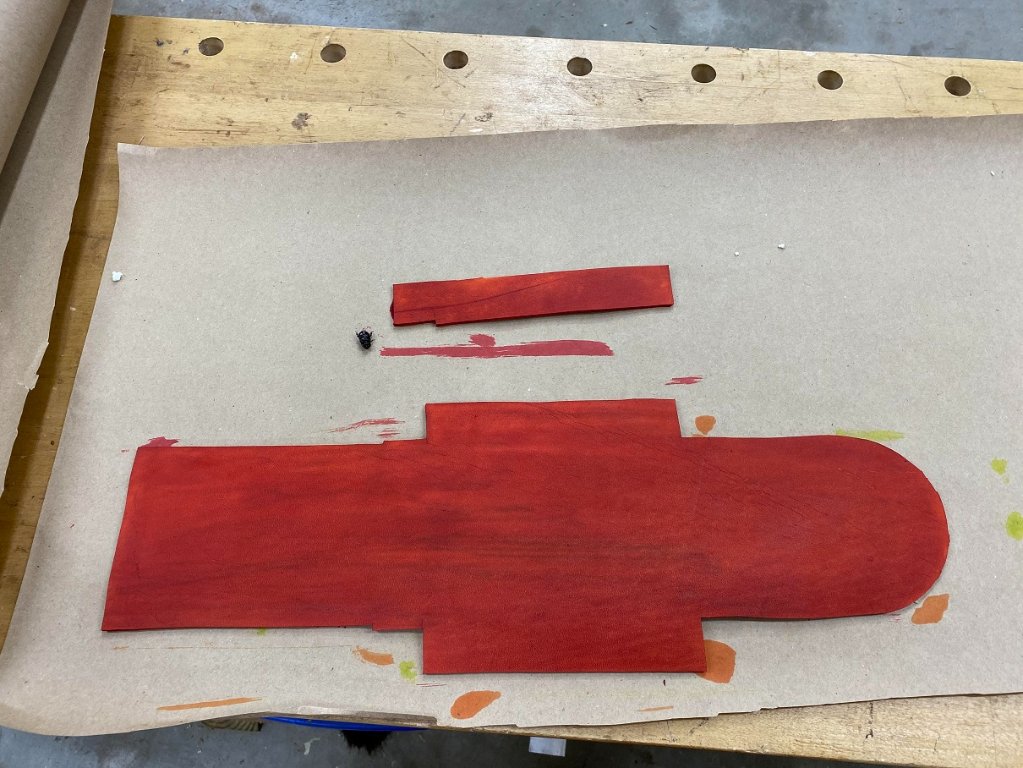
- 09 red.jpg (146.29 KiB) Viewed 9199 times
Re: A Pair of Med Pouches for My Daughter
Posted: Mon Jun 27, 2022 2:42 am
by BrokenolMarine
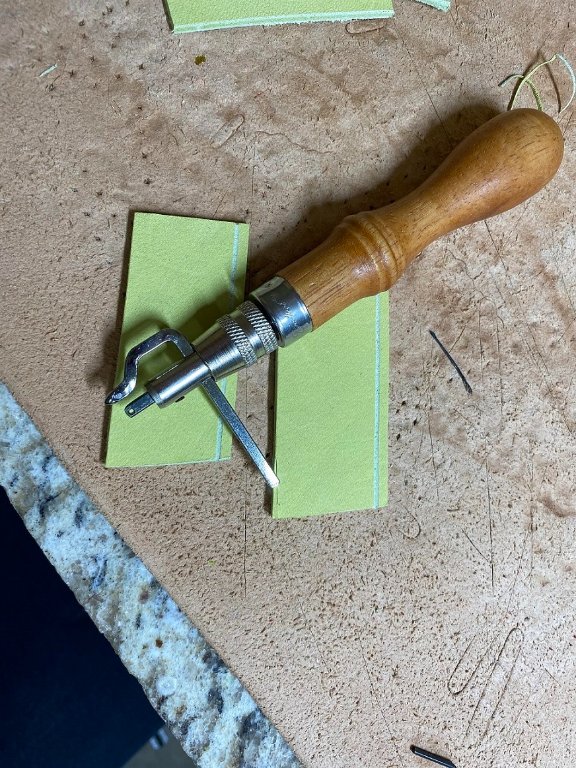
Now time to Fold the pouch. To fold without cracking the leather you have to groove the inside of the fold with a grooving tool. I usually try and groove about 1/3 the thickness. You can get away with that because the strength comes from the hide, not the grain. Especially here, as there isn't much strain. I cut the groove and then wet the leather to make it more flexible. No worries.
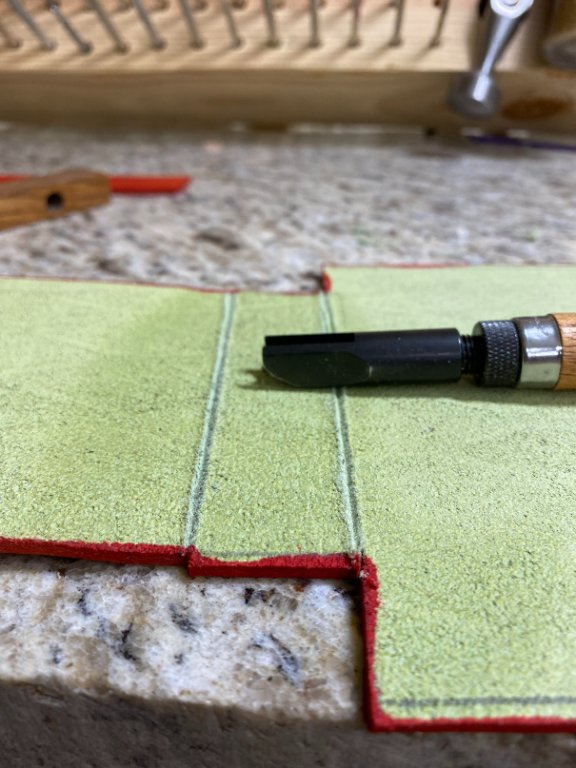
- 10 groovy.jpg (83.39 KiB) Viewed 9198 times
Then got busy, there were more grooves to cut. I cut each one slowly and carefully, then moved on. Wet them all down and gave the water time to soak in.
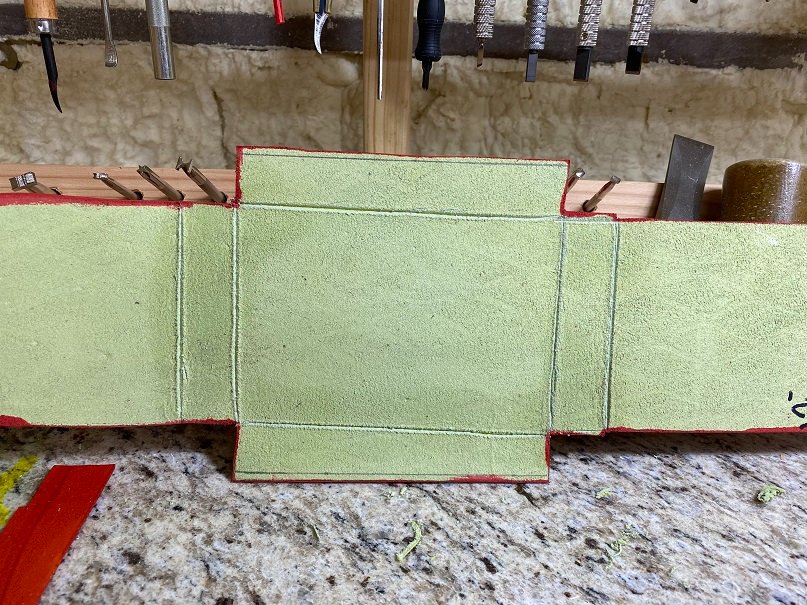
- 11 more grooves.jpg (183.2 KiB) Viewed 9198 times
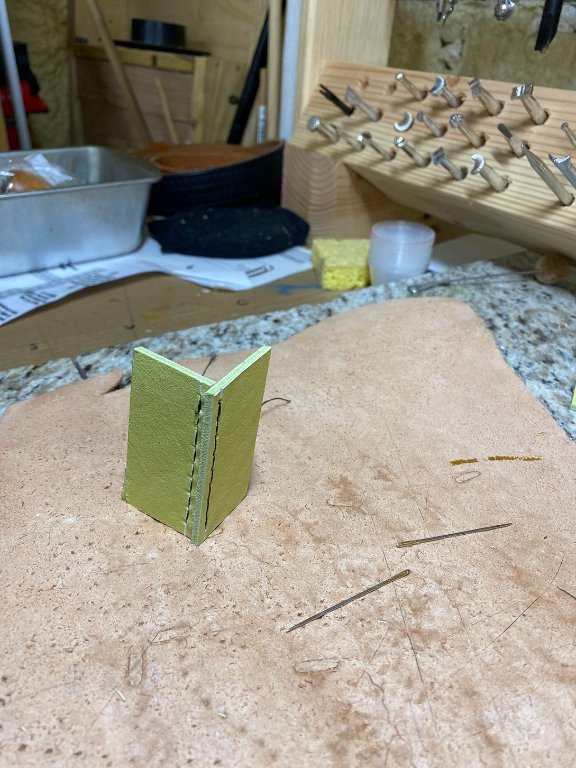
Now for the test, I folded the pouch and checked the fit. NICE.
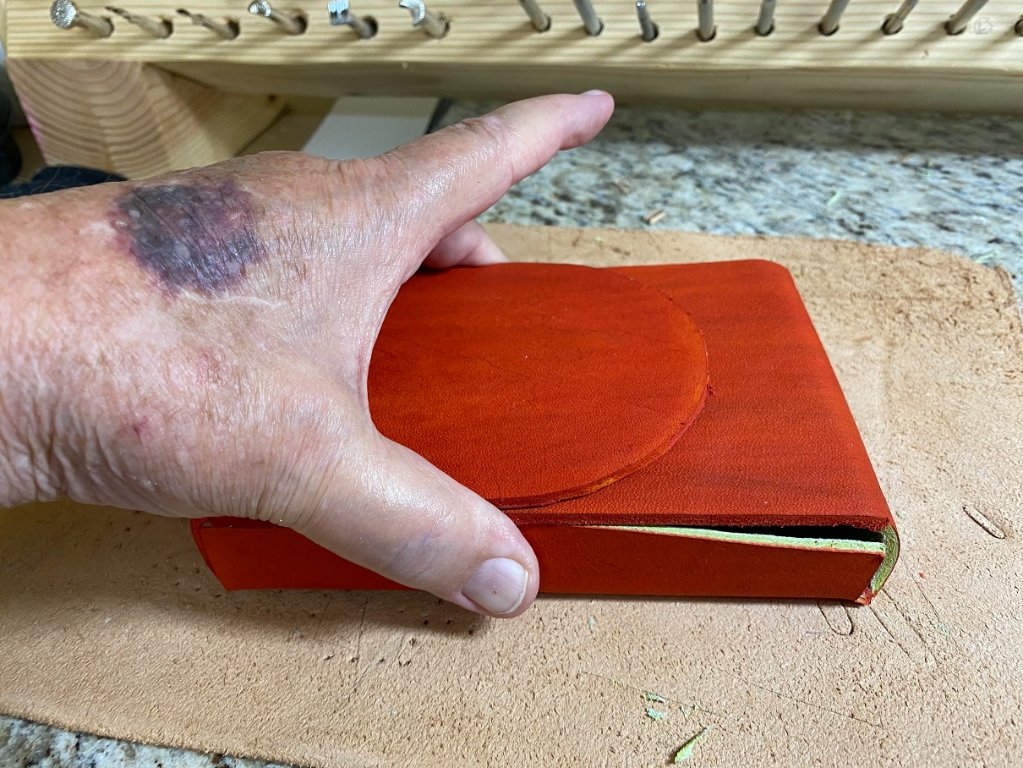
- 12 folded.jpg (189.51 KiB) Viewed 9198 times
What? The bruise on the back of my hand? No, not sparring with Miss T.
The meds I take, I bruise if a fly lands on me. I bumped my hand on the rim of the dryer taking t shirts out. I always look like I went ten rounds with Rhonda Rousey. (I wish).
Re: A Pair of Med Pouches for My Daughter
Posted: Mon Jun 27, 2022 2:54 am
by BrokenolMarine
Now it is time to make the D-Ring assemblies. I gather all the things I need, including the strip cutter and the leather strip I dyed earlier when I dyed the main panel.
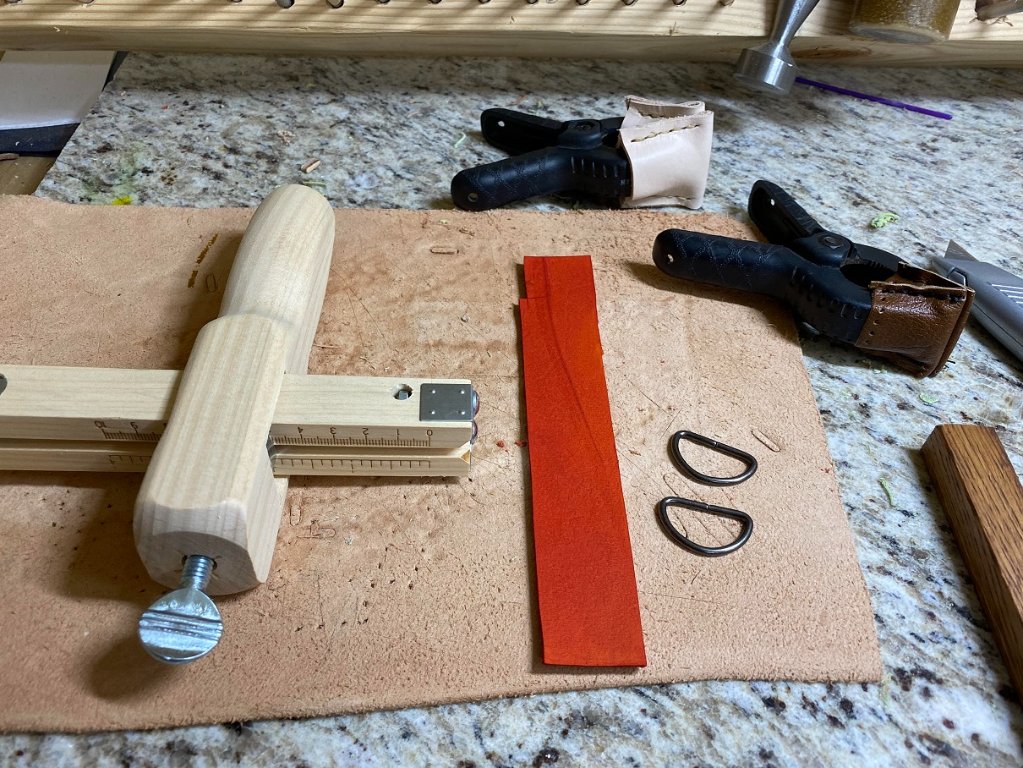
- 13 prep to cut strip for D-rings.jpg (217.57 KiB) Viewed 9196 times
I measure the inside width of the D-Ring, 7/8". I set the strip cutter at 7/8 and pull the dyed leather strip thru. Sweet. Works like a charm. I flip the strip over and mark the back for two 3" strips, and a center at 1/5 with a 1/4" wide protected strip in the center.
- 14 Marked strips for glue up.jpg (244.58 KiB) Viewed 9196 times
I paint the strips with contact cement on both sides of the no fly zone. It has to stay glue free so the D-Rings will move freely in the assembly.
Once the contact cement is tacky, I ease the strip thru, and fold them over. I clamp them and let them set up. They are set aside for much later.
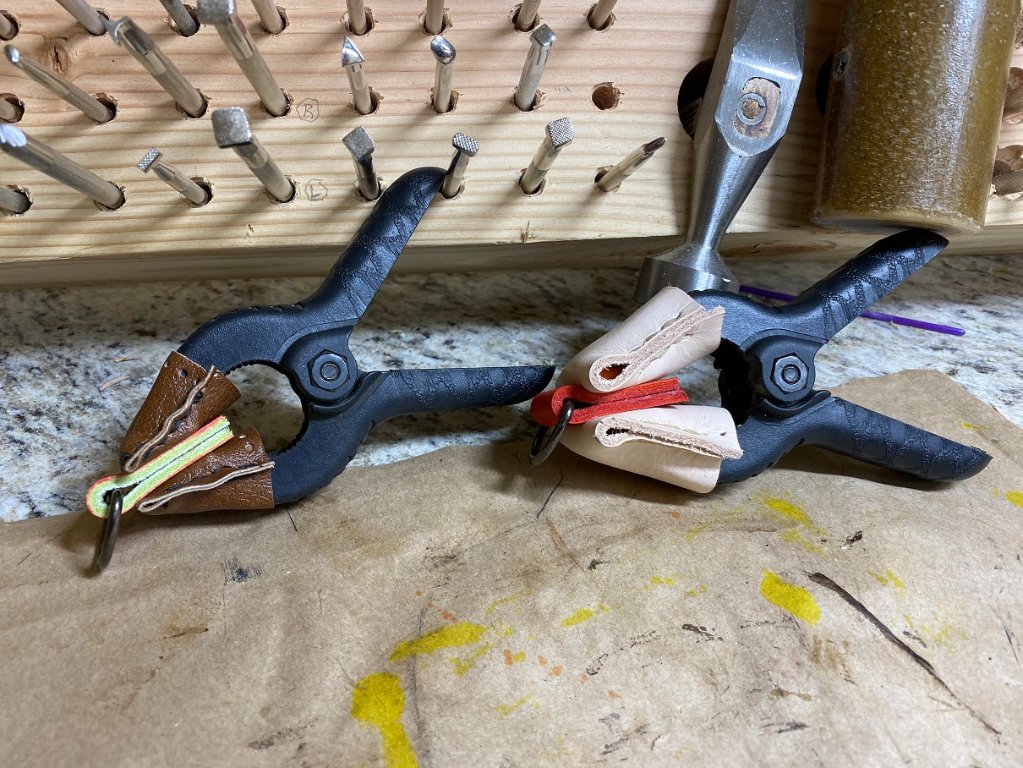
- 15 D-ring glue up.jpg (203.38 KiB) Viewed 9196 times
Re: A Pair of Med Pouches for My Daughter
Posted: Mon Jun 27, 2022 2:59 am
by BrokenolMarine
Time to glue the Velcro on, in preparation for sewing. I glue the Velcro hook square inside the flap. The hook panels tend to wear out first, so I put it on the one portion you can still be expected to sew on after the project is completed.
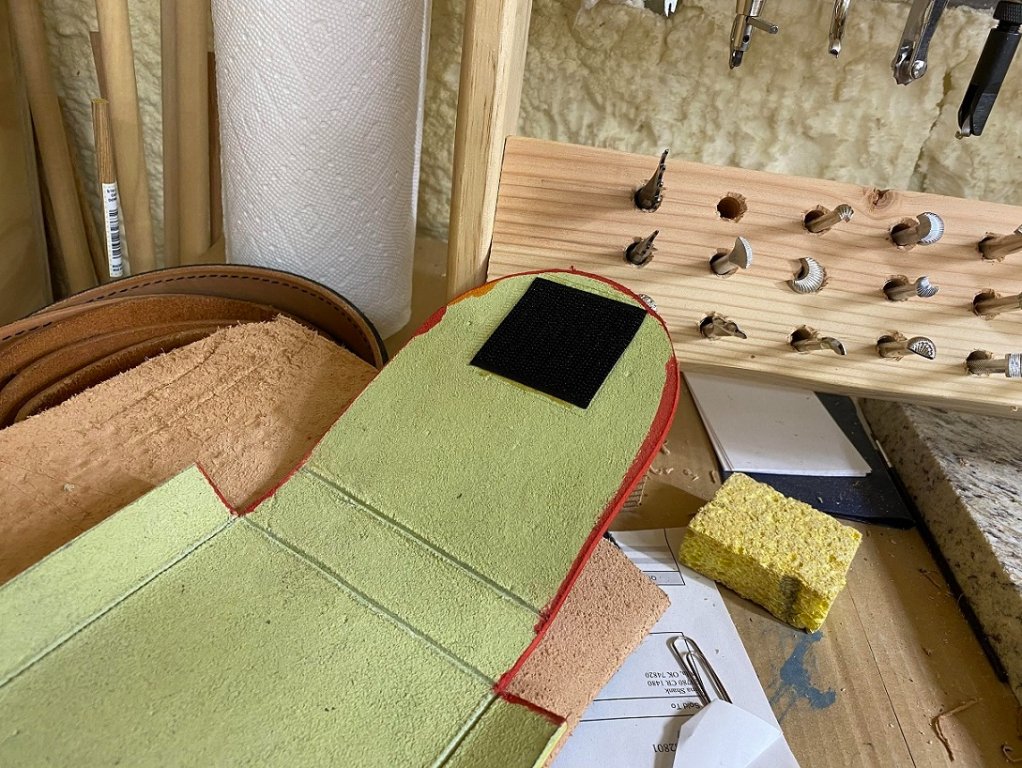
- 16 Velco glue up on Flap.jpg (206.63 KiB) Viewed 9196 times
I glue the Velcro Loop square on the outside of the front panel.
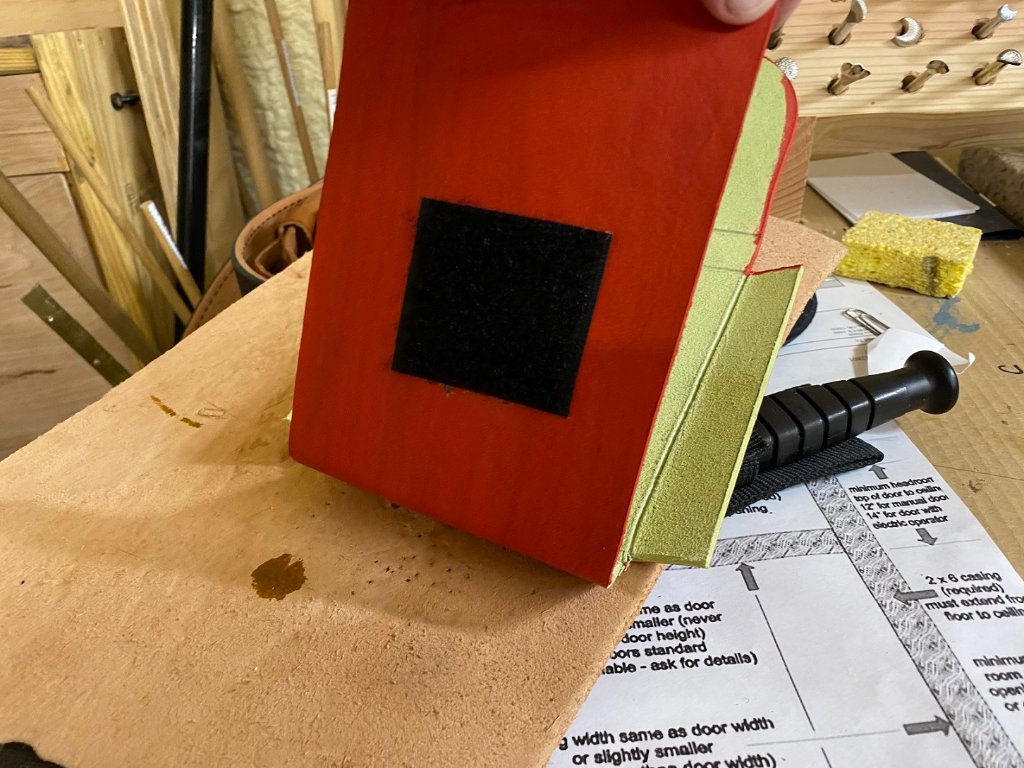
- 17 and on the front.jpg (153.85 KiB) Viewed 9196 times
Re: A Pair of Med Pouches for My Daughter
Posted: Mon Jun 27, 2022 3:10 am
by BrokenolMarine
The panels dry overnight and I come out and get ready to sew them into place. This will be only my second time sewing on the new machine.
This is the Cowboy 3200 if you haven't seen it, we just got it in and assembled a couple weeks ago.
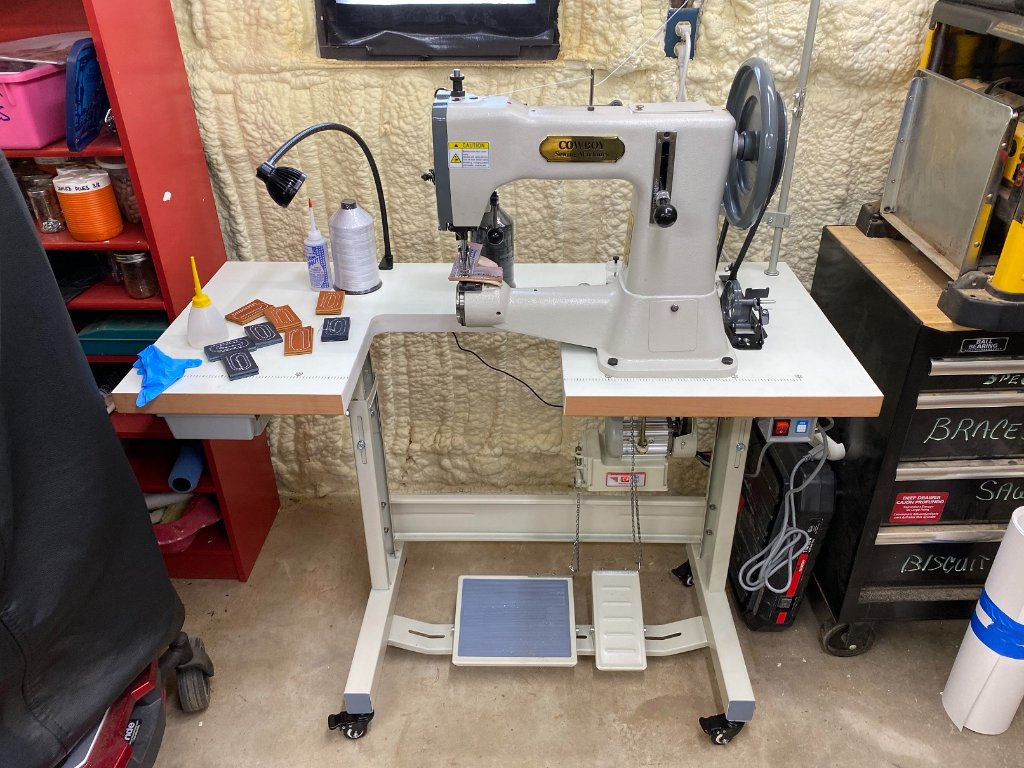
- 04 the machine.jpg (176.25 KiB) Viewed 9194 times
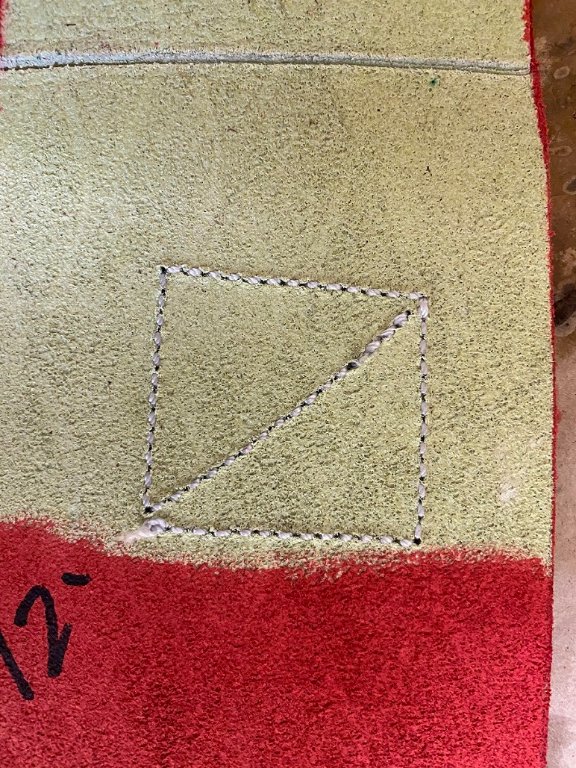
So, I sewed around the edges of the hook patch on the inside of the Flap, then a diagonal across the square. A view of the inside.
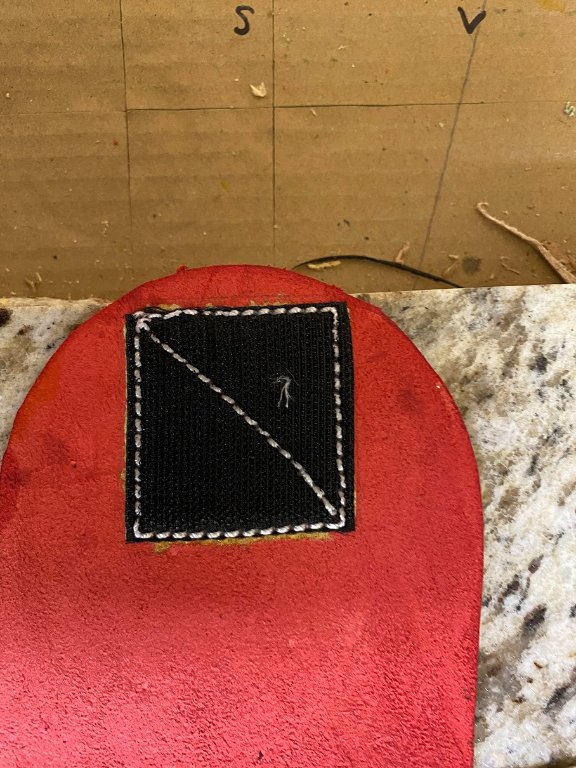
- 19 flap velcro hook patch.jpg (115.75 KiB) Viewed 9194 times
and of the outside. I will be sewing a red cross patch OVER these stitches to hide them. The patch also glows green in the dark to help Jess find the pouch in a night time emergency. It should be here Wednesday.
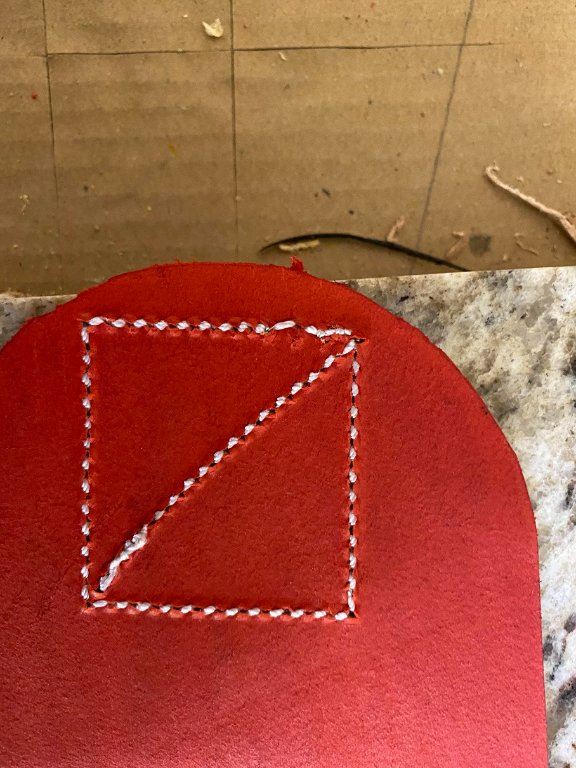
- 20 outside the flap.jpg (96.08 KiB) Viewed 9194 times
The next step was sewing the velcro loop sqare down on the outside of the front panel. Again, around the square and across.
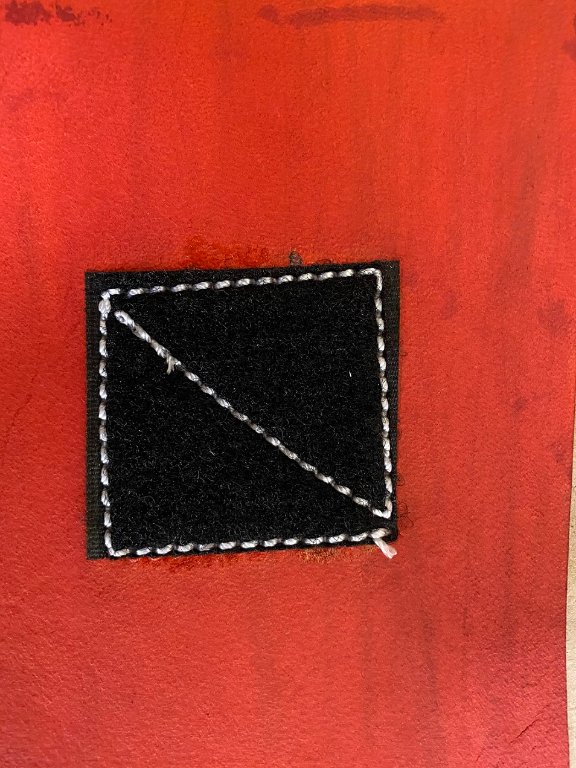
- 21 front of pouch loop velcro.jpg (109.95 KiB) Viewed 9194 times
And inside.
- 22 inside of the front of pouch.jpg (180.58 KiB) Viewed 9194 times
Last thing today? I fitted the D-Ring assemblies in place and marked them, noting by letter code, which one was marked in which spot. Then painted a stripe of contact cement on the pouch and on the assembly. I let the cement get tacky, then pressed them home. Then Clamped. They will cure overnight then be sewn down.
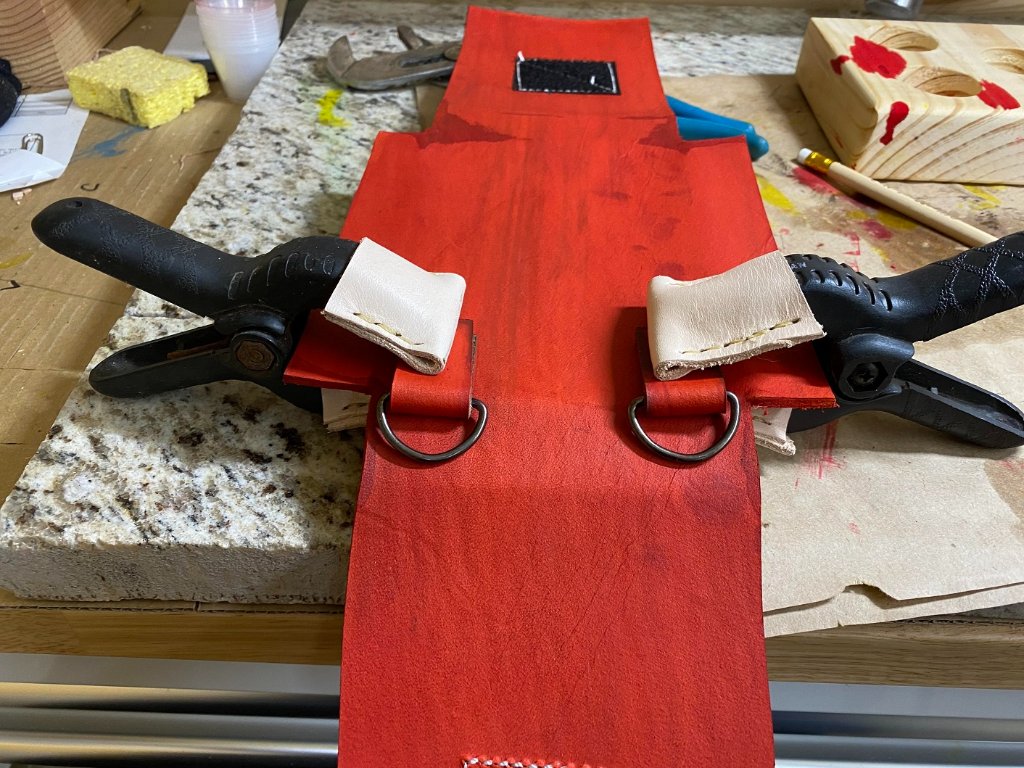
- 23 D-Ring assembly glue up.jpg (189.23 KiB) Viewed 9194 times
That's it until the patches come in. One for each pouch. I could start on the other, but I'm waiting, because the only other step on this one is hand sewing the bottom and edge seams. NOT doing that until I have sewn the flap. Not starting the other until this one is done.
There are OTHER jobs. I have to install a ducted vent fan in the boathouse and intake vents on three garage doors.

I have piles (Plural) of dirt to move for the range berm. Whoo Hoo. Should be shooting soon!
Watch this space.
Re: A Pair of Med Pouches for My Daughter
Posted: Mon Jun 27, 2022 3:12 am
by BrokenolMarine
Oh, You may have noticed that I did dye the inside of the project, pretty much. I dyed the inside of the flap, and all the edges, and halfway down the front panel. You won't be able to see the rest, but I'll probably go back and finish dyeing. I usually do fully finish the interiors.
Re: A Pair of Med Pouches for My Daughter
Posted: Mon Jun 27, 2022 10:29 am
by Hatchdog
Very creative. That’s an incredible amount of work your putting into the pouches. Good on you Dad!
Re: A Pair of Med Pouches for My Daughter
Posted: Mon Jun 27, 2022 10:33 am
by BrokenolMarine
I'll sew the d-rings today. The patches on Wednesday. I'll need to burnish all the edges.
The bottom and side seams have to be box stitched by hand after everything else is done.
Re: A Pair of Med Pouches for My Daughter
Posted: Mon Jun 27, 2022 1:13 pm
by BrokenolMarine
Hatchdog wrote: ↑Mon Jun 27, 2022 10:29 am
Very creative. That’s an incredible amount of work your putting into the pouches. Good on you Dad!
Meh, I'm bored, nothing else to do.

Yeah, right. Y'all aren't buyin it are you?
She's a good kid.
Re: A Pair of Med Pouches for My Daughter
Posted: Tue Jun 28, 2022 10:45 pm
by BrokenolMarine
I got out to the shop and after careful consideration and much thought, I was able to slowly sew the assemblies down. Tacking them down before sewing made the task much easier, but ... it was a pucker factor. I don't want to screw this up. I have made mistakes that GLARE at me every time I pick up to project.
Others may or may not spot them. They mock me. I hope to avoid them on the Lime One.

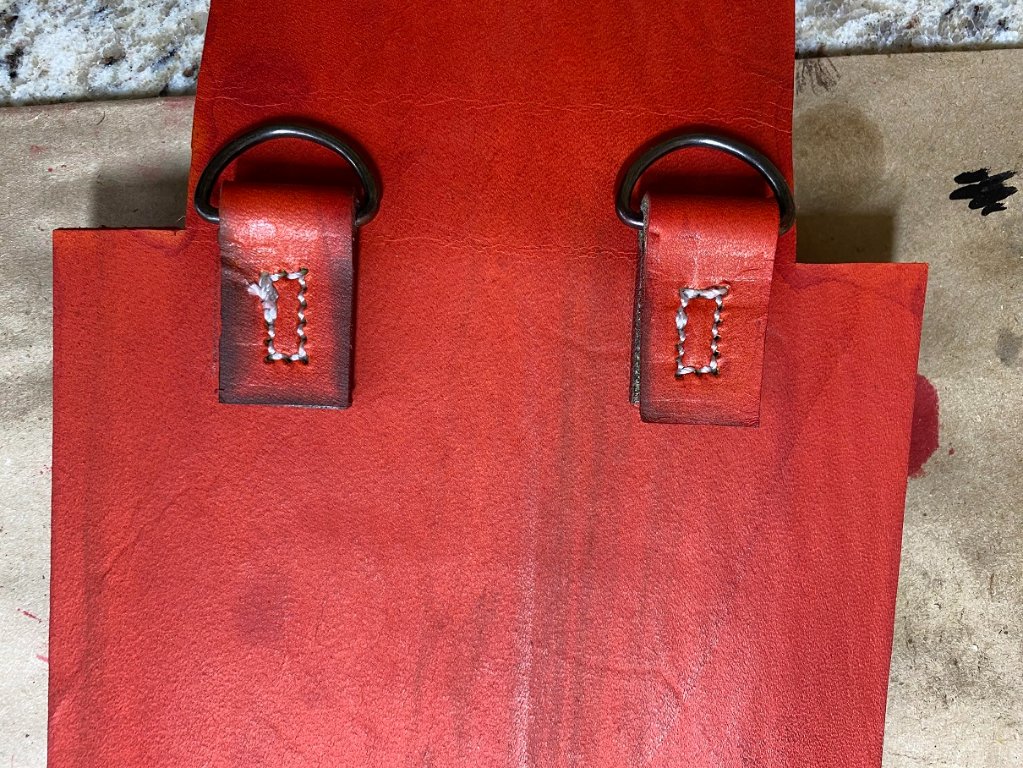
- 24 d-rings sewn.jpg (250.92 KiB) Viewed 6601 times
The project is nearly done. Water spots will fade when they dry, and the White Thread on the flap will be covered by the Red Cross Patch. Sigh...
For a first pouch, not half bad. Hopefully it works out.
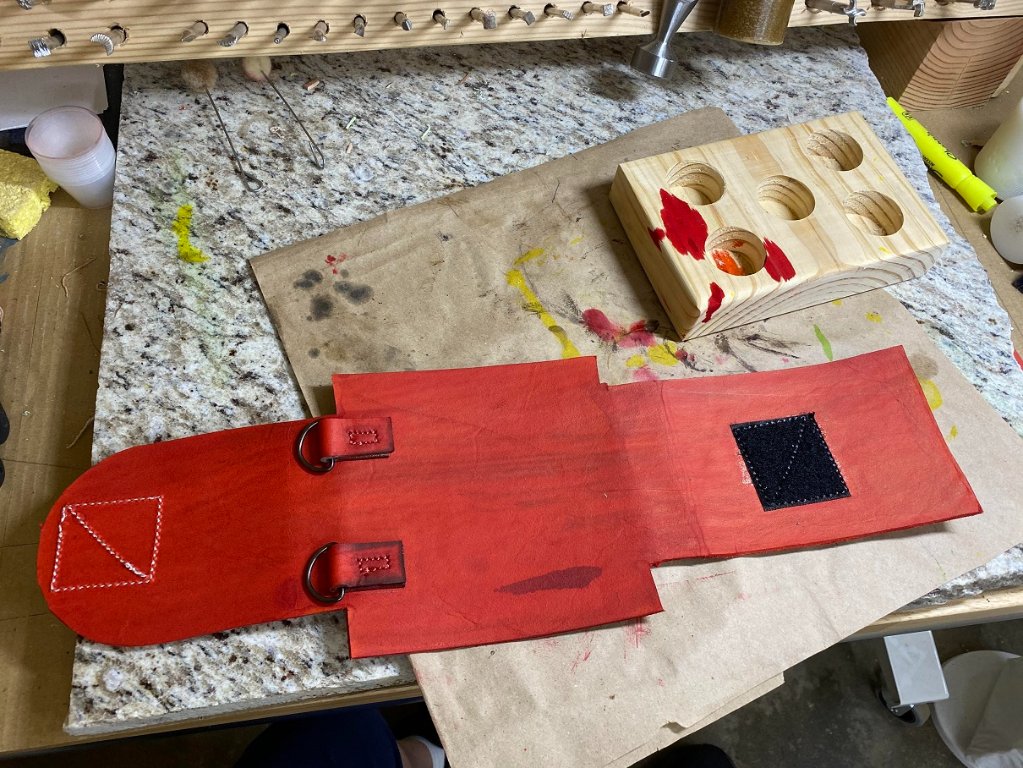
- 25 nearly done.jpg (214.18 KiB) Viewed 6601 times
I still have to sew up the sides and bottom and that's the box stitch. I have to practice it.
Re: A Pair of Med Pouches for My Daughter
Posted: Tue Jun 28, 2022 10:51 pm
by BrokenolMarine
So... I do. First you mark the edges to be stitched as a guide, as one will be butted at 90 degrees to the other. The top edge gets punched with the fork, all the way thru. You have your holes for sewing.
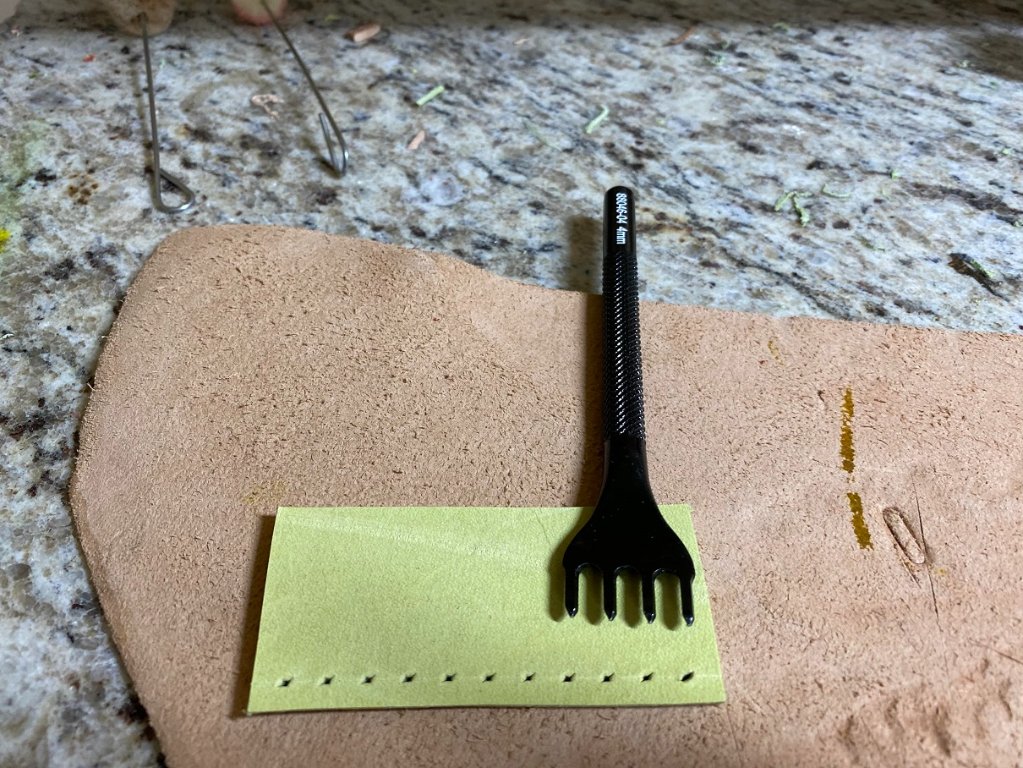
- 26 top forked.jpg (217.55 KiB) Viewed 6601 times
The side panel gets lightly forked to mark spacing, those holes are punched thru with an awl, your angle is such that the point should exit just above the bottom edge.
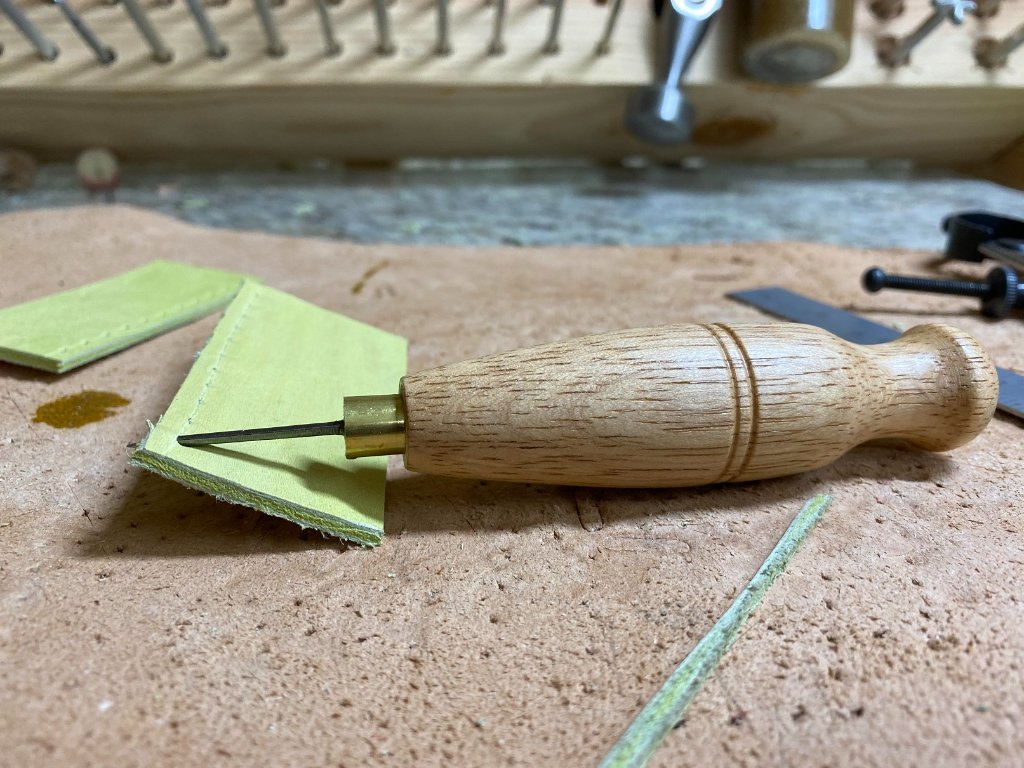
- 27 side awled.jpg (161.73 KiB) Viewed 6601 times
You stitch them as you would a saddle stitch, but at an angle to butt join the edges. My spacing was a bit off on marking the top line, I learned how I should space them. A learning process. Practice. I'll do this again tomorrow, AT least once before trying to sew the pouch itself. Probably at LEAST twice. Gotta get the spacing down.
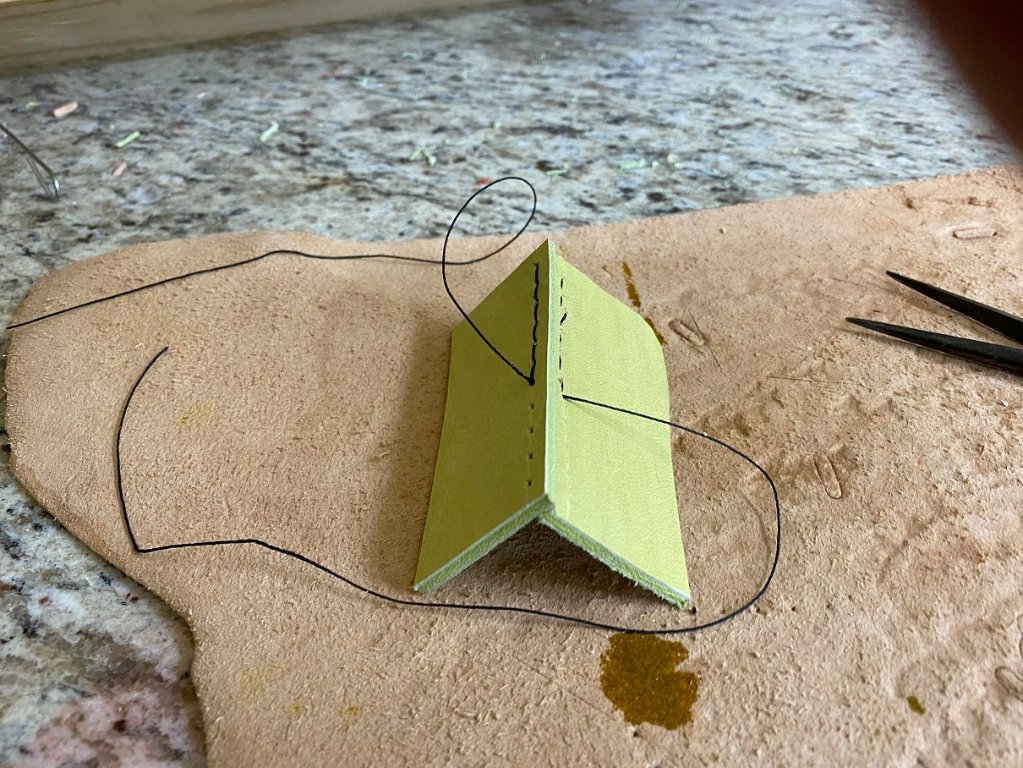
- 28 lesson learned.jpg (210.23 KiB) Viewed 6601 times
Before going in for the evening, I treated the panel with mink oil to soften it.
I also sewed the patch on. That's a story for tomorrow.

Re: A Pair of Med Pouches for My Daughter
Posted: Tue Jun 28, 2022 11:57 pm
by BrokenolMarine
Oh, I also burnished the edges as needed, in prep for final hand stitching.
Re: A Pair of Med Pouches for My Daughter
Posted: Wed Jun 29, 2022 6:31 am
by Sir Henry
That is quite the project. You are really getting good at it.
Re: A Pair of Med Pouches for My Daughter
Posted: Wed Jun 29, 2022 8:30 am
by BrokenolMarine
Thanks. I have the second one, in lime green, waiting in the wings. She liked the lime color better so I did the red first as practice. I won't make y'all suffer through the whole process again, but will post the final pics of the green one as well.
Re: A Pair of Med Pouches for My Daughter
Posted: Wed Jun 29, 2022 8:31 am
by BrokenolMarine
A couple practice runs at box stitch this morning, then...
Fingers crossed I'll be done with red.
Re: A Pair of Med Pouches for My Daughter
Posted: Wed Jun 29, 2022 10:17 pm
by BrokenolMarine
I got out to the shop this afternoon, and checked out the panel. The mink out had done it's job and the leather feels great. It's looking pretty good. I need to do a couple practice runs on the box stitch and I'll should be ready to fold and close.
- 29 lookin better.jpg (156.89 KiB) Viewed 6583 times
First step is to cut the stitching grooves with a "Stitch Groover." Wonder who names these things?
- 30 cut stitching grooves.jpg (158.42 KiB) Viewed 6583 times
In the first practice run, I marked and cut the grooves on BOTH pieces the distance from the edge based on the thickness of the leather.
I took my time stitching and tightened up nicely on each loop. Much better result, but there was still a slight overhang.
- 31 practice 1.jpg (108.15 KiB) Viewed 6583 times
I applied the lesson learned. The top groove line is half the thickness of the leather from the edge, and the angle of the Awl line is positioned so that it comes out midway thru the thickness. BOOM... worked well. As you can see, I got a nice lineup on the edges. The only improvement I would make on the next run is to put TWO stitches in the first couple holes to start, and two backstitches in the end. Strength....

I'll sew 'er up tomorrow.
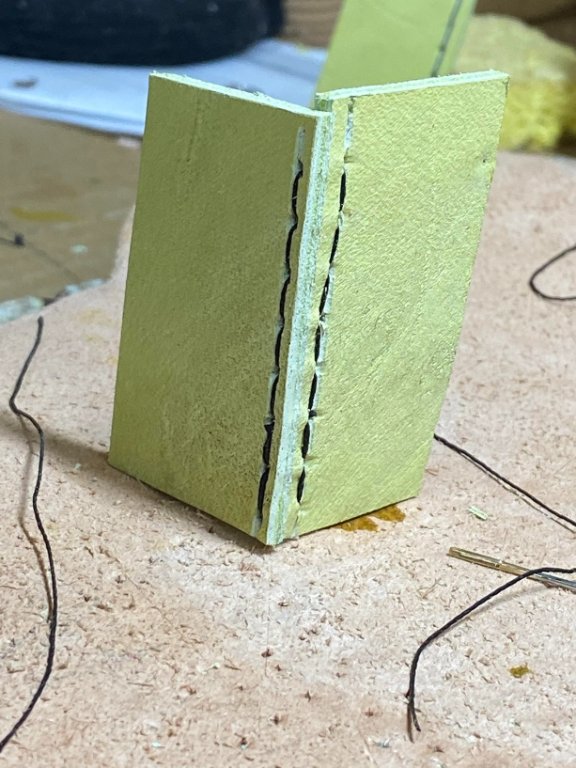
- 32 practice 2.jpg (96.9 KiB) Viewed 6583 times
I'm pretty happy with the second practice run. It was a strong bond as well.
Re: A Pair of Med Pouches for My Daughter
Posted: Fri Jul 01, 2022 5:43 pm
by BrokenolMarine
I went out this morning and marked and stuck the lines for the fork with the grooving tool and cut the grooves, then pushed thru the ones that went all the way thru with the fork. Marked the ones that just got marked and cut the angled holes with the awl and started sewing. I got halfway up one side and had to take a break. Then the Driver called with the load of limestone, and came with that... then the dirt for my berm.
Back at it and finished the one side and back at the other. I took my time, made sure all the stitches were tight. She is a pouch.
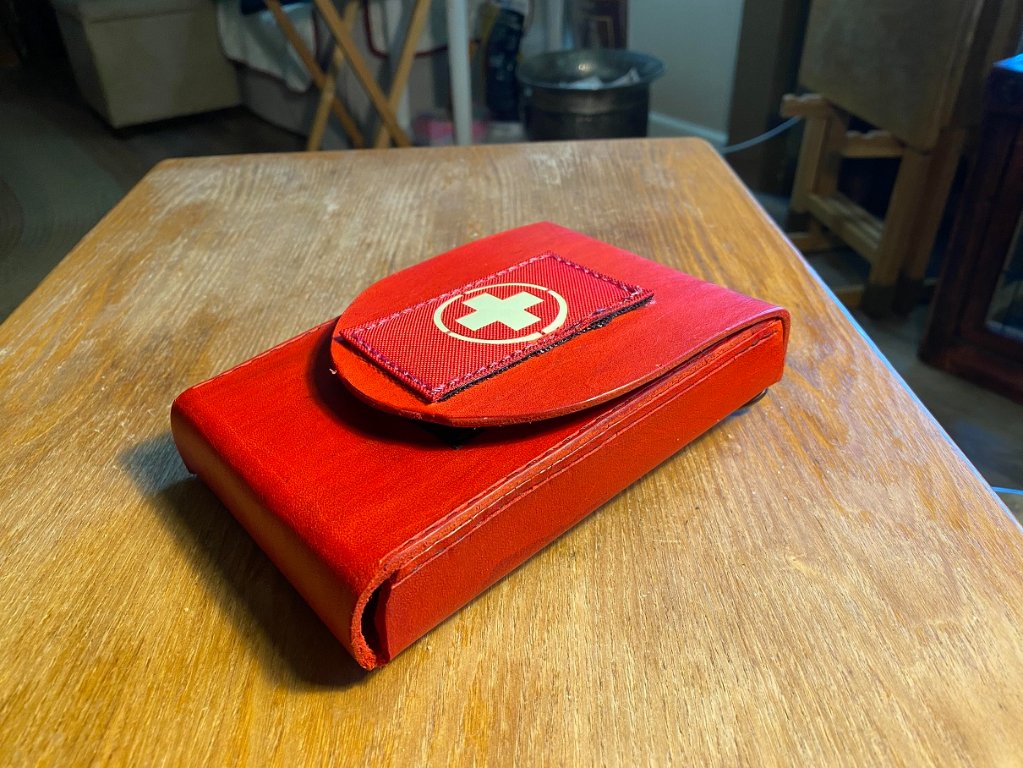
- 33 it's a pouch.jpg (179.47 KiB) Viewed 6564 times
There were a number of lessons learned along the way, and we are meeting Jess halfway tomorrow to pick up a package and she'll critique this pouch. If there are things she thinks I can improve on other than the things I already know about, I'll add them to the list. If the template is still good, I'll use the green one I have cut out and make the second. If not, I'll cut that one into practice squares and scrap the template and start over. I might also scrap the green one and make one out of Veg Tan, which can be carved and stamped with a design.
But for now, Stamp this project Done!
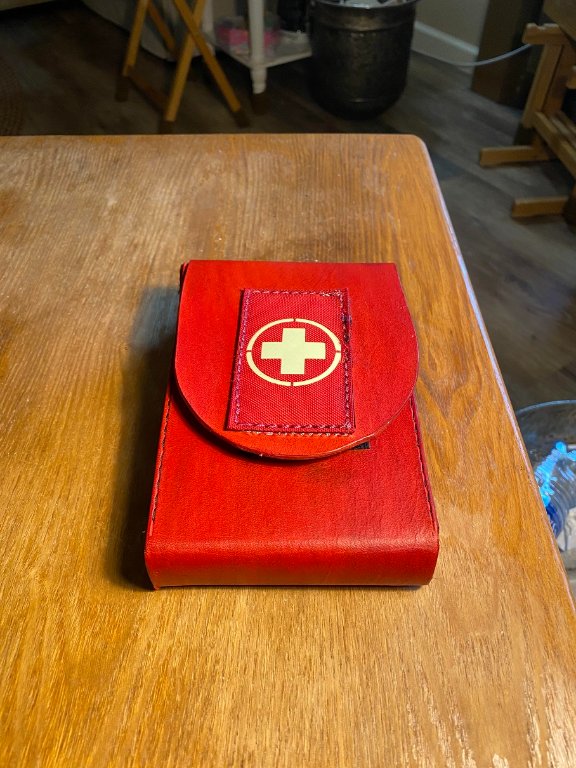
- 34 Done.jpg (105.51 KiB) Viewed 6564 times
Re: A Pair of Med Pouches for My Daughter
Posted: Fri Jul 01, 2022 11:13 pm
by BrokenolMarine
Side by Side Comparison
The new on the left, the old on the right.
Not too bad for a first try, by an old fat guy.


- 35 old and new.jpg (153.82 KiB) Viewed 6559 times
Just so's yah know... the new patch GLOWs in the Dark.