Site seems to be OK. Load issue should be resolved now.

New Project: Ticket Tumbler for Charity

Sit back and talk with friends. Same rules as before. Rule #1-Relax with friends on the front or back porch.
Rule #2-No Politics, religion or anything above a G level.
User avatar
BrokenolMarine
Ranch Foreman
Posts: 7494
Joined: Sat Nov 26, 2016 8:28 am
Location: South Central Oklahoma in the mountains
United States of America

Logo Work

Post by BrokenolMarine » Thu Sep 14, 2017 5:40 pm

Quick Evening Session to glue and pin the logo in place. Not a difficult task, just slow as I resanded the back of each letter to remove the oil stain that bled around to insure good glue adhesion and then pinned the letters in place to make doubly sure they stayed. After the task was complete, I temporarily assembled the tumbler for a peek at the nearly finished product.

I still need to add a handle to the crank, and of course there is the final sanding and finish to be applied and the base to build. :)
1.jpg
1.jpg (265.71 KiB) Viewed 1403 times
2.jpg
2.jpg (268.97 KiB) Viewed 1403 times
3.jpg
3.jpg (294.98 KiB) Viewed 1403 times
I think she is looking good. ;) Just hope I don't drop it, knock it off the table, or do something stupid. :roll:
You can tell a lot about the character of a man...
by the way he treats those who can do nothing for him.

I don't look back at the things I can no longer do, I just look forward to the things I still can.

User avatar
BrokenolMarine
Ranch Foreman
Posts: 7494
Joined: Sat Nov 26, 2016 8:28 am
Location: South Central Oklahoma in the mountains
United States of America

Re: New Project: Ticket Tumbler for Charity

Post by BrokenolMarine » Thu Sep 14, 2017 5:52 pm

I have my plan for the needed handle, just have to go to Lowes/Home Depot for a couple pieces of hardware (bolts, washers, nuts) to make it all work. I'll be interested to see if it does. :?
You can tell a lot about the character of a man...
by the way he treats those who can do nothing for him.

I don't look back at the things I can no longer do, I just look forward to the things I still can.

User avatar
BrokenolMarine
Ranch Foreman
Posts: 7494
Joined: Sat Nov 26, 2016 8:28 am
Location: South Central Oklahoma in the mountains
United States of America

the handle and stain applied

Post by BrokenolMarine » Fri Sep 15, 2017 5:11 pm

I had to run the old Verizon modem to the UPS store and drop it off, which gave me a chance to pick up the hardware to put together then handle I need for the crank for the tumbler. To do that, I needed to make some spacers to fit between the dowel caps I decided to use to form the handle. ;) While I was at it, I will also cut the oak spacer to go between the crank arm and the pedestal. :)

That done, I drilled the holes and the countersinks needed to make things work. I put the thing together and left it for the glue to dry, then I'll sand the walnut spacers to match the profile of the oak dowel ends and I should have a handle. If it works out, I'll assemble the crank, and cut the rod to the proper length. :P Wish me luck. I bought extra hardware in case I need to go back to the drawing board. I have been there several times on THIS project. :roll: :lol:
1.jpg
1.jpg (236.35 KiB) Viewed 1389 times
After the work on the handle was completed... I figured it was finally time to put the first coat of oil on the basic tumbler assembly. I decided to go with Golden Oak on the entire package, after testing the color on leftover cutoffs and liking the result. So far, the first coat looks good. I am very pleased with the way the golden oak made the walnut spacers on the drum POP.... but I am open to comments ... :)
2.jpg
2.jpg (282.37 KiB) Viewed 1389 times
3.jpg
3.jpg (301.98 KiB) Viewed 1389 times
4.jpg
4.jpg (301 KiB) Viewed 1389 times
5.jpg
5.jpg (296.53 KiB) Viewed 1389 times
You can tell a lot about the character of a man...
by the way he treats those who can do nothing for him.

I don't look back at the things I can no longer do, I just look forward to the things I still can.

User avatar
BrokenolMarine
Ranch Foreman
Posts: 7494
Joined: Sat Nov 26, 2016 8:28 am
Location: South Central Oklahoma in the mountains
United States of America

Getting really close...

Post by BrokenolMarine » Fri Sep 15, 2017 8:57 pm

To the end.

Miss Tina is at a trade show this evening and tomorrow during the day. ;) I went out to the shop for a couple hours for some serious sanding and shaping while I talked to her to see how the setup was going. (fine... by the way. :) )

I began with the oak spacer. What started out as a rough off cut, now looks like this:
1.jpg
1.jpg (184.25 KiB) Viewed 1385 times
It is ready to stain and place on the axle. :)

Next up was that rough handle body. That needed a lot of work, and I started with the disk sander for the rough shaping, then moved to 120 grit.
2.jpg
2.jpg (197.61 KiB) Viewed 1385 times
It helped, but since the daughters of my friend always work the raffle, I moved up to 220, and it ended up with a nice smooth finish. I really like the way the walnut insert turned out, and it really popped when I decided to put a coat of walnut oil on IT first, then stain the entire piece with Golden Oak.
3.jpg
3.jpg (209.84 KiB) Viewed 1385 times
All the pieces looked good.
4.jpg
4.jpg (260.93 KiB) Viewed 1385 times
The end caps will be installed once I cut the excess off the axle, but I need to make CAREFUL measurements before I do that, and will most likely wait until after I make the base (Tomorrow?) and get that installed. Then I can cut the axle, install the end caps, and drill the crossing hole thru the crank and axle and install the screw that will lock them together.
5.jpg
5.jpg (287.1 KiB) Viewed 1385 times
6.jpg
6.jpg (277.57 KiB) Viewed 1385 times
After that, the tumbler is finished except for any addtional coats of Watco oil and a possible coat of wax. In addition, I'll most likely make a trip to Luther's YakAttack building and pick up the lighting for the interior. Then I have some "surprises" I will add that are just enhancements, decoration, "bling" if you will. They will involve intarsia, the scroll saw, carving, and the like. Bass, bream, crappie, walnut, oak, cherry, and the outside of the drum..... You get the idea.
You can tell a lot about the character of a man...
by the way he treats those who can do nothing for him.

I don't look back at the things I can no longer do, I just look forward to the things I still can.

User avatar
BrokenolMarine
Ranch Foreman
Posts: 7494
Joined: Sat Nov 26, 2016 8:28 am
Location: South Central Oklahoma in the mountains
United States of America

Basically Done!

Post by BrokenolMarine » Sat Sep 16, 2017 10:40 am

Went out this morning and let out the wife's Chickens... :P
Poured a fresh cup of coffee,
and got started in the shop.

The first task this morning was the cross pin for the crank handle. This would be a multi-step process and slow and careful. Didn't want to screw this up and have to make another crank. :o

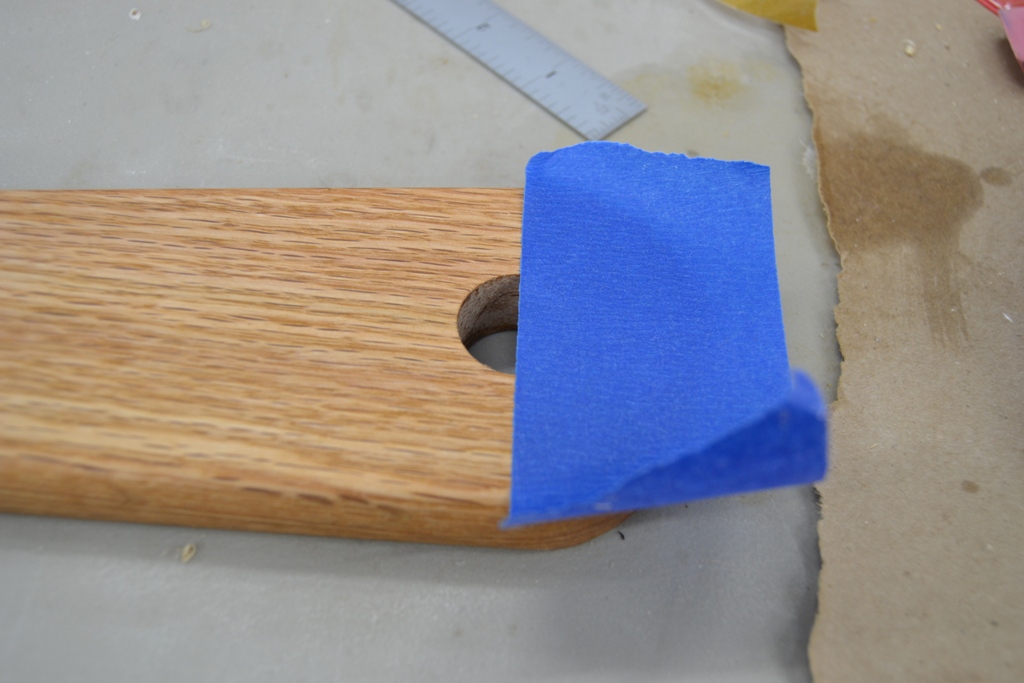
First, was to make a reference line on the crank. Didn't want to make a pencil line that might leave residue. No marker or chalk. What :? ....
That old standby... painters tape. :)
1.jpg
1.jpg (239.3 KiB) Viewed 1376 times
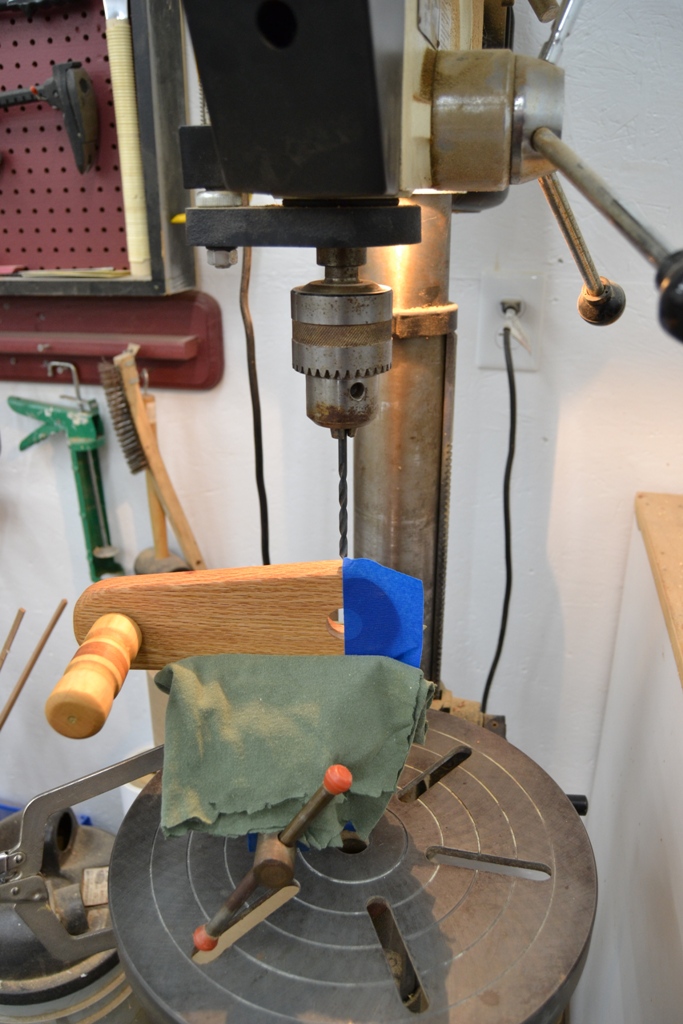
Next question. How do I hold the crank assembly level and steady and work the handle on the drill press? That's easy, put it in the drill press VISE, but pad the vise so IT doesn't leave marks.
2.jpg
2.jpg (290.33 KiB) Viewed 1376 times
Drilling the holes thru the crank was a three step process. Each required that the crank, held in the vise, be aligned and the depth be set for that pass.

The first pass, was for a hole to be drilled that was the same size as the outside diameter of the threads on the torx screw I would use as the cross pin. No need for the pin to lock into the first half of the crank. So, the first pass would only cover the first half.

The second pass would be in the off side of the crank and would be just under the size of the threads on the torx screw, and would be the same bit I would use to drill thru the axle. (dowel.) This pass would only go halfway thru the off side.

The third pass on the drill press would countersink the entrance to the crosspin channel.

Each of the passes were performed without a hitch. Each step was set up, a test pull with the vise and it's contents BEHIND the bit was performed and then the vise was moved into position and secured and a slow pull performed the pass. :roll: Yup, the pucker factor was present, but not too bad. Good preparation reduces the chance of error. (knock on wood.) :lol:

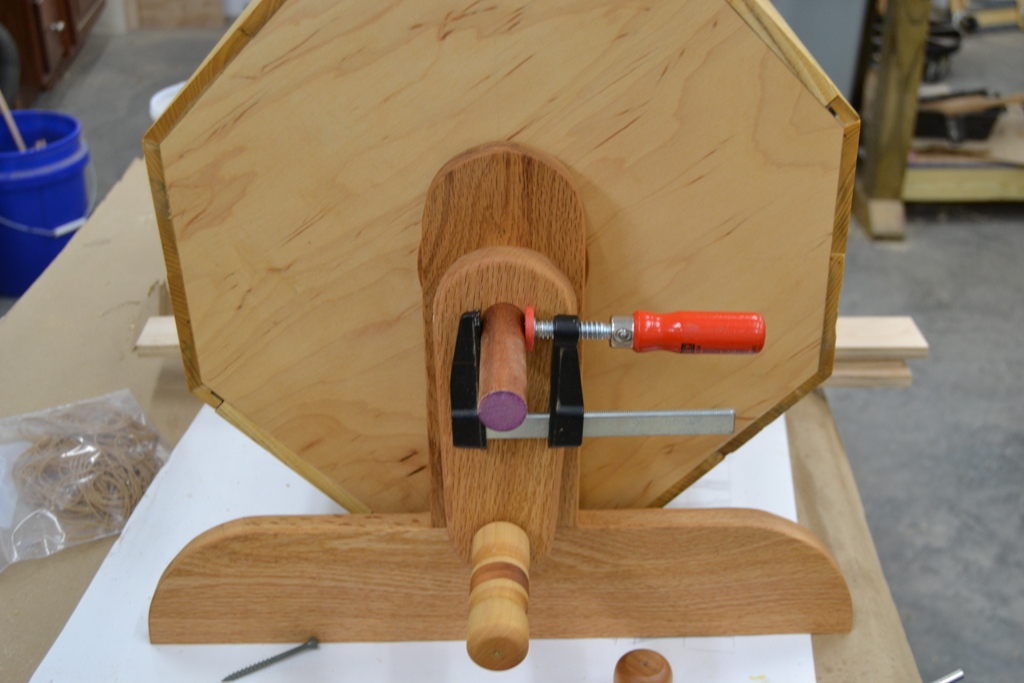
Next step was to drill thru the axle, and using the crank itself as the guide would reduce the chance of error. I set up the tumbler in the position so the down crank handle would put the logo out front and the open hatch at the top so tournament folks could toss in raffle tickets. Got everything just so and Blocked the bottom of the tumbler so it couldn't move and clamped the crank so it was tight against the spacer.
3.jpg
3.jpg (240.6 KiB) Viewed 1376 times
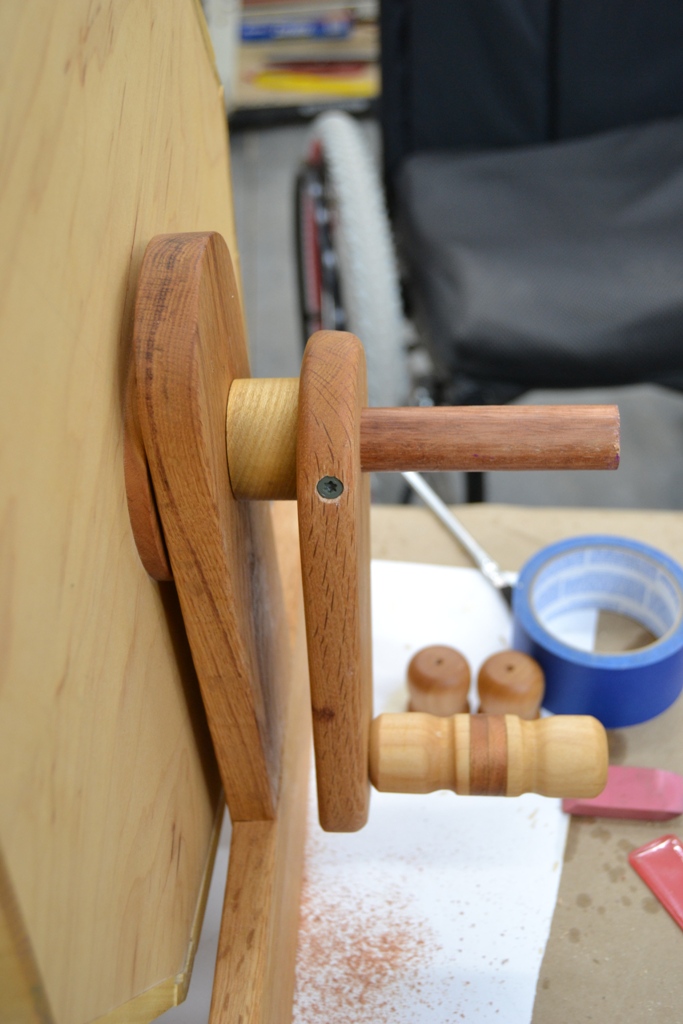
Took a deep breath, and drilled. Boo Yah. It was easy to determine how far to drill. I had resistance while drilling thru the axle, but when it cleared, I felt the bit slip into the void on the off side. I removed the crank, blew out the sawdust, and then installed the pin. The crank was now locked to the tumbler.
4.jpg
4.jpg (239.71 KiB) Viewed 1376 times
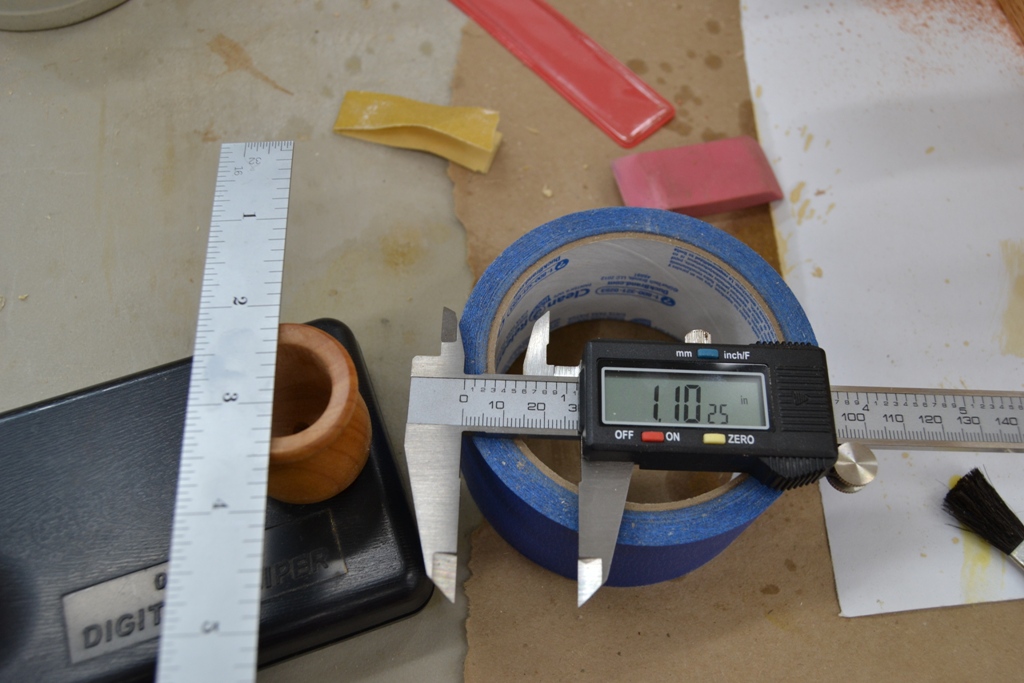
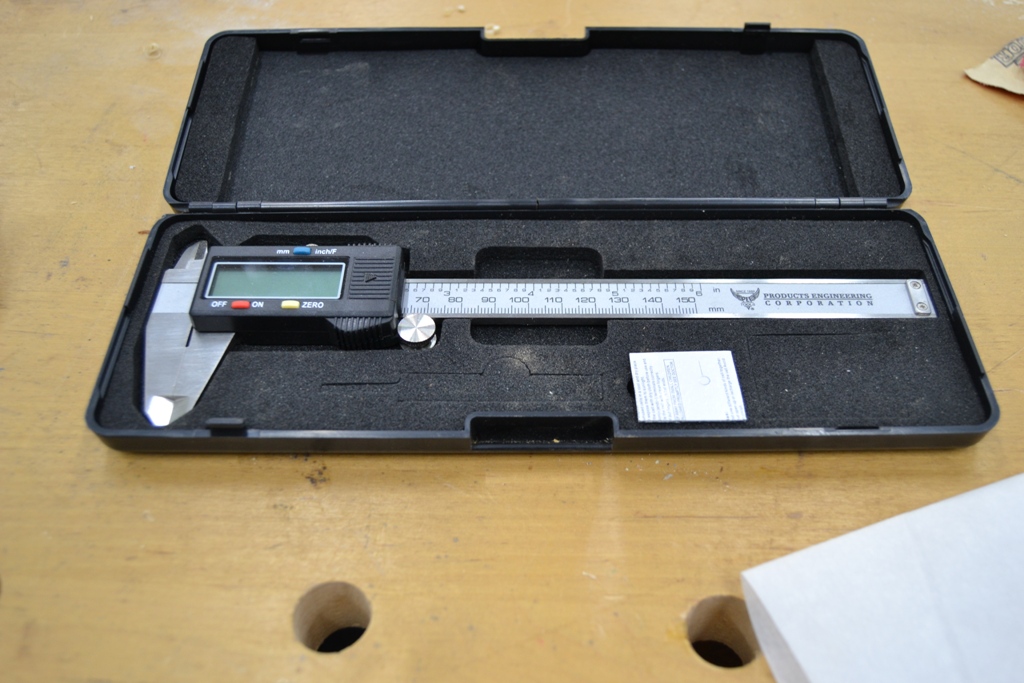
Next task was to install the end caps. To do so meant cutting off the excess length on both ends of the axle. Hmmm... first we need to know how deep the caps are. Measurements again. This time we'll use the digital caliper.
5.jpg
5.jpg (292.69 KiB) Viewed 1376 times
To get an accurate measurement, I lay a steel rule across the open end of a cap, and then measure the depth with the caliper.
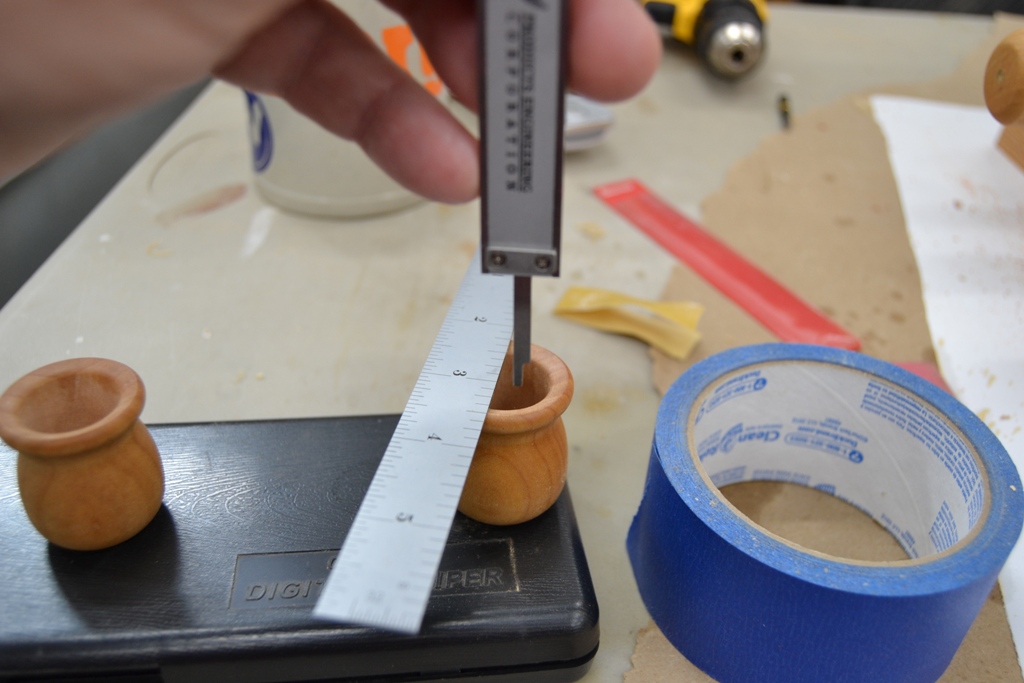
6.jpg
6.jpg (242.17 KiB) Viewed 1376 times
7.jpg
7.jpg (268.27 KiB) Viewed 1376 times
As you can see by the pictures, we have a depth of just over one inch. I will cut the exposed ends to just UNDER one inch so the caps will fit flush. First though, I will cut a countersink in the ends of the caps to allow for a contrasting plug to hide the screws after installation.
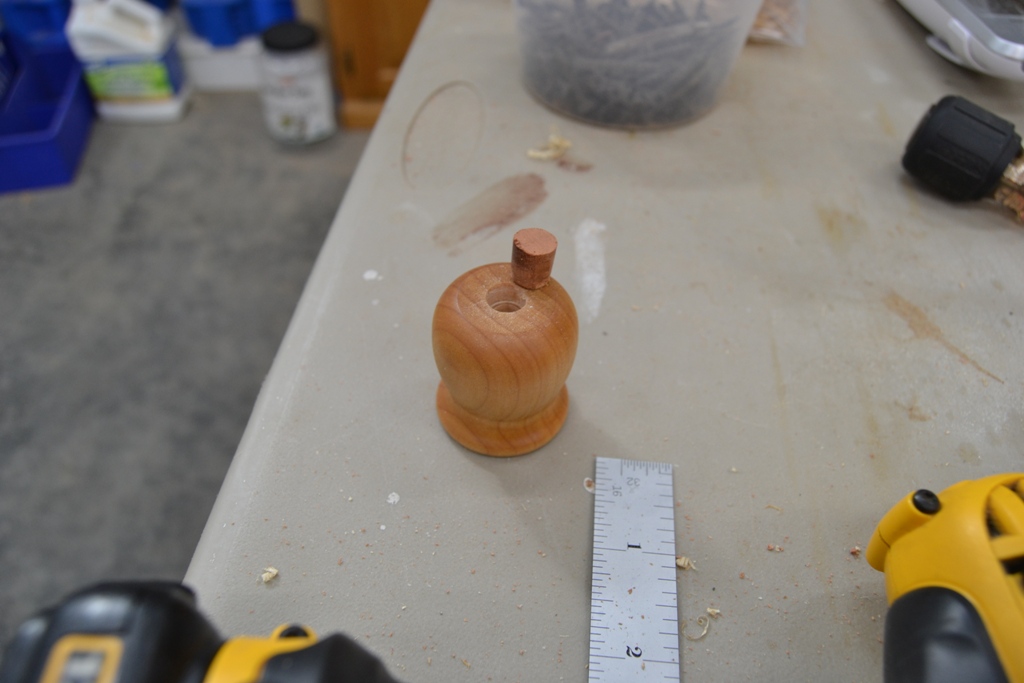
8.jpg
8.jpg (214.2 KiB) Viewed 1376 times
I marked the crank end first and made my cut with a Japanese pull saw. They make the smoothest cuts and are razor sharp. Cap installed and plug in place. Once it dries I'll cut it close with the saw, then cut it flush with a freshly sharpened chisel. (Those pics will follow.)
9.jpg
9.jpg (195.54 KiB) Viewed 1376 times
10.jpg
10.jpg (267 KiB) Viewed 1376 times
Repeated the process with the other end, and now the tumbler could be used.
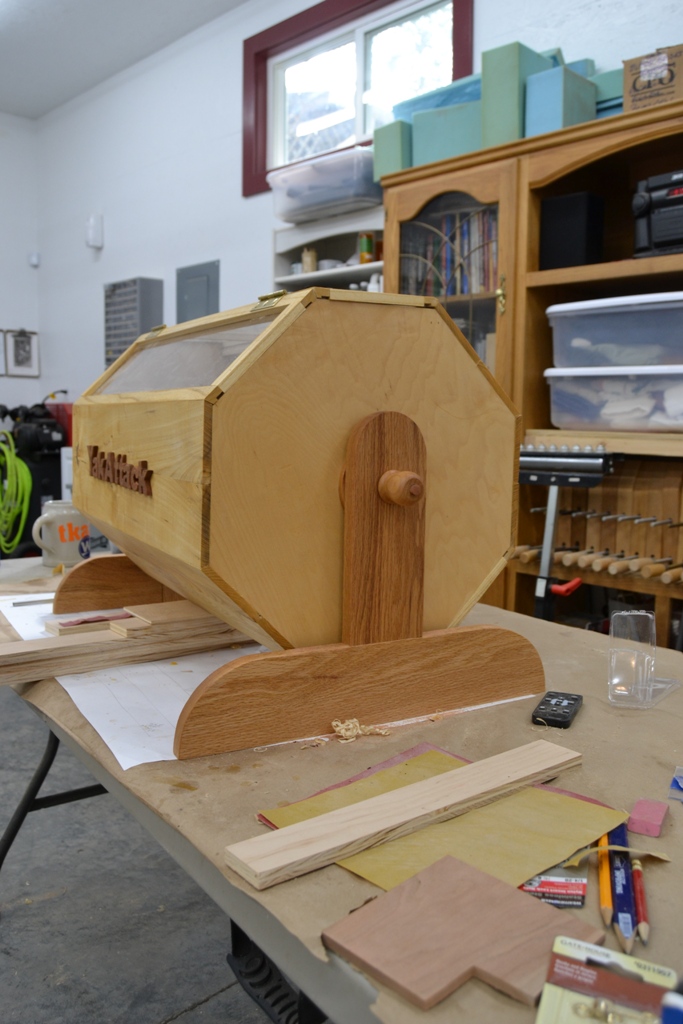
11.jpg
11.jpg (278.51 KiB) Viewed 1376 times
The only tasks remaining are adding the base, trimming those two plugs, and the enhancements I mentioned in the last post, which could be done without. The base will add weight and stability so it's definitely happening. :P

This turned out as I had hoped, but is not what I pictured when I started. Like most of my original constructs, they change on the fly, but usually work out. (To be fair, I have had a few end up as scraps and kindling.) I can't take full credit for all the ideas. Using magnets for door closures is advertised on the Lee Valley Website and I have seen them used for Tumbler hatch closures on YouTube posts. Not much new these days. I have to thank those who post on You Tube and share their ideas. Much of what I have learned over the years came from other woodworkers on forums, or from You Tube posts... much came from woodworking magazines. Some I pulled out of the air, discovering there are easier ways to do things. :lol:

I hope you guys enjoyed the post.

As long as folks enjoy them, I'll keep posting.
Regardless, I'll keep taking pictures of the progress of my builds, I do that for myself and keep them in case I go back years later and want to do the same project again. It helps ME remember how I did things. ;)
You can tell a lot about the character of a man...
by the way he treats those who can do nothing for him.

I don't look back at the things I can no longer do, I just look forward to the things I still can.

User avatar
BrokenolMarine
Ranch Foreman
Posts: 7494
Joined: Sat Nov 26, 2016 8:28 am
Location: South Central Oklahoma in the mountains
United States of America

Re: New Project: Ticket Tumbler for Charity

Post by BrokenolMarine » Sun Sep 17, 2017 7:55 am

My memory isn't what it used to be. Just noticed the small gaps in the ends of the rails of the window panels. :roll:
I'll need to cut and fit the sixteen plugs for those. :) A couple hours of fine work, mostly sanding and shaping. A swipe with the watco soaked cloth, and boom... the gaps never existed. (Hopefully 8-) )
You can tell a lot about the character of a man...
by the way he treats those who can do nothing for him.

I don't look back at the things I can no longer do, I just look forward to the things I still can.

User avatar
BrokenolMarine
Ranch Foreman
Posts: 7494
Joined: Sat Nov 26, 2016 8:28 am
Location: South Central Oklahoma in the mountains
United States of America

More finish work

Post by BrokenolMarine » Sun Sep 17, 2017 12:05 pm

Back out at it this morning... a quick pick for a follow up.
Once the end cap plugs were trimmed and the end caps re-stained, they turned out pretty good.
1.jpg
1.jpg (284.25 KiB) Viewed 1361 times
One more load off my mind. :)

It was time to plug the 16 holes in the windows... there are four in each assembly, two in each end.
2.jpg
2.jpg (237.07 KiB) Viewed 1361 times
I gathered my tools in preparation for the job, and a piece of scrap oak left over from the build. I never throw away the scraps til the entire job is done. Even then, much of the scrap goes into a bucket where it may end up as inlay, accent, or shims. :? Waste Not/Want Not.
3.jpg
3.jpg (280.74 KiB) Viewed 1361 times
Hand forming the plugs isn't hard, really. It just takes trial and error, and more sanding. You want the plug to fit tight. Working with plugs this small is a little more difficult, but ... I put in some good tunes and carry on.
4.jpg
4.jpg (266.57 KiB) Viewed 1361 times
In the end, they all get done and most fit exceptionally well. ;)
5.jpg
5.jpg (253.83 KiB) Viewed 1361 times
At least better than the gaps I started with.
:lol:
You can tell a lot about the character of a man...
by the way he treats those who can do nothing for him.

I don't look back at the things I can no longer do, I just look forward to the things I still can.

User avatar
BrokenolMarine
Ranch Foreman
Posts: 7494
Joined: Sat Nov 26, 2016 8:28 am
Location: South Central Oklahoma in the mountains
United States of America

Worked on the Base.

Post by BrokenolMarine » Wed Sep 20, 2017 11:28 am

Spent some time in the shop yesterday, before we went to the big city to find the leather company. I got the base for the Tumbler done and it turned out pretty nice. I started by cutting out a base from the Cabinet ply, and then cutting face trim from the remaining piece of oak. Then it was a matter of cutting the oak to fit the base. I intentionally left the oak just a bit proud in height, to later make it match exactly with the plane.
8-)
1.jpg
1.jpg (276.86 KiB) Viewed 1346 times
2.jpg
2.jpg (168.77 KiB) Viewed 1346 times
Working with the hand plane, I not only trimmed the oak down to the level of the maple ply, but rolled the edge, rounding it over, for aesthetics There are other ways to do this, using the router is faster, but also noisier and more risky, and makes a bigger mess. :)
3.jpg
3.jpg (300.15 KiB) Viewed 1346 times
After the shaping with the hand plane, I used a block sander and 220 grit sand paper to smooth everything, and any small gaps, I used an old trick to hide. :roll: Just prior to sanding, fill the small gaps with yellow wood glue, and then start sanding, and take the fine sawdust, sweep it to your small gap, and pack it in. Keep sanding and keep packing, if need be, add more glue. This works very well for "SMALL" gaps in trim work, or flaws in ply. You can't repair a huge crack this way, or a large flaw in measurements. :(

Once I finished the prep sanding, I applied the finish, and left for town... giving the Watco Oil time to cure.
4.jpg
4.jpg (281.41 KiB) Viewed 1346 times
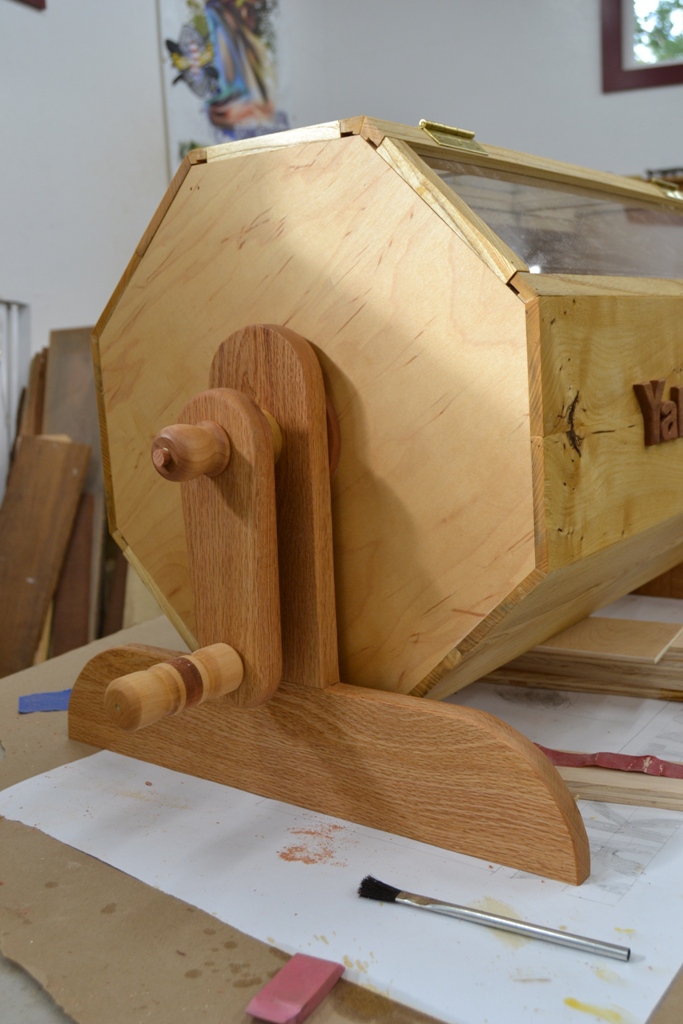
The base makes a fine accent to the completed Tumbler, and it is ready to use. Since I have so much time before the next tournament... (May 2018) ... I can think about the enhancements I planned. They will show up down the road, and when they are all done... I will most likely share them in a separate post. 8-)
5.jpg
5.jpg (303.73 KiB) Viewed 1346 times
Last edited by BrokenolMarine on Thu Sep 21, 2017 7:44 am, edited 1 time in total.
You can tell a lot about the character of a man...
by the way he treats those who can do nothing for him.

I don't look back at the things I can no longer do, I just look forward to the things I still can.

User avatar
CT_Shooter
Administrator emeritus
Posts: 5776
Joined: Mon Mar 21, 2016 8:42 am
Location: Connecticut
United States of America

Re: New Project: Ticket Tumbler for Charity

Post by CT_Shooter » Wed Sep 20, 2017 12:51 pm

Thanks for sharing your progress all along the way, Marine. I enjoyed every minute of this outstanding project! Keep them coming!
H006M BBB .357 - H001 Classic .22LR - Uberti/Taylors & Co. SmokeWagon .357 5.5" - Uberti/Taylors & Co. RanchHand .22LR 5.5" - Colt King Cobra Carry 2" - Colt Official Police 38spl 4"

MuddyWaters62
Cowhand
Posts: 326
Joined: Thu Jun 09, 2016 11:37 am
Location: Texas
United States of America

Re: New Project: Ticket Tumbler for Charity

Post by MuddyWaters62 » Thu Sep 21, 2017 9:33 am

OUTSTANDING!!! Marine. I just love looking over your shoulder as you document your progress. Thank you for taking us under your wing.
Congrats!!
Muddy Waters

User avatar
Sir Henry
Administrator / Owner
Posts: 14720
Joined: Sun Mar 20, 2016 10:58 pm
Location: Price County Wisconsin
United States of America

Re: New Project: Ticket Tumbler for Charity

Post by Sir Henry » Thu Sep 21, 2017 10:12 am

I like these detailed posts on building stuff.
Hi, my name is Gene and I'm a Henryholic from Wisconsin.

Range Reporter: Henry Repeater

User avatar
BrokenolMarine
Ranch Foreman
Posts: 7494
Joined: Sat Nov 26, 2016 8:28 am
Location: South Central Oklahoma in the mountains
United States of America

Re: New Project: Ticket Tumbler for Charity

Post by BrokenolMarine » Wed Oct 04, 2017 4:50 pm

Got a chance to work on the Tumbler again... the extras. 8-)

I got started on the enhancements I talked about. First I glued two paper patterns to a piece of cedar I saved for this. One is a kayak fisherman decal outline a long time friend of ours designed that has been popular in this area for some time. He has passed them out and traded them at tournaments all over the east coast, and they show up everywhere. :lol: I needed a kayak fisherman for the tumbler and thought I'd honor Mike by using his design.
The second pic is just a clip art bass, but it will do... LOL... I needed one to put on the opposite side of the tumbler... hooked by the fisherman.
I used spray adhesive and attached them, then went over the lines with an exacto-knife.
1.jpg
1.jpg (307.03 KiB) Viewed 949 times
I cut out the fisherman already, on the scroll saw. Next will come the shaping and sanding, then the finishing, (as always) then gluing and pinning it to the tumbler... but here is a quick peek.
2.jpg
2.jpg (289.72 KiB) Viewed 949 times
The bass will be a bigger challenge... my intent is not only to cut it out on the scroll saw, but to CARVE some details into the bass, make it MORE 3D and more alive than just a silhouette.
3.jpg
3.jpg (271.91 KiB) Viewed 949 times
Wish me luck, more pics to follow as I progress.. ;)
You can tell a lot about the character of a man...
by the way he treats those who can do nothing for him.

I don't look back at the things I can no longer do, I just look forward to the things I still can.

User avatar
BrokenolMarine
Ranch Foreman
Posts: 7494
Joined: Sat Nov 26, 2016 8:28 am
Location: South Central Oklahoma in the mountains
United States of America

Sharpened the Carving Chisels...

Post by BrokenolMarine » Thu Oct 05, 2017 11:59 am

and attempted my first carving... :D
Thought I'd show you WHY it's important to keep the sharpened chisels protected.
Sharpening the chisels is a FIVE stage process for me. Extra Coarse Diamond, then the Blue Medium Coarse Diamond, Then 1000, 4000, and 8000 grit water stones. Finally, (Oops, six stage) buffing on the leather strop with buffing grit.
1.jpg
1.jpg (208.61 KiB) Viewed 944 times
The extra coarse plate and the strop are NOT in the picture. ;)

After a bit over an hour or so, all eleven of the carving chisels were ready to go.
2.jpg
2.jpg (302.43 KiB) Viewed 944 times
About 90 minutes after that... I had achieved a three dimensional effect on the man in the kayak that I wanted. Not as detailed as I would have liked, but it IS my very first try. :lol:
3.jpg
3.jpg (323.66 KiB) Viewed 944 times
The red oak Watco Oil is still wet, but you get the feel or idea of what he'll look like.

The bass is up next, but I may work on the box this afternoon and come back to the bass tomorrow. :roll:
You can tell a lot about the character of a man...
by the way he treats those who can do nothing for him.

I don't look back at the things I can no longer do, I just look forward to the things I still can.

User avatar
BrokenolMarine
Ranch Foreman
Posts: 7494
Joined: Sat Nov 26, 2016 8:28 am
Location: South Central Oklahoma in the mountains
United States of America

Tumbler is done... really!

Post by BrokenolMarine » Fri Oct 06, 2017 10:48 am

:D

Well, you know, unless I think of some other enhancement to carve, add, put on....
But the bass and kayak fisherman are done and in place. ;)

I went out this morning and took the weight off the fisherman... which insures good contact and bonding with the glue up.
1.jpg
1.jpg (285.85 KiB) Viewed 939 times
I rolled the tumbler over and took a look, and the kayak fisherman looked pretty lonely on there by himself, don't you think?
2.jpg
2.jpg (251.21 KiB) Viewed 939 times
I had planned to start working on the box top for the new box, but ... Mike needed some company. So I started carving on the bass. Interesting, as it was mostly just detail. I learned something in the carving. Cheap chisels lose their edges quickly. Good thing we got these for little of nothing at a yard sale or auction or I would have been upset. :?

After an hour or so, I ended up here... I need about a half hour with 400 grit sandpaper and this will do.
3.jpg
3.jpg (314.23 KiB) Viewed 939 times
Carving and sanding gave me a bass to keep Mike company on the tumbler and I think will look good. Needs some stain.
5.jpg
5.jpg (323.44 KiB) Viewed 939 times
Nice... I can't decide if I want to add some very thin fishing line between them for a final touch or just leave it. I am thinking just leave it.
4.jpg
4.jpg (302.28 KiB) Viewed 939 times
You can tell a lot about the character of a man...
by the way he treats those who can do nothing for him.

I don't look back at the things I can no longer do, I just look forward to the things I still can.

Post Reply