Hi all!
Back at last! I posted on my first gun, a Henry H004Y Golden Boy Youth, earlier at http://henryrifleforums.com/viewtopic.php?f=7&t=5027
Well, I finally sent the receiver cover off to Andy at Skinner Sights to drill/tap. Got it back in about two weeks, as Andy was on a much deserved vacation. Normal turnaround is about a week. Also ordered a new .500 front sight, a dovetail plug and other stuff. All came last Saturday. So on Sunday I spent an enjoyable day mounting it all, and while she was apart I did some fine tuning. Hope to get out to the BLM range this weekend, weather permitting, to dial her in.
I chose the .500 (1/2") front sight because I was really happy with my first groupings from the factory set buckhorn. So I carefully measured everything and plugged the numbers into the calculator on the Skinner site. Adjusted for the longer sight radius, it showed .506, close enough for me! I'll know if it was the correct decision at the range soon.
Since she was apart anyway, I also decided to fine tune the action, deburr and polish the operative faces, and wax the furniture. So now she's "done"!
Following are 14 photos that may be of help to you all if you want to go down this trail... Being a toolmaker and instrument maker (as well as a designer) I use a lot of tools you may not have, but no matter, as the illustrations explain it and it's easy to make do with available tools.
Understand that the action was already very smooth, but my tweaks improved on even the HRA legendary quality. Also, trigger pull was reduced almost 1/2 pound!
1) I noticed some edge dings (very common) on the all important slide, so I stoned them out and deburred the sharp edges with a medium grit square stone. The nature of the machining process can leave a slightly rough surface, which is immediately indicated as bright spots on the black with just a few passes of the stone. There is no need to "polish" it up, just knocking down the high spots will suffice. Focus on the sharp edges. Note the two new tapped holes on the receiver cover.
2) Ditto on the slide surfaces of the cover. I used a "riffle" file, which you probably don't have, but any file that will access the area will suffice. Don't overdo it- just the high spots!
3) After deburring, I used the Skinner Bluing, following instructions, to touch up the now spotted steel surfaces. I then lightly lubricated the slide and operative surfaces with white lithium grease, but wiped it almost all off. No heavy grease, just a film! The action was very smooth before, but now it's like glass. Pay special attention to the flat surfaces that contact the inside of the receiver. Trigger pull has dropped from about 45 ounces to just under 30 ounces! But the tell-tale snick-snick of racking a round is fairly quiet now, unlike the scary and nasty sound a pump makes to a bad guy in the hallway!
4) Now it gets "down and dirty"! I decided to wax and polish the beautiful walnut furniture! From HRA, the walnut is very smooth and finished. But for added beauty and protection, I used my own concoction of Renaissance Wax tinted with black artist's tempera powder. This is an old furniture restorer's trick, although most use a burnt umber powder rather than black. Renaissance Wax was developed by The British Museum for restoration and preservation of priceless artifacts, and is universally used as the highest quality wax on the market. Expensive, but my jar has lasted for decades, and is especially valuable in the very dry climate of Santa Fe, New Mexico. It looks nasty, but in fact the goop imparts a hard mellow sheen, darker in the little grain that's not filled by Henry, as well as around the tacks and in the crevasses. Trust me, it's worth it! It really makes the beautiful walnut glow!
5) I opted to add Skinner's thumbscrew to the elevation to make it easier to adjust for elevation at the varying range yardage. But it's a bit too long, and snagged my scabbard lining.
6) So I shortened it with a jewelers saw, and cleaned up the thread end with needle files. You can just grind it down.
7) Ta da!
8) Fitting the new front sight using Skinner's 60 degree file with a safe edge. Safe edge does not show in the photo, but all you want to do is VERY carefully stroke the dovetail on the muzzle end a tiny bit at a time until you can finger press it in about 1/3rd of the way. Then hammer it in using a brass punch ONLY. It's really easy to get it too loose, so be patient, and make sure it's centered!
9) Ta da!
10) When tapping out the OEM buckhorn (easy job- whereas the front sight was really tight) release the tension first by putting the buckhorn at the near end, and a piece of card or plastic under it to protect the barrel.
11) An old instrument maker trick. Put a little glop of beeswax on the screwdriver to help hold tiny setscrews.
12) The walnut stock after waxing with my magic goop. I removed the butt cuff for waxing, and also added a piece of 1/2" closed cell foam to the inside end of the cuff, not for recoil mitigation (none), but to increase the LOP to 13 1/2" from the stock 13". Great fit-up now!
13) Another view of the stunning walnut and the replaced and stitched butt cuff.
14) Installed Skinner Peep, with dovetail plug, tapped to hold a spare alternate peep. I've settled on the Skinner .070.
So I hope this missive helps you guys and gals along our Henry Rimfire trail! Next up for me is a lever .410! Followed by a Henry BB 45 Carbine and an El Patron in 45 ca. Sure wish HRA made a "Henry Quality" 20 gauge Mule Ear Coach Gun!
Bill
Spring has sprung. Get out and shoot your Henry
New Skinner Peep + fine tuning, H004Y (long with photos)
New Skinner Peep + fine tuning, H004Y (long with photos)
You do not have the required permissions to view the files attached to this post.
Last edited by BillyBoy on Tue Oct 02, 2018 6:01 pm, edited 1 time in total.
9 x
-
CT_Shooter

- Administrator emeritus
- Posts: 5155
- Joined: Mon Mar 21, 2016 8:42 am
- Location: Connecticut

Re: New Skinner Peep + fine tuning, H004Y (long with photos)
Wonderful documentation and photos, BillyBoy. Congratulations. You have a unique Henry GoldenBoy. Beautiful work.
0 x
H006M Big Boy Brass .357 - H001 Classic .22LR - Uberti / Taylors & Co. SmokeWagon .357 5.5" - Uberti / Taylors & Co. RanchHand .22LR 5.5"
Re: New Skinner Peep + fine tuning, H004Y (long with photos)
Very nice tweaks you've done to your GB, Bill. X2 on what CT_Shooter wrote.
I especially like your "down and dirty" work described in #4. Wood is my favorite part of any firearm! I regularly use Renaissance Wax on all my firearms, and like the darkening that you've achieved on your GB wood. That looks very, very sharp. I think I'd like to try that on my SGC....would love to have a darker glow to my rifle's wood. Sure would dress it up real purty!!
And if I had the tools you used, I'd also shorten my thumbscrew as you did in #5-7. I had special-ordered a bronze Skinner peep to replace the original blued stock peep that came with my SGC, and then added the thumbscrew. It looks great, but the thumbscrew does really hang out to the right side. I'll keep your adjust for this in mind, and see if a friend of mine might have the tools to help me do this. He's pretty handy at gunsmith work on his firearms.
Thanks for sharing your "ta-da" project. End results are top-notch. Congrats!
PT7
0 x
~Пока~
-
North Country Gal

- Firearms Advisor
- Posts: 6086
- Joined: Thu Apr 07, 2016 12:46 pm
- Location: northern Wisconsin
Re: New Skinner Peep + fine tuning, H004Y (long with photos)
Don't know if we have the capability to save posts as a sticky for future reference, but this one would be a good candidate. Thanks for all your hard work and willingness to share.
0 x

Re: New Skinner Peep + fine tuning, H004Y (long with photos)
Well done, written and presented! Many of us here are adamant Renaissance Wax users. Tinting with artist's tempera powder is something new to me. Thanks for sharing!
0 x
UPDATES: OR passes 114, "one of strictest gun control measures in U.S." https://henryrifleforums.com/viewtopic. ... 34#p213234
Re: New Skinner Peep + fine tuning, H004Y (long with photos)
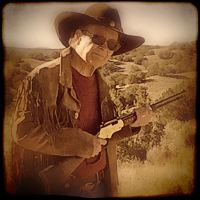
Well, I couldn't resist adding a badger claw "dangle". Very traditional to add a totem to a Native American gun. I'll replace it sometime with a Bear fetish. Bear is my totem, or Spirit Guide. Came from an encounter I had in Montana, when I was about six years old. I was playing outside when a huge black bear sauntered by. Not knowing any better, I was really excited and started yelling "Hi Bear", and waved at him or her. Just glad it was not a "her" with cubs! Bear looked over at me, stood up and waved back, then dropped back down and slowly wandered off. When I told my mom and uncle, I had to sit through an hour long lesson on the "dos and don'ts" of living with wildlife in Montana!
What's interesting is that my wife Geri's tribe adopted me (I'm a "skin-in-law") and at the Naming Ceremony gave me the name Hunar Ahiken, which means "Bear Whistle". Maybe because I also make Native American style flutes? Maybe not!
Also a full on shot of the now completed Golden Boy Carbine.
What's interesting is that a carbine is a very personal gun, and I did things to it that I would never do to another Henry (or other) rifle. There's just something about a carbine that makes you want to personalize it.
I saw a Sharps 45-70 in a museum (can't remember which) that a Native American warrior had modified with a pistol grip and a shortened barrel to about 12". Gads! That must have been worse on the shooter than the recipient!
Thanks for all the kind replies! Hopefully this post was an inspiration!
Bill
You do not have the required permissions to view the files attached to this post.
Last edited by BillyBoy on Tue Oct 02, 2018 4:04 pm, edited 1 time in total.
4 x
Re: New Skinner Peep + fine tuning, H004Y (long with photos)
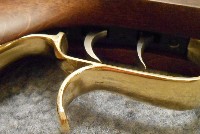
Inspiration indeed! Also, we kinda know what you look like now. Can vaguely see you and your camera in the reflection of the forearm brass band. 
1 x
UPDATES: OR passes 114, "one of strictest gun control measures in U.S." https://henryrifleforums.com/viewtopic. ... 34#p213234
Re: New Skinner Peep + fine tuning, H004Y (long with photos)
Hi all!
So, the weather was great on Sunday here in Santa Fe, in the high '60's with bright blue sky. Went out to the BLM range near Diablo Canyon to dial in the now mounted Skinner Peep, and to test my new Uberti Cattleman 22 LR 12 shot revolver, a fine little playmate for my carbine!
Shot two groups of 10, using CCI Mini Mag ammo. First group was a bit high, so I lowered the aperture down one full turn, and that was that! Not much different than my best group with the buckhorn, but WAY faster. Point the rifle and it just sort of falls on the target. Now it's up to me to hone my shooting skills! My goal is 10 in one hole...
It was a challenge finding the front blade on the new .500 tall sight, so I'm going to paint the serrated ramp face white or yellow and see if that helps.
Also, the elevation thumbscrew easily loosened, so a little glop of beeswax should add the stiction necessary to retain it without over tightening and damaging the post threads.
Bill
You do not have the required permissions to view the files attached to this post.
4 x


Re: New Skinner Peep + fine tuning, H004Y (long with photos)
I mounted the Skinner front on my .357 and had to ease the edges all the way round as it tore the lining of one of my soft cases. I also painted the top 1/4 of it with a white paint pen. It helps some in lower light, but still isn’t perfect.BillyBoy wrote:It was a challenge finding the front blade on the new .500 tall sight, so I'm going to paint the serrated ramp face white or yellow and see if that helpsl
You do not have the required permissions to view the files attached to this post.
0 x
SGC .22 LR Stripped and oiled up
BBSC .357 w Skinner Express & Patridge
BBSC .44 Magnum with Skinners
Marlin 1895GS .45-70 w RPP Cloverleaf
Marlin 336BL .30-30 w Skinner LoPro 2 and Sig 2-7x
1912 Winchester 1894 .30 WCF
BBSC .357 w Skinner Express & Patridge
BBSC .44 Magnum with Skinners
Marlin 1895GS .45-70 w RPP Cloverleaf
Marlin 336BL .30-30 w Skinner LoPro 2 and Sig 2-7x
1912 Winchester 1894 .30 WCF
-
jstanfield103

- Cowhand
- Posts: 379
- Joined: Sat Nov 12, 2016 4:45 pm
- Location: Kentucky
Re: New Skinner Peep + fine tuning, H004Y (long with photos)
What a beautiful rifle you created, Thanks for posting. Great job
0 x
Aim Small, Miss Small