Just wanted to keep busy, but not get tied up in a major project. Of course I cleaned, sorted, and organized in the shop. But then, I did some of the small projects on my Roun2it list.
First up was to reverse the doors on the upper cubbies on the shop cabinet I built ten years ago. Always annoying... but never got around to it.
When I orginally designed the cabinet, I thought it would be slick to have the weight of the doors hold them closed and didn't think it would be a problem to have them lift UP to open. It really wouldn't have been if they had been truly upper cabinets, overhead or eye level, but these are the two cabinets just under the edge of the work bench.
I always intended to invert the doors placing the hinges at the bottom and have magnetic latches at the top. Shouldn't even have to move the pulls since they are symmetrical. So, I moved the hinges. I ended up having to shim the hinges a bit, but they are adjustable for height via screws, and I was able to get them perfectly aligned. I added chains to support the weight and the magnetic catches. Worked great. Should have done it six months after I built the dang cabinets.
Then I decided to build another custom cane from shop scraps. Always fun, but a bigger challenge than it would be for someone with a lathe. First, choose the scraps. I chose mahogany and spalted maple. Using the table saw I cut the rough bark still on maple to rough size. Then a hand plane smoothed the edges to be glued up. The mahogany scraps were from another project and were cutoffs. I planed the edges just to make sure I'd get good adhesion and clamped them all up.
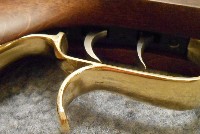
Cabinet maker's clamps make sure you get a nice tight even pressure. Looking down the length, you can see the pattern I was hoping for.
Out of the clamps the next morning, you can see why it's a bit of a challenge with no lathe. The shaping will be done with the spokeshaves. I love working with them, but it's a challenge with the shoulder surgery pending. Work a bit, rest a bit, work a bit, rest a bit. I trued the edges on the table saw, and got started.
The spokeshaves get the work done if you keep them sharp. I got to 4,000 on the waterstones, then touch them up as needed.
Keep rotating on the bench, keep checking progress and you'll get there. Unless you are a pro, it'll never look like lathe work, but you can turn out something that looks good.
I got where I wanted to be and marked the socket size on the end. Using a fine saw, and a chisel, I cut the tenon on the end.
Slow and steady gets you there. Better to take small cuts and test often, You can't put it back.
Once the socket was finished, I shaped the blank to make a smooth transition and then cut some texture into the cane. In this one I didn't want that glass smooth turned look.
Miss T liked the finish a lot. I applied medium walnut Watco oil to the mahogany sections with a Q-Tip to keep the Maple light... then Red Oak to the entire project. I was happy with the look. Two applications of red oak and then I waxed and buffed 'er out.
Not bad for scraps most would have tossed. It would have been easier with a lathe, but ... I don't want to fall down THAT well.
Spring has sprung. Get out and shoot your Henry
Busy Work
- BrokenolMarine
- Ranch Foreman
- Posts: 5798
- Joined: Sat Nov 26, 2016 8:28 am
- Location: South Central Oklahoma in the mountains
Busy Work
1 x
You can tell a lot about the character of a man...
by the way he treats those who can do nothing for him.
Re: Busy Work
You are about par with a person who owns a lumber mill as a family business, Marine. I remember seeing some of those smaller operations in the OR forests. Getting as much out of a tree as possible is most profitable and least wasteful. You have that skill in abundance. Sharp-looking wooden cane.
PT7
PT7
1 x
~Пока~
- BrokenolMarine
- Ranch Foreman
- Posts: 5798
- Joined: Sat Nov 26, 2016 8:28 am
- Location: South Central Oklahoma in the mountains
Re: Busy Work
The next one will have a more complex interaction between the woods, and a more interesting headpiece. . I may just have to wait until after the surgery and recovery.
1 x
You can tell a lot about the character of a man...
by the way he treats those who can do nothing for him.
Re: Busy Work
My goal for this winter is to wade into my shop and get it usable again. Eight years of neglect has made it a bunch of piles with two trails through it. There is a lot of work before I can make actual use of the building as a workshop as opposed to storage. A good friend of mine suggested using a Bobcat but that seems a bit extreme.
Thanks for your posts as it keeps me focused on being able to work with wood projects once again. I have missed the creative process.
1 x
- BrokenolMarine
- Ranch Foreman
- Posts: 5798
- Joined: Sat Nov 26, 2016 8:28 am
- Location: South Central Oklahoma in the mountains
Re: Busy Work
First step is back up to the door and load up everything you KNOW you won't use and haul it away or give it to your help. (Wink, wink... Bribes for the help.) Repeat as needed until there are no more certain you won't use loads.Ernie wrote: ↑Fri Sep 06, 2019 10:11 pmMy goal for this winter is to wade into my shop and get it usable again. Eight years of neglect has made it a bunch of piles with two trails through it. There is a lot of work before I can make actual use of the building as a workshop as opposed to storage. A good friend of mine suggested using a Bobcat but that seems a bit extreme.
Thanks for your posts as it keeps me focused on being able to work with wood projects once again. I have missed the creative process.
The next phase is much harder, and that's letting go of the not likely to use. I had two large trash cans off offcuts, mostly from making boxes. Exotics such as purpleheart, cocobola, rosewood, curly cherry and the like. Many were small pieces or oddly shaped but I told myself I might use (Need) them for cutting plugs, trim, or inlays. I finally admitted I hadn't used anything out of either can in years. I tossed the contents, and put the cans outside for household trash.
The rest is organizing, and cleaning. Tossing actual trash. The best advice I ever got here was to get rid of several shelves scattered around my original small shop, then build one main cabinet to organize tools and supplies. The cabinet I reversed the doors on at the beginning of this post... Is that cabinet. They also advised I give away or toss all those tool cases I didn't need, and store the tools in the cabinet. Unless you actually take the tools out to jobs. My contractor friends were thrilled to have the brand new cases to replace their worn out ones. I was amazed at how much space this opened up.
Good luck. I still go thru and declutter my shop about every six months. I have to toss the offcuts I find myself hoarding. There are some I'll use, but some have to go.
2 x
You can tell a lot about the character of a man...
by the way he treats those who can do nothing for him.
- BrokenolMarine
- Ranch Foreman
- Posts: 5798
- Joined: Sat Nov 26, 2016 8:28 am
- Location: South Central Oklahoma in the mountains
Re: Busy Work
Stopped on the way to the VA for my MRI and picked up the tip for the cane. I went out this morning and worked on the installation. It wasn't a slam bam thank you m'am install.
The tip required a 3/4" tenon, so I got out the tools to mark the tenon diameter. I used my 30 year old drafter's kit.
This was a kit that has paid for itself over and over (and over.) I have used it in drawing, woodworking and measuring so many things, and Miss T has borrowed it so many times. Amazing that the parts are all still there. Probably because NONE of the four kids ever touched it. I bought them cheapo kits to lose things from. I measured 3/8 and found the center of the tip of the cutoff from the original cane, then marked the 3/4" tenon. Then I got the Micrometer and measured the depth of the tip, and marked that.
Using the depth set on the micrometer, I marked the line and then cut around the scrap piece to cut to depth with the pull cut Japanese saw. CAREFULLY, slowly but surely. Then cut the tenon with the chisel and sanded it smooth.
Once I tested it for a solid fit and was happy, I cut it to the proper length and saved the rest of the off cut. Who knows, I might need THAT again. I checked it carefully and set it aside for a minute while I set up the drill press.
Next the tip was placed in the vise on the drill press to drill thru for the long screw as insurance with the glue for added strength. Checked for alignment and drilled.
Placed the screw in the slot and the tip on the cane mounted in the vise, and a sharp rap with the rawhide mallet to set the tip, then drilled a pilot hole in the cane. Glue on the cane and in the hole and then screwed it in place. sanded the joint to match. Stained and waxed and we achieved a nearly perfect match. After a month or so of use, no one will notice.
Here is a peek with the tip in place.
Done and done, although I might add a couple more coats of wax down the road, and inset a Marine Corps medallion of some sort in the upper portion of the cane shaft.
1 x
You can tell a lot about the character of a man...
by the way he treats those who can do nothing for him.