Spring has sprung. Get out and shoot your Henry

A build... Woodcraft Kit...

Any and all knives or other edged things. Special preference for BUCK knives
User avatar
BrokenolMarine
Ranch Foreman
Posts: 5783
Joined: Sat Nov 26, 2016 8:28 am
Location: South Central Oklahoma in the mountains
United States of America

A build... Woodcraft Kit...

Post by BrokenolMarine » Wed Sep 13, 2017 4:28 pm

I mentioned this in PT's post, so I thought I would throw up a pic or two. I have this started, and will work on it more later this week or first part of next week as time permits. It's a tanto kit from Woodcraft. The scales are from a slice from a Spalted Maple we planted YEARS ago as a stick. You know, you order them from the catalogs that show up, and they come in about as thick as a pencil and two feet long. Plastic tag saying "Silver Maple," or "Oak" and you stick them in the ground and hope for the best. :lol: Bugs got that one and we had to take it down. I dried it for two years, then cut and stacked it to cure.
1.jpg
I have not had much experience at this, but hope for the best. Each attempt is a learning experience, I take my time and if I mess up the scales, I start over. The blade kits aren't that expensive, that you risk too much to LEARN on them, but aren't cheapo so you feel you are wasting your time.
2.jpg
My daughter in OK still uses the knife I made her several years ago, every day, on her horse farm. She loves it.
skinner.jpg
I have three or four other kits waiting in the wings.... :P
You do not have the required permissions to view the files attached to this post.
2 x
You can tell a lot about the character of a man...
by the way he treats those who can do nothing for him.

User avatar
BrokenolMarine
Ranch Foreman
Posts: 5783
Joined: Sat Nov 26, 2016 8:28 am
Location: South Central Oklahoma in the mountains
United States of America

Beginning the work...

Post by BrokenolMarine » Sat Sep 16, 2017 3:04 pm

Had a little time this afternoon, and finally got a good start.
First step in the real work is to gather the necessary stuff.
1.jpg
You have the knife blank, the scales, the five minute epoxy, gloves, some clamps, and the two drill bits to match the holes.
You'll also need a couple mixing sticks and something to mix on, as the glue up is a two step process.

So, when you are ready, and you are sure... you are ready... mix the epoxy. You only have a short working time.
Spread it on the knife blank, put your clamps in place and tighten, and check the position, check it again. Once the epoxy sets, in a couple minutes... you can't change your mind. :evil:
2.jpg
I give 'er about fifteen to twenty minutes at least, just to be sure.... an hour if I have something to fill the time. Then I move to the drill press. In the first pass, you use the empty side of the knife blank as your guide to drill your holes. Match the bit to the blank to drill the proper size holes.
3.jpg
4.jpg
Once the one side is done, you mix up the second batch of epoxy, because the first batch is hard as a rock by this time, and put the second scale on the knife blank and make SURE it's properly positioned. Once that is done, you let it set up, give it time to harden.
5.jpg
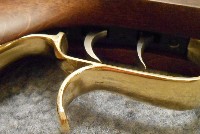
Once you are sure it won't move, use the holes on the first side as your guide to drill the holes for the second side.
6.jpg
I spent a good while prepping the blanks and then mounting them.
Now I get to start shaping the handle on the knife. I start using the drill press with two sizes of round sanding drums. Get the rough shape done, and I'll spend some time with strips of 120, 220, 400, and 800 grit.

Here is the rough shape done. I quit for now and will work on the strip sanding later.
7.jpg
8.jpg
** Note that I have left the plastic sleeve on the blade, and I'll leave that on throughout the process. I also held the blade with a thick rag while using the sanding drums in the drill press. Better safe than sorry.
You do not have the required permissions to view the files attached to this post.
4 x
You can tell a lot about the character of a man...
by the way he treats those who can do nothing for him.

User avatar
BrokenolMarine
Ranch Foreman
Posts: 5783
Joined: Sat Nov 26, 2016 8:28 am
Location: South Central Oklahoma in the mountains
United States of America

Shaping the handle...

Post by BrokenolMarine » Sun Sep 17, 2017 2:28 pm

An afternoon in the shop, strip sanding the handle. It's beginning to take shape. :)
This is done using strips of sandpaper cut in thin strips depending on the area you are shaping. Usually not more than a half inch wide, at the widest.
The knife is held in the bench vise, and you sand it like you were buffing your shoes. This is how "I" do it anyway. Works for me. The formative work this afternoon was with the 80 grit. As I work my way up, thru 120, 220, 400... it will get smoother and more glass like. I can quit at any stage.
;)

Here's where we are so far:
1.jpg
2.jpg
As you can see, the scales are really starting to look like something....

Here are the various strips. Once they start to heat up, they tear.
Then you cut another strip and move on. Save the old half strips for detail sanding later... or toss em. :twisted:
3.jpg
Next knife session,
120 grit.

The plastic sheath started to sweat from the heat and I took it off. I used parchment paper, (similar to wax paper) and taped her in place with .. Painter's Tape.. :P
You do not have the required permissions to view the files attached to this post.
2 x
You can tell a lot about the character of a man...
by the way he treats those who can do nothing for him.

User avatar
BrokenolMarine
Ranch Foreman
Posts: 5783
Joined: Sat Nov 26, 2016 8:28 am
Location: South Central Oklahoma in the mountains
United States of America

Finished the Knife....

Post by BrokenolMarine » Mon Sep 18, 2017 12:57 pm

Got out into the shop this morning and finished the knife. :D

The first hour was spent with sanding, 120 and 220 grit paper.
Once that was done, it was time to countersink the holes for the special screws that come with the kit.
This takes a special bit, that you can order, or buy at Woodcraft. I have three, just a matter of deciding which one goes to which hole.
As the old Knight told Indy in the search for the Grail, "You must choose wisely." :P

Screw it up at this point and ... :twisted:
1.jpg
The bit redrills the hole you made earlier, clearing out any remaining epoxy, and then countersinks to the depth you choose. It's a trial and error thing for me, requiring a number of passes. Better to make three or four shallow cuts than go too deep. ;)
2.jpg
Since there are two different sized screws, you'll have to use two different bits, plus there are two of each size, and two sides. Lots of careful set ups, passes on the drill press, checking the depth with the actual screw, and back to the press until you have it just right. It pays off in the end.
3.jpg
Once that is completed, we are back to final sanding with the 220 grit, and some polishing and final prep before the finish is applied. I chose the Golden Oak Watco Oil, and the British Bees Wax. I LOVE that smell in the shop. The grain really pops with the Watco Oil and the oil and wax combo works well.
4.jpg
5.jpg
6.jpg
It's done, and I am very happy with the result, hope to make a nice sheath when I get the time. But, it's ready to work, or sit on display. Hope you enjoyed the thread as much as I enjoyed the build. I have more kits, just have to decide what's next.
:P
You do not have the required permissions to view the files attached to this post.
4 x
You can tell a lot about the character of a man...
by the way he treats those who can do nothing for him.

User avatar
PT7
Drover
Posts: 4889
Joined: Mon Mar 21, 2016 8:32 am
Location: The Show-Me State
United States of America

Re: A build... Woodcraft Kit...

Post by PT7 » Mon Sep 18, 2017 1:19 pm

A+ on these handles, Marine. Getting the screw depth right on seemed to be the biggest challenge per your comments.
Your choice of oil & wax sure brought out some beauty in the wood. Looking forward to your next kit choice. Thanks.
1 x

~Пока~

User avatar
BrokenolMarine
Ranch Foreman
Posts: 5783
Joined: Sat Nov 26, 2016 8:28 am
Location: South Central Oklahoma in the mountains
United States of America

A Sheath?

Post by BrokenolMarine » Tue Sep 19, 2017 4:34 pm

:P

Miss T and I made the long drive to town, more than an hour, then spent another twenty minutes looking for the Tandy Leather shop, which we finally found it tucked away in between several other small shops. It was in a strip mall a block off the main road it carries the address of. It was worth the search.

For one thing, the smell reminded me of gun shops that carry a lot of cowboy rigs... Tina said it smelled great.. :lol: ... "like a saddle shop." The folks were really helpful, and I got all the tools and supplies I need to make the first (of many?) Leather projects. A sheath for the spalted maple knife.

Wish me luck.

;)
1 x
You can tell a lot about the character of a man...
by the way he treats those who can do nothing for him.

User avatar
BrokenolMarine
Ranch Foreman
Posts: 5783
Joined: Sat Nov 26, 2016 8:28 am
Location: South Central Oklahoma in the mountains
United States of America

Re: A build... Woodcraft Kit...

Post by BrokenolMarine » Tue Sep 19, 2017 10:55 pm

Got started this evening. No clue what I'm doing really, other than the two videos I watched... :lol: ... but it's been interesting so far. One major error after drawing the paper pattern and transferring that, then cutting it out. I realized, I forgot to turn the good side down. :evil: That meant my right hand design became left handed. I was :cry: and :oops: ... but then I took two views. I look at the entire process as practice... and if it doesn't turn out well... it was left handed anyway. :)

Secondly... when I wear a holster, I usually wear the knife on the off side anyway. 8-)
So far,so good, you know... other than that. :P
0 x
You can tell a lot about the character of a man...
by the way he treats those who can do nothing for him.

User avatar
BrokenolMarine
Ranch Foreman
Posts: 5783
Joined: Sat Nov 26, 2016 8:28 am
Location: South Central Oklahoma in the mountains
United States of America

Sheath Progress

Post by BrokenolMarine » Wed Sep 20, 2017 11:35 am

Just a little update on the progress. I have been working a bit on the sheath and it's cut out and I took it out to the shop this morning and started the process of drilling the holes to sew 'er up. Here is a look at the "sheath" so far. I will use the watco oil to dye it... saves buying the leather dye, a crossover that the guys at the leather shop say is perfectly fine. :)
1.jpg
2.jpg
Since these pics were taken I have sewn the belt loop down, drilled the holes for the edges as well, and decided on the color Oil I will use. (natural)
I made a test square and stained it with all three to insure I made an educated decision. I confirmed my choice with the boss, who has a better feel for those things than I... :lol: More later. 8-)
You do not have the required permissions to view the files attached to this post.
1 x
You can tell a lot about the character of a man...
by the way he treats those who can do nothing for him.

User avatar
BrokenolMarine
Ranch Foreman
Posts: 5783
Joined: Sat Nov 26, 2016 8:28 am
Location: South Central Oklahoma in the mountains
United States of America

Sweet

Post by BrokenolMarine » Wed Sep 20, 2017 1:25 pm

Didn't screw it up too bad. I got to the point where I can see that the design will work. :D
1.jpg
I have finished the assembly, the sewing is done. All that is left to do is a light pass or two over the belt sander to smooth the edge, then burnish the edges. Once that is done, I'll use the walnut oil to stain those for an accent. Then the final coat of natural oil all over. A day or so to dry, and then the mink oil and buff her out, and done. :D

The area where it looks as though the stain didn't take? That's a high area where the knife scales raise the leather in the sheath, in a later picture with the knife in the sheath you'll see what I am trying to convey... just don't want to put the knife back in the wet sheath at this point. ;)
You do not have the required permissions to view the files attached to this post.
2 x
You can tell a lot about the character of a man...
by the way he treats those who can do nothing for him.

User avatar
BrokenolMarine
Ranch Foreman
Posts: 5783
Joined: Sat Nov 26, 2016 8:28 am
Location: South Central Oklahoma in the mountains
United States of America

Re: A build... Woodcraft Kit...

Post by BrokenolMarine » Wed Sep 20, 2017 4:20 pm

It's done. :)
Got the edge finished, the thing dyed, and it's been waxed.
For a first try, I am satisfied... 8-)

I have other knives to make and there will be other sheaths to make as well. My daughter in OK saw the pics and wants a Fatboy sheath for Her Fatboy knife. :lol: The boss is going out there at the end of next month and will bring the knife back so I can take care of the request. ;)
1.jpg
2.jpg
3.jpg
I really enjoyed the challenge of the first sheath. :P
You do not have the required permissions to view the files attached to this post.
2 x
You can tell a lot about the character of a man...
by the way he treats those who can do nothing for him.

Post Reply